Showing posts with label Tips. Show all posts

Samsung Galaxy S5: How to Set Homepage in Internet App in Android 4.4.2 Kitkat

You probably ever noticed that when you open the stock Browser app in Samsung Galaxy S5, it automatically opens a new window with the Samsung website is loaded as the default homepage. In case, if you don't like that default to be your homepage, you can change the homepage by utilizing the available options so that it can be fit with your need. Also, set the right homepage will be able to provide you a better way to use the Internet app.


How to change homepage in Internet app?
You can do so by using the following steps:
  1. Open Internet app.
  2. Tap or long press the Recent apps key to open up the additional options and then select Settings.
  3. Tap Set homepage and then select from the following options:
    • Default page: select this option if you want to set the Samsung website as your homepage.
    • Current page: select this option if you want to set the currently opened webpage as your homepage.
    • Quick access: select this option if you want to set the webpages that have been added to the quick access list to be displayed as the homepage.
    • Most visited: select this option if you want to set the most visited webpages to be displayed as the homepage.
    • Other: select this option if you want to set other webpage as your homepage. If you select this option, you'll be asked to enter the webpage address and then tap OK button.
  4. Tap Done button to save the changes.
  5. You'll be asked whether you want the selected homepage to be shown when you open new tabs or not. If you tap Cancel button then the Internet app will use quick access as the homepage when you open new tabs, while if you tap OK button then the Internet app will use the selected homepage as the homepage when you open new tabs. FYI, this window won't appear when you select quick access as your homepage.
  6. The homepage has been set. Now, when you open Internet app, a new window will be opened and display the selected homepage.

As a note, the homepage you have set will be reverted back to the default when you reset the Internet app settings or when you perform clear data for this app via app info or application manager.

Samsung Galaxy S4: How to Find IMEI Number in Android 4.4.2 Kitkat

IMEI stands for International Mobile Equipment Identity. It's typically a 15-digit unique number that can be used to identify your phone thus it ought to be different with other devices. You can use IMEI number to retrieve information about the phone (e.g: model, brand, hardware info, etc) and since it's unique it can be used to track lost or stolen phones. The IMEI number can also be used by the network provider to block the lost or stolen device from accessing the network so that the device can't be used easily by the thief.


How to get IMEI number?
Actually, there are various methods that can be used to find the IMEI number (all of them should have the same result). But, in this post we'll learn how to get IMEI number by using 5 different methods.


Method #1: From the settings menu
  1. Swipe down the top of the screen to open up the notification panel and then tap to go to the settings menu.
  2. Tap More tab.
  3. Scroll down to the About device and then tap it.
  4. Tap Status.
  5. Scroll down to find IMEI to see your 15-digit IMEI number.


Method #2: Dialing the code
  1. Open Phone app.
  2. In the keypad tab, dial *#06# (you don't need to tap the Call icon since the IMEI number will be displayed as soon as you completely enter the code).


Method #3: Looking under the phone battery
  1. Turn off the phone.
  2. Open the back case.
  3. Pull the battery out.
  4. The IMEI number is usually printed on a sticker that is attached on the phone underneath the battery.


Method #4: Looking on the box
When you buy a new Samsung Galaxy S4, it's usually packaged in the box. The IMEI number is usually printed on a label that is placed over the opening since it usually act as a seal.


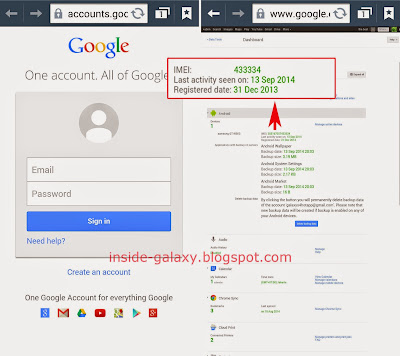
Method #5: Using Google account
Actually you can use this method from any device (phone or PC) as long as you have an internet connection and know the Google account associated with the phone. But, as the example we'll access Google dashboard directly from the phone. See the following steps to do so:
  1. Open Browser app and then access www.google.com/settings/dashboard.
  2. Enter your Google account(username and password) associated with your phone to login to your Google account dashboard.
  3. Tap Android to see your device information(including with the IMEI number).

FYI, since the IMEI number has important function, it will help if you know some methods to retrieve it so that you can easily find it when needed.

Samsung Galaxy S4: How to Transfer Files to SD Card in Android 4.4.2 Kitkat

As we all know that low internal storage can bring some problems to your Samsung Galaxy SIV, for instance error while saving or reading files or error while using apps. You may move some files to the PC or other storage to free up some space so that the device can work properly and doesn't encounter any error that is caused by low internal storage. But, if you want those files can still be accessed from your phone without having to spend the space in your internal storage then moving those files to the SD card is the best bid that you can do.


How to copy files to SD card?
Compared with "move files", copying files is relatively safer and more recommended because it will avoid you losing your files. You can use the following steps to copy files from the internal storage to the SD card:
  1. Open My Files app.
  2. Tap All files.
  3. Tap Device storage.
  4. Navigate to the required folder.
  5. Select the required files you want to copy to the SD card.
  6. Tap and then select Copy.
  7. Now, tap SD memory card.
  8. Navigate to the folder where you want to paste the files. If necessary, you can create a new folder by using the following steps:
    • Tap Create folder .
    • Enter the folder name.
    • Tap OK button.
    • Tap the newly created folder to open it.
  9. Tap Paste here button
  10. All selected files in the step #5 will be copied to the folder you have selected/created in the step #8.
  11. Now, you can safely deleted the original files you have just copied from your internal storage.


How to move files to the SD card?
Please note that I don't recommend to move files to the SD card because it might make you lose the files. But, in case you still want to use this method to transfer files from internal storage to the SD card regardless the risk that you may receive then you can do so by using the following steps:
  1. Open My Files app.
  2. Tap All files.
  3. Tap Device storage.
  4. Navigate to the required folder.
  5. Select the required files you want to move to the SD card.
  6. Tap and then select Move.
  7. Now, tap SD memory card.
  8. Navigate to the folder where you want to paste the files. If necessary, you can create a new folder by using the following steps:
    • Tap Create folder .
    • Enter the folder name.
    • Tap OK button.
    • Tap the newly created folder to open it.
  9. Tap Move here button
  10. All selected files in the step #5 will be moved to the folder you have selected/created in the step #8 and the original files in the internal storage will be deleted automatically.

As a note, "move" allows you to transfer files to the SD card and it will delete the original files automatically but you may be at risk losing your files though in rarely occasion, while "copy" allows you to transfer files to the SD card without you have to worry losing your files but it makes you have to delete the original files manually.

Samsung Galaxy S4: How to Change Bluetooth and Wi-Fi Direct Names in Android 4.4.2 Kitkat

Have you ever been in a situation where your friends had difficulty to find which the device that was truly yours when they wanted to transfer files via Bluetooth or Wi-Fi Direct because there were some devices that had the same name? If that so, instead of letting your friends to be connected to the wrong device, you can help them to find your device easily by changing your Bluetooth and Wi-Fi Direct names to the easily recognizable ones.


How to change Bluetooth and Wi-Fi Direct names?
Now, you don't need to change Bluetooth and Wi-Fi Direct names separately because you just need to change the device name to change the name for these two features. See the following steps to do so:
  1. Swipe down the top of the screen to open up the notification panel.
  2. Tap to go to the settings menu.
  3. Tap More tab.
  4. Scroll down to find About device and then tap it.
  5. Tap Device name.
  6. Enter the new name for your device and then tap OK button. It'd better if you create a unique name so that your device can be easily recognized by others simply by looking the name.
  7. The device name has been changed and the name will be used as the Bluetooth and Wi-Fi Direct names.

As a note, others who are connected with you via Bluetooth can rename your Bluetooth name on their devices, but it's only temporary because the name will be reset back when the device is unpaired. Next time, when they scan for available Bluetooth devices in their phones, the name listed in your device name is the name that will be displayed there.

Samsung Galaxy S4: How to Hide or Show Keyboard in Android 4.4.2 Kitkat

Have you ever been in a situation where you wanted to hide the keyboard to get a wider screen for reading? For instance, when you have finished writing a long text/email message and wanted to review the message before sending it or when you have finished filling a form with numerous entries and wanted to review all of your entries before submitting it. Luckily, you can free up the screen by hiding the keyboard so that it won't cover the screen or what you're writing. If needed, you can also easily show the keyboard again.


How to hide or show keyboard?
To make it easier, as the example we'll try to change the keyboard visibility when creating a new text message in the stock Messaging app. See the following steps to do so:
  1. Open Messaging app.
  2. Tap to create a new text message.
  3. Enter the contact's name or number in the Enter recipient field.
  4. Type your message in the Enter message field.
  5. To hide the keyboard, simply by tapping the Back key (it's a physical button which is located in the right side of the Home key).
  6. To show the keyboard again, simply by tapping your finger in the text field.

As a note, you can use the same way to hide or show the keyboard on any screen or app where you can enter text, for instance when you write a memo, fill a form in a web page, create/edit a contact, etc.

Samsung Galaxy S3: How to Make a Music File Can't be Played by the Music Player App

An insider named Laurie has leave her comment here and asked me about the step to keep certain song from not playing without having to delete them. She said that she has a Christmas song and don't want it to be played back when she listen to the music through the Music Player app because the Christmas is over. Fortunately, in Android-based smartphone including with the Samsung Galaxy SIII, the user can be easily to do so by adding certain extension in the end of the music file name in order to disable media scanning so the Music Player app can't read it.

See also: How to Use Music Player App in Samsung Galaxy S3


How to make Music Player app doesn't read certain music file?
Generally, you can do so by using another third-party File Manager apps. But, we'll use the ES File Explorer app in this step. Well, here are the steps:
  1. Open ES File Explorer app.
  2. Navigate to the folder where the music file you wants to rename is saved.
  3. Long tap the required music file to select it.
  4. Tap Rename button.
  5. Add .nomedia behind the music file name. For example: rename your_song_title.mp3 became your_song_title.mp3.nomedia
    This extension will prevent this music file from being scanned and loaded by the Music Player app.
  6. Tap OK button to save the change
  7. Done. Now, the music file you've just renamed should not be listed in the Music Player app.

For the record, this steps is only renaming the music files, so next time whenever you want this music file be played back again in the Music Player app, you just need to remove .nomedia from the music file name using the same steps. Once done, in a few seconds, the Music Player will be able to read and plays it back. So, hope this helps :)

Samsung Galaxy S3: How to Keep Wi-Fi On or Off During Sleep

One way that you can do to get internet connection on the Samsung Galaxy SIII is using Wi-Fi to connect to Wi-Fi network.

See also: How to Connect to Wi-Fi Network on Samsung Galaxy S3

Here you can also keep your phone's Wi-Fi on during it is asleep. But, you should note that when you turn this option on then you must pay it with more battery consumption.


How to turn on keep Wi-Fi on during asleep?
As written on videotron.tmtx.ca, you can activated this option by following the steps below:
  1. Tap the Menu key on Home screen.
  2. On the pop up menu select Settings.
  3. Here make sure that the slider next to the Wi-Fi option shows ON.
  4. Tap Wi-Fi.
  5. Tap the Menu key then select Advanced.
  6. Tap Keep Wi-Fi on during sleep.
  7. On the pop up menu select Always. When the dot indicator shows green means this option is selected.
  8. Done. Now your phone's Wi-Fi will remain connected to the Wi-Fi network even if your phone is asleep.

How to turn off keep Wi-Fi on during asleep?
From the same source, if you want to deactivated this option due to any reasons, then following the steps below:
  1. Tap the Menu key on Home screen.
  2. On the pop up menu select Settings.
  3. Tap Wi-Fi.
  4. Tap the Menu key then select Advanced.
  5. Tap Keep Wi-Fi on during sleep.
  6. On the pop up menu select Never. When the dot indicator shows green means this option is selected.
  7. Done. Now your phone's Wi-Fi will not connected to the Wi-Fi network while it is asleep.

Well, by knowing on how to turn this option on or off, now you can set it according to your needs and conditions. When you want to stay connected to the Wi-Fi network and want to save your data usage, then keep it on. But, if you want not to always connected to the Wi-Fi network especially while it is asleep and want to save more battery consumption, then you can turn it off. So, choose which best for you then share your experience here through the comment below :)

Samsung Galaxy S3: How to Auto Upload Photos to Facebook

Facebook is one of the most popular social media available today. You can use it to update status, chat, upload photos and else. You can also set your phone to display the Facebook photo gallery in your Gallery app so you can see them without having to launch the Facebook app.

See also: How to Display My Facebook Albums and Photos in Gallery on Samsung Galaxy S3

As the opposite, you can also sync your photos in the Gallery app to your Facebook account. This of course will save you from the troubles of uploading your photos one by one to your Facebook account. All of synced photos will remain private until you share them through the webs. Well, basically there are two methods you need to do, first you need to sync your Gallery with your Facebook account, and then you need to open your Facebook in the web to decide which photos you want to share.


How to sync Gallery app with the Facebook app?
Assuming that you already installed the Facebook app on your phone, then here are the steps to do so:
  1. Open Facebook app.
  2. If necessary, log in using your Facebook user name and password.
  3. View the side menu, and then tap Photos.
  4. Tap Synced button located in the lower right corner of the screen.
  5. Tap Sync Photos button to enable Photo sync.
  6. Wait until the photos completely uploaded.
  7. Your photos will be saved in a new private album on your Facebook account. Later, any new photo taken by using the phone will automatically uploaded to your Facebook account in the background.

How to share or delete private photos on Facebook?
Once you finish syncing your Gallery app with your Facebook account, now you can log into your Facebook account from the web--either from the PC or the browser app-- then decide which photos you wish to share with others by set them public. Assuming that you open the Facebook website through the computer, then here are the steps:
  1. Open Facebook website.
  2. If necessary, log in using your Facebook user name and password.
  3. Go to your timeline, and then select Photos.
  4. Click Synced from Phone button, and then follow the on-screen instructions.
  5. Select photos you wish to share by clicking the checkmark icon in the upper right corner of the photo. When the checkmark icon shows green means photos is selected.
  6. Now, you can make them public by clicking Share Photos button or delete them by clicking Trash can icon.

By knowing this steps, now your photos will automatically uploaded to a private folder on your Facebook account. From there, you can either to choose which one you wish to share with others or delete unwanted photos from the private album by using the steps mentioned above. So, hope this helps :)

Samsung Galaxy S3: How to Organize Application in the App Menu

Lot of choices of applications available in the Google Play Store or other sources that you can install into your Samsung Galaxy SIII sometimes makes you end up with installing lot of apps to your phone. With so many apps installed, arrange the apps using the best view according to your need is one way that you can do to make you more easier when you want to access them.

See also: How to Sort Applications on the App Drawer on the Samsung Galaxy S3

In addition to determine how the phone sort the app, in the app menu you can also organize them according to your liking, for example, move the app location or see the app info or else.


How to organize apps in the app drawer?
Below are the steps to do so:
  1. Go to Apps through Home screen.
  2. Tap the Menu key then select Edit.
  3. To move the app, tap and hold the app then drag it to a new location.
  4. To add the app to a new folder, tap and hold the app then drag it to the new folder icon. You can also add another app to this new folder by tap and hold the app then drag it to the folder.
  5. To move the app to a new panel, tap and hold the app then drag it to the new panel icon.
  6. To uninstall the app, tap and hold the app then drag it to the uninstall iconthen follow the on-screen instructions to uninstall the selected app.
  7. To view the app info, tap and hold the app then drag it to the app info icon. Here you can perform clear cache, clear data, force stop and uninstall the app.
  8. Once you have done , you can tap Save to save the changes.

Well, the step above will of course be able to help you manage lots of apps by placing them in the place you want or group them per category into a folder to free up some space and make you more easier to access the app that has the similar function or category. So. hope this helps :)

Samsung Galaxy S3: How to Add Pauses to an Existing Contact Numbers

In the Samsung Galaxy SIII, there are several ways that you can do to make a call more faster and easier by utilizing the existing features owned by this phone. For example, you can use the easy call feature that will allow you to make calls simply by swiping the contact from left to right, or you can use the speed dial that will allow you to assign a shortcut number to an existing contact number on your contact list.

See also: How to Make a Call Easier and Faster Using Existing Features on Samsung Galaxy S3

Another way that you can do to make a call more easier, especially if you want to make a call on the contact number that require you to type in the PIN numbers or extensions is by adding pauses in the contact so you do not need to enter the number each time you call them. You can either add a pause to stop the calling sequence for 2 seconds or adding a wait to pause the calling sequence until you enter number or pressing a key.


How to add a pause or wait to an existing contact?
Below are the steps to do so:
  1. Open the Contacts app.
  2. Tap the required contact you wish to add the pauses.
  3. Tap the Edit button.
  4. Tap the phone number field at the position where you wish to add the pause or wait.
  5. Tap the Sym key. To add pause go to the step # 6 while to add wait go to the step # 7.
  6. Add pause to contact
    • Tap Pause to add a two second pause. This will displayed as comma (,). For example: if the standard call in 888-444-111, but Rehan was in 234, then in Rehan's contact: 888-444-111,234
    • Tap the Save button to save the changes.
    • Now, when you call Rehan, your phone will wait for 2 seconds before the phone continue dialing the next set of number after comma.
  7. Add wait to contact
    • Tap Wait to add a wait. This will displayed as a semi-colon (;). For example, if the standard call in 888-444-111, but Rehan was in 234, then in Rehan's contact: 888-444-111;234
    • Tap the Save button to save the changes.
    • Now, when you call Rehan, you will be prompted with a box to enter a number or press a key to tell the phone when to continue dialing the next set of number after the semi-colon.

By knowing this step, now you can much more easier to call the persons who have phone number with extensions or you can much more easier to call the phone number which require you to type in the PIN or password, such as when you want to access a voice mail or call another automated call systems. So, hope this helps :)

Samsung Galaxy S3: How to Quickly Accessing Your Favourite Website

Nowadays we can easily get the information we want through the Internet. That's why no wonder if the easiness to do that makes Internet users growth rapidly from time to time. The growth of Internet users has also resulted in a growing number of websites present which offers a variety of information to the visitor.

As the users of the Samsung Galaxy SIII, you can utilize the stock Browser app available on this phone to browse the web and get the information you want. Usually when you use this app to browse the web, you may be met with an interesting website that you might want to visit again later. Well, here we'll discuss about some methods that you can do to make you more easier and faster to access your favourite websites by using the stock Browser app inside your precious Samsung Galaxy SIII.

1. Add to bookmarks
By adding your favourite websites to bookmark, then another time you can easily reopen the bookmarked website by tapping the bookmark icon and choose which bookmarks you want to open.
See also: How to Add and View Bookmarks on Samsung Galaxy S3

2. Create shortcut on Home screen
Create a shortcut to your favourite website on the Home screen will certainly make you more faster in accessing the website, simply by tapping the shortcut on the Home screen and it'll open up the web in the Browser app.
See also: How to Create a Website Shortcut on Samsung Galaxy S3 Home Screen

3. Set custom homepage
Set the browser homepage to your favourite websites is the next method that you can do to access the website more faster and easier. Once you set the homepage, then every time you open the browser app, then the app will open up the web page that you have previously set as the homepage.
See also: How to Set Browser Home Page on Samsung Galaxy S3

4. Access from the Internet history
The last method that you can do to access the website is through the Internet history. You can reopen the website through the available entries under the last 7 days section, last month section or most visited section.
See also: How to Find Most Visited Website List on Samsung Galaxy S3

Well, these are 4 methods that you can do to speed up accessing your favourite website. And because all of the methods mentioned above don't require you to manually entering the URL, then of course all of them will save you from the trouble of forgetting the website address that you want to visit. Even so, if you know any other method to do so and it's not listed here, then I'll really appreciate if you're willing to share it through the comments below :)

Samsung Galaxy S3: How to Add Photo to Contact

In Samsung Galaxy S3 you can easily add new contact to stay keep in touch with them through My People app or directly trough your Contacts app then saved it to your SIM or phone storage.

See also: How to Add Contact on Samsung Galaxy S3

Here you can also add photo to the required contact to personalize them. But, you should remember that you can do this only with the contact that you've saved on your phone, not the SIM. Well, there are two ways you can do to assign a photo to the contact: through Contacts app or through Gallery app.


How to add photo to contact through Contacts app?
Here are the steps you need to do if you want to set photo to contact through Contact app:
  1. Go to Apps through Home screen.
  2. Tap Contacts.
  3. Tap the required contact you wish to add a photo.
  4. Tap the Edit icon to edit the contact.
  5. Tap on the blank contact image.
  6. Now you will see two options available on pop up menu. They are:
    • Image: Select this option if you want to use image from your Gallery as photo contact.
    • Take picture: Select this option if you want to take the picture using camera then use it as photo contact.
  7. Tap Done button.
  8. Tap Home button to return to the standby mode.
  9. Finish. Now you have managed to add photo to the selected contact through Contacts app.

How to add photo to contact through Gallery app?
While if you want to set photo to contact through Gallery app, then kindly follow the steps listed below:
  1. Go to Apps through Home screen.
  2. Tap Gallery.
  3. Go to the required folder where you save the photo you want to add to contact.
  4. Tap the required photo.
  5. Tap the Menu key.
  6. On pop up menu select Set as.
  7. Tap Contact Photo.
  8. Tap the required contact you wish to add its photo.
  9. Tap Done button.
  10. Tap Home button to return to the standby mode.
  11. Finish. Now you have managed to add photo to the selected contact through Gallery apps.

By knowing how to add photo to contact in two different methods, now you can do it using one of the methods mentioned above that best suits you. So, hope it helps :)

Edited: Nov, 3rd 2013

Samsung Galaxy S3: How to Stops Ads Appears in Notification Bar

Generally, lot of Android users said that they feel annoyed with the ads from certain apps appears on their devices, even when they're not using the apps. Luckily, if you already upgrading your Samsung Galaxy SIII to the Android Jelly Bean, then you can easily set the apps not to send you a notification or ads.

See also: How to Block Notification on Certain Apps in Samsung Galaxy S3 with Android Jelly Bean

But, if your phone is still with the Android Ice Cream Sandwich which is not have the option to disable the notification on the apps and you encountering the problem of always receiving ads in the notification bar, then there are some steps that you can do to fix the problem.


How to stop ads in notification bar?
Usually you'll see some ads with a green plus or star, can't be removed until you tap it which will bring you to certain web page. For some user, this is so annoying and of course it'll eat the data. Well, here are some steps that you can do to get rid the ads and free up your notification bar from them:
  1. Review of any installed apps in your device to know which one may have push ads. If you noticed that you start receive an ads after install certain apps, then this may the culprit. You can also read on the customer review of the apps you have installed to know the apps history, from there you may get some information to know whether the apps contains these ads or not.
  2. If the step #1 can't tell you what the apps causing the problem, then you can try to install another third-party apps to help you determine which the apps may have push ads included in it, such as Addons Detector apps.
  3. Once you've know the apps sending you the ads, then you may have to consider to uninstall the apps.
  4. For further prevention, don't reinstall the apps that you already know it has the ads included in it. Also you can leave a review to help other users knowing that the apps has the ads included in it.

Well, these are four steps that you can do to stop ads appears in notification bar. But, if you have your own tips or tricks to stop the ads and it's not listed here, then I'll really appreciate if you willing to share them with us through the comment below :)

Samsung Galaxy S3: How to Block Notifications on Certain Applications in Android Jelly Bean

The easiness to download and install applications through the Google Play Store sometimes make you end up with installing lot of applications into your Samsung Galaxy SIII. Lot of installed apps that not managed well of course will give you some problems later, such as low internal storage, error when save or read saved files, etc. One of the solution that you can do to fix this problem is by uninstalling the apps.

See also: How to Uninstall Apps on Samsung Galaxy S3

Another problem you may have encountering when you install lot of apps is that some of them start sending you an advertisement in the notification bar, even when you're not using them. Well, if your Samsung Galaxy SIII already with the Android Jelly Bean inside and you feels annoying with the ads, then you can easily block the ads on certain apps to not appearing.


How to disable notifications of the apps?
Here are the steps you need to do:
  1. If you already know the apps which displaying ads, then go to the App info window by following one of the steps listed below:
    • On the Apps menu, tap and hold the required apps then drag it to the App info icon.
    • Go to Settings> Applications manager> tap the required apps.
  2. Uncheck the box next to the "Show notifications" option to stop the apps sending you a notifications or ads.
  3. If you don't know the apps which displaying ads, then you may have to install another third-party apps named Addons detector to help you to monitor all of the notifications that appear in the notification bar and tell you which the apps displayed them.
  4. Another way, if you no longer use the apps that displaying the ads then you may have to consider to uninstall the apps. This will be able to not only stop the apps displaying the ads, but also will be able to free up some space on your phone's storage.

By knowing how to disable notifications, now you can get rid the annoying ads appearing in the notifications bar. The other benefit of this step is it will save you more data because now you would no longer accidentally tap the ads and load the site referred from them. So, hope this helps :)

Samsung Galaxy S3: How to Manage Internal Memory with 5 Easy Ways

Internal memory or also known as RAM is one of important component inside your Samsung Galaxy SIII that used by the phone to store running apps or open docs/files. Managing RAM properly is something that you should do to keep the phone works well and avoid the phone from the problem caused by low internal memory, such as the device become slow, the apps suddenly closes, etc.


5 things to manage RAM
There are some steps that you can do to manage RAM, such as:
  1. Restart the phone regularly
    This is the most common first aid used by the user to solve any problems on the device. Restarting the device will make it to refresh and be able to fix some problems. Do this by pressing and holding the Power button then on pop up menu select Restart.
  2. Don't use live wallpaper
    If your phone is running slow, it may be caused by low memory. Using the live wallpaper may be the one that cause it to happen. You can choose to select the wallpaper from Gallery apps or from the default wallpaper provided by Samsung.
    See also: How to Use Picture on Gallery Apps as Wallpaper on Samsung Galaxy S3
  3. Use Home screen as needed
    As we know that Samsung Galaxy SIII allows the user to use up to seven Home screen. You can customize each of them as you wants. Unfortunately, these Home screen will increase the memory use. So, if your phone becomes slow then try to remove some Home screen from your phone.
    See also: How to Remove Home Screen on Samsung Galaxy S3
  4. Use Widgets on Home screen as needed
    Some of widget that need to update information or widgets with animation will also increase memory use. Remove them or remove unused widgets is one things that you should consider to do if you noticed that your phone becomes slow.
    See also: How to Remove widgets on Samsung Galaxy S3
  5. Manage Application
    Manage apps will also help to keep the apps works well, such as keep application updated, clear apps cache and data, etc.
    See also: How to Manage Apps in Samsung Galaxy S3

These 5 things will be able to help you manage RAM, increase performance and avoid the phone encountering some problems that may occurs because the low internal memory. However, if you have your own way to manage internal memory and it's not listed here, then I'll be more than happy if you willing to share them through the comment below :)

Samsung Galaxy S3: How to Manage Applications in 6 Easy Ways

The easiness to download and install applications, either from Google Play Store or Samsung Apps sometimes teased you to install lot of applications into your phone. Unfortunately, if not managed well, these apps will use lot of memory and will cause the phone encountering some problems, such as the phone becomes slow.


6 things to do to manage apps
Below are some steps that you can do to manage apps:
  1. Make sure the new apps that you'll download and install into your phone has a good reputation. You can see it through the customer reviews. If you find lot of users report the good thing then you can continue installation, but if you find lot of complaints or problems reported by the user then it will be better if you not installing this apps into your phone.
  2. Some errors may occurs after the user installing new apps into the phone. So, if you also experience this situation, you can consider to uninstall this apps to fix the problem.
    See also: How to Uninstall Applications on Samsung Galaxy S3
  3. Some errors may occurs in certain apps may be solved with the updates. So, keep the installed apps updated to avoid problems and get a "fix" to some bugs. Moreover, you can also set the phone to automatically updates the apps inside your phone.
    See also: How to Automatically Update All or Certain Applications on Samsung Galaxy S3
  4. Clear apps cache and data regularly to reduce memory use and keep the apps work properly.
    See also: How to Clear Applications Cache and Data on Samsung Galaxy S3
  5. Always close the apps by using the Back key instead of the Home key. Closing apps using the Home key will put the apps under standby mode which will stay consume memory. Another way to do so is by pressing and holding the Home key then tap the apps from the list and drag it to the right to close the apps individually or tap Clear all icon located at the bottom right to close all recent apps, Or you can also close the recent apps using task manager.
  6. Only use the default task manager provided by the Samsung, because installing another third-party task manager apps will interfere the OS works and later can cause problems.

Well, these are 6 things that you can do to manage the apps and avoid the phone encountering some problems caused by the apps. And, as always, if you have your own way or tips to manage the apps and it's not listed here, then I'll appreciate if you willing to share them through the comment below :)

Samsung Galaxy S3: How to Manage Internal Storage

Once you've known the differences between internal memory and internal storage and what's the function on each of them, now we'll learn about how to manage internal storage or ROM in order to keep the storage has some space enough to support the device works properly and not encountering error caused by the low internal storage.

See also: The Differences Between RAM and ROM


5 things to do to manage ROM
Here are some steps that you can do to manage your Samsung Galaxy SIII internal storage:
  1. Check the internal storage availability from time to time.
    Check the ROM availability regularly by going to Settings> Storage, then see if the storage space is running or if necessary do some steps as listed below to free up some space on the ROM and avoid the ROM being filled quickly.
  2. Clear the internal storage regularly.
    Make sure the internal storage has some space enough or at least over 150MB for Android 4.0 by clearing the storage at least once a week to keep the operating system work well. Delete some files is the possible way to do, such as:
    • Delete unnecessary text or multimedia message.
    • Move pictures, video or other files to your computer or other external storage.
    • Delete call logs.
  3. Set the phone to automatically clear the storage.
    • Set the text message limit to delete old message.
    • Decrease the frequency of the email sync to download only for past three days.
  4. Manage Applications.
    • If you encountering errors after installing apps, then you may have to consider to uninstall them.
    • Clear apps cache and data.
    • Uninstall unused apps.
    • Move the stable apps or apps that not use the notifications bar or apps that sync online to the SD card.
  5. Set some apps default storage to the SD card, such as set the pictures have been taken by the camera to the SD card or set to save downloaded files to the SD card.

These things mentioned above is the basic steps you may have to do to ensure the internal storage on your phone always has space enough to runs properly and avoid you encountering error when save or read saved files and apps can't work well because the low internal storage. Also, if you have your own tips to manage ROM and it's not listed here, then I'll appreciate if you willing to share them through the comment below :)

Samsung Galaxy S3: How to Clear Applications Cache and Data

Everybody should be agree that Samsung Galaxy SIII is a great Android-based smartphone that comes with lot of abilities and features. But, it doesn't mean that this phone will not experience the problem. The phone's uses and its age surely will lower its performance. Luckily, there are some methods that you can do to tweak this phone to be feels faster, such as using SwypePad or replace the default launcher, etc.

See also: How to Make Samsung Galaxy S3 Feel Faster with Five Simple Tweaks

The same thing also could happen with the application you already installed. If you feels the application runs more slower and heavier than usual when you use it, then you can tweak it by clearing the applications cache and/or data to make the application runs as fast as usual.


How to clear cache and data of the applications?
Some of user also said that they were managed to solve some software problems by clearing the application cache and data. Well, below are the complete steps to do so:
  1. Go to Settings.
  2. Tap Applications manager.
  3. Find the application you wish to clear its cache and/or data by swiping the screen to appropriate screen: Downloaded, Running or All.
  4. Tap the desired apps.
  5. Tap Clear cache button then tap OK button to confirm clearing the applications cache.
  6. Tap Clear data button then tap OK button to confirm clearing the applications data.
  7. Tap Home button to return to the standby mode.

For the record, if you clearing the data of certain apps then any data stored in that app will lost, such as settings, login information, and saved games. So, if the problem was solved by clearing the cache, then you don't need to perform clearing the applications data. So, hope this helps :)

Samsung Galaxy S3: 3 Ways to Make You More Easier and Faster Accessing the Applications

Samsung Galaxy SIII comes with several pre-loaded applications to meet the basic need of using this phone, such as Messaging apps that you can use to send and receive text or multimedia message, Gmail apps to send or receive email message through your Gmail account, Contacts apps to save your contacts and customize them, Phone apps to make a voice or video call, and many more.

Here you can also downloading and installing another apps according to your needs through the Google Play Store or Samsung Apps Store. Moreover you can also installing apps from another source aside from both of the official market.

Many choices of the apps available, sometimes makes you end up with installing many apps on your phone. Even though, in fact you just use some of them, and the other is not. Instead of uninstall the apps, here are 3 ways that you can do to make you more faster and easier accessing your favourites apps:


1. Add the shortcut of the apps to the Home screen.
Adding your favourites apps shortcut on Home screen of course will make you more easier and faster to access the apps. You don't need to go to the application list, simply tapping the apps shortcut on the Home screen and the apps will launch.

See also: How to Add Apps or Widget on the Home screen on Samsung Galaxy S3

2. Change the default app on the bottom dock of the Home screen.
By default, there are usually four icon of the most frequently used apps available in the bottom of the Home screen. If you don't want one of them to be there, then you can delete it and use the blank spot there to add the new apps that you wish to be there.

See also: How to Replace Icon on Home Screen Dock on Samsung Galaxy S3

3. Change the default apps shortcuts on lock screen.
As with the default apps in the bottom of the Home screen, you can also do this with the apps icon on the lock screen. You can change one or more of them with your favourites apps. By doing this, you can access your favourites apps easily even when your phone is locked.

See also: How to Replace Lock Screen Shortcuts on Samsung Galaxy S3


Well, these three methods surely will be able to facilitate you accessing your favourites apps. And this will also save you more time because by using these methods you will be able to skip some steps while accessing the apps. However, if you have your own methods to make you more easier and faster accessing the apps and it's not listed here then I'll really appreciate if you willing to share them with us through the comment below :)

Samsung Galaxy S3: How to Customize Options Under Features Section on Blocking Mode

If you've upgrading your phone to the newest Android version: Android Jelly Bean, then you'll find some new features which is accompanying this operating system. One of the features available on Galaxy SIII with Jelly Bean is blocking mode option.

See also: How to Enable or Disable Blocking Mode on Samsung Galaxy S3

Once you've enabled this feature, now you can configuring some options inside it. One of which is you can block incoming calls, notifications, LED indicator, alarm and timer.


How to configure options under features section on blocking mode?
You can configuring option under the features section in order to help you to enable or disable them. Here are the steps:
  1. Go to Apps through Home screen.
  2. Scroll to Settings, then tap on it.
  3. Ensure you have enabling Blocking mode option. When the slider next to this option shows green or in the right side means this option is enabled.
  4. Tap Blocking mode.
  5. Here you will see four options available under features section. They are:
    • Disable incoming calls
    • Disable notifications
    • Disable alarm and timer
    • Disable LED indicator
  6. Tick the checkbox next to the option you want. Tick the checkbox will disabling the option from functioning.
  7. Tap Home button to return to the standby mode.

By default, if you turning on blocking mode on your mode then it will enable all of the options under features section. So, by knowing on how to configure option under this section will allow you to choose which option you want to use. Hope this helps :)