Samsung Galaxy S5: How to Cancel a Scheduled Email Message Sending in the Stock Email App in Android 4.4.2 Kitkat

A couple weeks back, an insider sent me an email to ask the way to cancel the sending of a scheduled email message. FYI, a scheduled email message will be placed in the scheduled outbox folder before it'll be sent automatically at the scheduled time. So, depends on your reason, there are two actions that can be taken to cancel the sending of a scheduled email message. First, if it's because you're no longer want to send a scheduled email message then you can cancel its sending by deleting the email message. Second, if it's because you want to correct something wrong in a scheduled email message (e,g: you have accidentally set a wrong date) then you can cancel its sending by editing the email message to set a new date so that it'll be sent at the right time.


How to delete or edit a scheduled email message in the stock Email app?
You can do so by using the following steps:
  1. Open the stock Email app. If you have multiple email accounts, the Combined inbox folder will be opened by default.
  2. Tap at the top left to open up the menus.
  3. Tap Scheduled outbox folder to view all scheduled email messages. To delete a scheduled email message go to the step #4, while to edit a scheduled email message go to the step #5.
  4. Deleting a scheduled email message:
    • Check the box in the left side of a scheduled email message to select it.
    • Tap at the bottom of the screen to delete the selected email message.
    • The selected email message has been deleted.
  5. Editing a scheduled email message:
    • Tap a scheduled email message to open it.
    • Tap at the top right to open up the additional options and then tap Edit.
    • Now, you can edit your email message, for instance: you can set a new date if you have set a wrong date.
    • Once done, tap to save your changes and send the email message. The email message will be placed in the Scheduled outbox folder and will be sent automatically at the scheduled time.

Samsung Galaxy S5: How to Use the Stock Calculator App in Android 4.4.2 Kitkat

Calculator app is one of pre-installed applications in Samsung Galaxy S5. You can use this app to perform simple or complex calculations since this app combines basic and scientific calculators. All calculations you have made with this app will be saved in the calculations history. You can see the history to review your earlier calculations, or, if needed, you can copy the required calculation history and then paste it to other apps.


How to use the stock Calculator app?
You can do so by using the following steps:
  1. Open the stock Calculator app.
  2. If you hold the phone vertically, the basic calculation buttons will be displayed. You can use these buttons to perform basic mathematical operations, e.g: addition, subtraction, division, multiplication, etc.
  3. If you hold the phone horizontally, the advanced mathematical/scientific buttons will be displayed. You can use these buttons to perform complex mathematical operations, e.g: percentages, Sinus, Cosinus, Tangus, square root, etc. FYI, if the screen rotation feature in your phone is off, you can enable the scientific calculator by tapping and then tap Scientific calculator.
  4. Tap above the keypad to view the calculations history and hide the keypad. While viewing the history, you can do these things:
    • Reviewing earlier calculations: swipe the screen up or down.
    • Copying a calculation history: long tap the required calculation history and then tap Copy. Next, you can paste the copied calculation history to other apps.
    • Deleting calculations history: tap the Clear history button.
  5. Tap at the bottom of the screen to hide the calculations history and show the keypad.

Samsung Galaxy S5: How to Adjust the Flash Settings in the Stock Camera App in Android 4.4.2 Kitkat

Samsung Galaxy S5 is equipped with a built-in flash that is placed below the rear camera. You can use the flash as an artificial light when taking photos in some conditions, e.g: when the light levels are too low, when the subject is darker than the background, etc. By default, the flash in the stock Camera app is set to off. But, if needed, you can adjust the flash settings to fit your need.


How to adjust the flash settings in the stock Camera app?
You can do so by using the following steps:
  1. Open the stock Camera app. FYI, you can speed up the way you access the stock Camera app by enabling the camera shortcut in the lock screen.
  2. Tap to open up the detailed settings menu.
  3. Tap Flash to change the flash settings. There are three flash settings available:
    • On: use this option if you want the camera fires the flash each time you capture a photo. When this option is selected, you'll see this icon in the preview screen.
    • Off: use this option if you don't want the camera fires the flash when you capture a photo.
    • Auto: use this option if you want the camera's sensor determines when the camera need to fire the flash based on the light levels in the scene. When this option is enabled, you'll see this icon in the preview screen.

Samsung Galaxy S5: How to Organize Quick Shortcuts in the Stock Camera App in Android 4.4.2 Kitkat

By default, the stock Camera app in Samsung Galaxy S5 places two quick shortcuts in the preview screen(HDR and selective focus) for fast and easy access. However, if needed, you can organize those quick shortcuts to fit with your need, for instance: add other items/features as quick shortcuts, remove unwanted/unused quick shortcuts or rearrange quick shortcut positions.


How to add an item/feature as a quick shortcut in the stock Camera app?
You're allowed to place up to three quick shortcuts in the preview screen in the stock Camera app. You can do so by using the following steps:
  1. Open the stock Camera app.
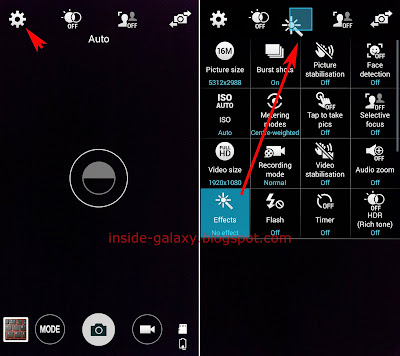
  2. Tap to open up the detailed settings menu.
  3. Tap and hold the required item/feature (e.g: Effects, Burst shorts, Timer, etc) you want to set as a quick shortcut and then drag it to the quick shortcuts slot. FYI, if you hold the phone vertically, the slot is at the top of the screen, in the right side of the camera settings icon.
  4. Release to place the selected item/feature in the slot.
  5. The selected item/feature has been set as a quick shortcut.


How to remove an unwanted or unused quick shortcut in the stock Camera app?
You can do so by using the following steps:
  1. Open the stock Camera app.
  2. Tap to open up the detailed settings menu.
  3. To remove a quick shortcut from the slot, tap and hold the required quick shortcut and then drag it out from the quick shortcuts slot. FYI, if you hold the phone vertically, the slot is at the top of the screen, in the right side of the camera settings icon.
  4. The selected quick shortcut has been removed from the slot.


How to rearrange quick shortcut positions in the stock Camera app?
You can do so by using the following steps:
  1. Open the stock Camera app.
  2. Tap to open up the detailed settings menu.
  3. Tap and hold the required quick shortcut in the slot and then drag it to the required position. FYI, if you hold the phone vertically, the slot is at the top of the screen, in the right side of the camera settings icon.
  4. Release to place the selected quick shortcut at the new position in the slot.

Samsung Galaxy S5: How to Fix Flipped or Mirrored Portrait Photos in Android 4.4.2 Kitkat

Save as flipped is a feature that will be available when you're using the front-facing camera. When this feature is enabled, the stock Camera app will invert a picture that you're captured with the front-facing camera to create a mirror-image of the original scene, in other words, the picture will be flipped horizontally when it's saved so that the right side in the original scene will be the left side in the photo and vice versa. However, when it comes to take a self-portrait photo, this feature will flip your face too. Thus, if you want to stop the stock Camera app from auto flipping your self-portrait photos, you have to turn off save as flipped feature in this app.


How to turn off save as flipped feature in the stock Camera app?
You can disable this feature by using the following steps:
1. Open the stock Camera app.
2. If the stock Camera app is still using the rear camera, tap to switch to the front-facing camera.
2. Tap to open up the detailed settings menu.
3. Tap Save as flipped to turn this feature off.
4. From now on, all portrait photos taken with the front-facing camera won't be saved as flipped or mirrored images.

Samsung Galaxy S5: How to Take Self Portrait Photos in Android 4.4.2 Kitkat

Nowadays, many people like to share their self portrait photos through social media(e.g: Facebook, Instagram, Twitter, etc.) to show their confidence, personality and fashion taste to others. It may be the reason why most of smartphones today are equipped with a front-facing camera because it can help the users to take self portrait photos with more easily. In Samsung Galaxy S5, you're provided with the 2MP front-facing camera and a feature to beautify your face by removing the facial flaws as much as possible so that you'll get beautiful self portrait photos.


How to take a self portrait photo?
You can do so by using the following steps:
  1. Open the stock Camera app. FYI, you can speed up the way you access the stock Camera app by enabling the camera shortcut in the lock screen.
  2. Tap to switch to the front-facing camera. By default, the front-facing camera uses beauty as the shooting mode because it will let you take flawless portrait photos with an airbrushed effect so that you can get smoother and clear face.
  3. If needed, you can adjust the beauty scale by tapping and then drag the beauty adjustment bar to the left or to the right. But, you have to remember that higher scale will make your face look unnatural or waxy.
  4. Aim the front-facing camera at your face. To help the camera easily detects your face, make sure your face is not too close to the camera and gets enough lighting.
  5. The camera will detect the face and show the enhanced face in real time.
  6. Tap to take a self portrait photo.

Samsung Galaxy S5: How to Adjust the Delay Timer in the Stock Camera App in Android 4.4.2 Kitkat

By default, the delay timer in the stock Camera app is set to off so that the photo will be captured as soon as you tap the camera icon or press the Volume key. But, there's a condition when you will probably need to adjust the delay timer, for instance: when you want to take an inclusive group photo. Set the timer will make the camera app waits for a specified time before capturing the photo after you tap the camera icon or press the Volume key so that you'll have a time to get yourself in the photo.


How to adjust the delay timer in the stock Camera app?
You can set the timer in this app by using the following steps:
  1. Open the stock Camera app.
  2. Tap to open up the detailed settings menu.
  3. Tap Timer and then select 2 secs, 5 secs or 10 secs.
  4. The delay timer in the stock Camera app has been adjusted.
  5. From now on, once you tap the camera icon or press the Volume key, the camera will start counting down the selected delay timer and then capture the photo when delay timer is over. As the example, if you have set the delay timer to 5 secs, the photo will be captured 5seconds after you tap the camera icon or press the Volume key.

Samsung Galaxy S5: How to Set SD Card as the Default Storage of the Nearby Devices Feature in Android 4.4.2 Kitkat

As we all know that you can use the nearby devices feature in your Samsung Galaxy S5 to download shared photos or videos from a nearby device into your phone, in condition that that device is connected to the same Wi-Fi network with you. By default, the downloaded files will be saved in the Download folder in the device storage. But, if needed, you can set your phone to save downloaded files to the Download folder in your SD card by setting the SD card as the default storage of the nearby devices feature so that the free space in your internal storage won't run out quickly.


How to set SD card as the default storage of the nearby devices feature?
You can do so by using the following steps:
  1. On any screen, swipe down the top of the screen to open up the notification panel and then tap at the top right to go to the settings menu.
  2. With the settings menu is displayed in grid view, scroll down to the Connect and share section and then tap Nearby devices .
  3. If Nearby devices is off, tap the ON/OFF switch to turn it on. You'll see this icon is displayed on the status bar as a sign that the nearby devices feature is enabled.
  4. Scroll the screen to the very bottom.
  5. Tap Download to and then select SD card.
  6. Your SD card has been set as the default storage of the nearby devices feature.
  7. From now on, all media files that are downloaded using the nearby devices feature will be saved in the Download folder in your SD card.

Samsung Galaxy S5: How to Play Shared Music Using Nearby Devices Feature in Android 4.4.2 Kitkat

Nearby devices is a content sharing feature available in Samsung Galaxy S5 that will let you share or access media files with other nearby devices that are connected to the same Wi-Fi network. One of the media files that can be accessed using this feature is music files. When the nearby devices feature in your phone is enabled, you can access shared music in a nearby device and play it directly from your phone.


How to enable the nearby devices feature?
Before you can play shared music in a nearby device, you have to enable the nearby devices feature in your phone first by using the following steps:
  1. On any screen, swipe down the top of the screen to open up the notification panel and then tap at the top right to go to the settings menu.
  2. With the settings menu is displayed in grid view, scroll down to the Connect and share section and then tap Nearby devices .
  3. If Nearby devices is off, tap the ON/OFF switch to turn it on.
  4. The nearby devices feature has been enabled and you'll see this icon is displayed on the status bar.


How to play shared music in a nearby device?
If you have enabled the nearby devices feature in your phone and there's a nearby device available that is connected to the same Wi-Fi network, you can play shared music from that device directly from your phone by using the following steps:
  1. Open the stock Music Player app.
  2. Swipe the menus at the top of the screen from the right to the left to find the Devices tab, and then tap it.
  3. All available nearby devices will be listed in the Nearby devices section.
  4. Tap the required device you want to play its music files.
  5. All shared music from the selected device will be displayed here.
  6. Tap the required song you want to play.
  7. While playing the music, you can use the controller at the bottom of the screen to control the music playback, e.g: play/pause/resume/rewind/forward the music, etc.

As a note, the stock Music Player app doesn't let you download shared music files from other nearby devices due to software limitation.

Samsung Galaxy S5: How to Watch or Download Shared Videos Using Nearby Devices Feature in Android 4.4.2 Kitkat

Watching or downloading shared videos in a nearby device is a thing that you can do when the nearby devices feature in your phone is enabled. This content sharing feature will work if both your phone and the nearby device are connected to the same Wi-Fi network.


How to enable the nearby devices feature?
Before you can watch or download shared videos in a nearby device, you have to enable the nearby devices feature in your phone first by using the following steps:
  1. On any screen, swipe down the top of the screen to open up the notification panel and then tap at the top right to go to the settings menu.
  2. With the settings menu is displayed in grid view, scroll down to the Connect and share section and then tap Nearby devices .
  3. If Nearby devices is off, tap the ON/OFF switch to turn it on.
  4. The nearby devices feature has been enabled and you'll see this icon is displayed on the status bar.


How to watch or download shared videos in a nearby device?
If you have enabled the nearby devices feature in your phone and there's a nearby device available that is connected to the same Wi-Fi network, then you can watch or download shared videos from that device by using the following steps:
  1. Open the stock Video Player app.
  2. Tap the Devices tab.
  3. All available nearby devices will be listed in the Nearby devices section.
  4. Tap the required device you want to watch or download its videos.
  5. All shared videos from the selected device will be displayed here. To download shared videos go to the step #6, while to watch shared videos only go to the step #7.
  6. To download shared videos from the selected device into your phone, do as follows:
    • Tap at the top right or long press the Recent apps key to open up the additional options and then tap Select.
    • Select the required videos you want to download.
    • Tap at the top of the screen to download the selected videos into your phone. By default, the downloaded files will be saved in the Download folder in the device storage and listed in the stock Video Player app.
  7. To only watch shared videos from the selected device without downloading, do as follows:
    • Tap the required video to play the video.
    • While watching the video, you can use the controllers at the bottom of the screen to control the video playback, e.g: play/pause/resume/rewind/forward the video, etc.

Samsung Galaxy S5: How to Access or Download Shared Photos Using Nearby Devices Feature in Android 4.4.2 Kitkat

Nearby devices is a content sharing feature available in Samsung Galaxy S5. When this feature is enabled, you can access or download shared photos in other nearby devices that are connected to the same Wi-Fi network.


How to enable the nearby devices feature?
Before you can access or download shared photos in a nearby device, you have to enable the nearby devices feature in your phone first by using the following steps:
  1. On any screen, swipe down the top of the screen to open up the notification panel and then tap at the top right to go to the settings menu.
  2. With the settings menu is displayed in grid view, scroll down to the Connect and share section and then tap Nearby devices .
  3. If Nearby devices is off, tap the ON/OFF switch to turn it on.
  4. The nearby devices feature has been enabled and this icon will be displayed on the status bar.


How to access or download shared photos in a nearby device?
When you have enabled the nearby devices feature in your phone and there's a nearby device available that shares the photos and is connected to the same Wi-Fi network, then you can access or download shared photos from that device by using the following steps:
  1. Open the stock Gallery app.
  2. Tap at the top left corner of the screen to open up the menus.
  3. All available nearby devices will be listed in the Nearby devices section.
  4. Tap the required device that you want to access or download its photos. 
  5. All shared photos from the selected device will be displayed here. To download shared photos go to the step #6, while to view shared photos only go to the step #7.
  6. If you wish to download some shared photos from the selected device into your phone, do as follows:
    • Tap at the top right or long press the Recent apps key to open up the additional options and then tap Select.
    • Select the required photos you want to download.
    • Tap at the top of the screen to download the selected photos into your phone. By default, the downloaded files will be saved in the Download folder in the device storage, or you can see the downloaded photos in the Download album in the stock Gallery app.
  7. If you wish to only view shared photos from the selected device without downloading, do as follows:
    • Tap the required photo to view it in full screen.
    • Swipe the screen from the left to the right or vice versa to view other shared photos.