Samsung Galaxy S5: How to Enable and Use Direct Call Feature in Android 4.4.2 Kitkat

Direct call is a motion feature that can be found in the Samsung Galaxy S5. This feature lets you easily call those whose logs, messages or contact details are being displayed on the screen simply by bringing your phone near your ear, allows you to make a call without physically touching the call icon.


How to enable or disable the direct call feature?
You can do so by using the following steps:
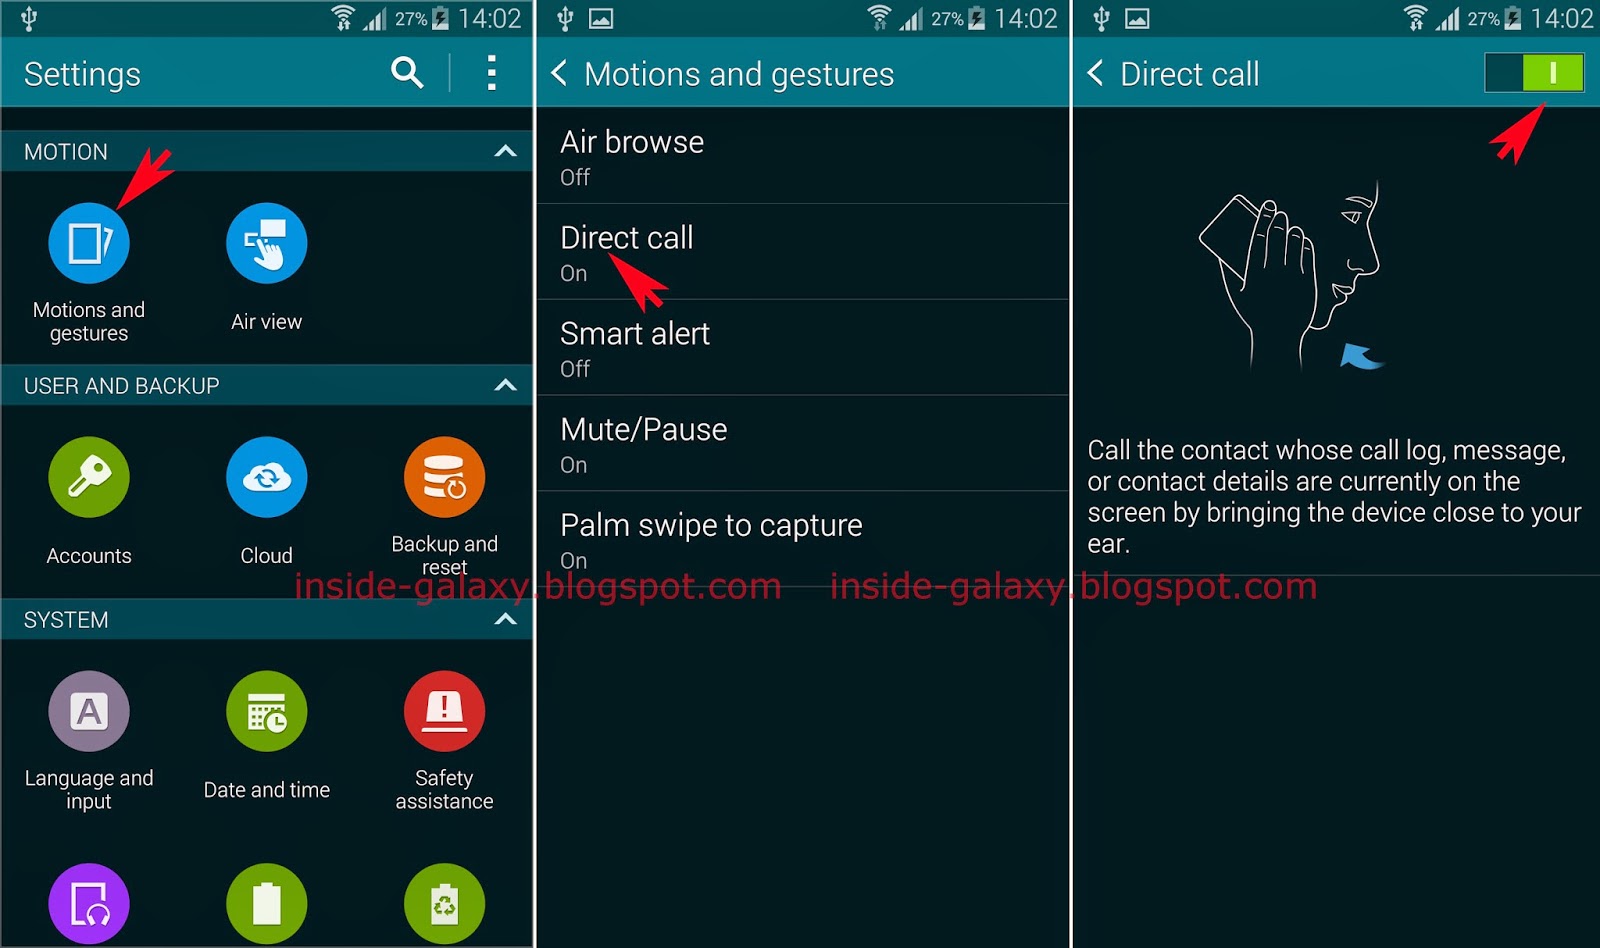
  1. Swipe down the top of the screen to open up the notification panel and then tap to go to the settings menu.
  2. With the settings menu is displayed in grid view, scroll down to the Motion section and then tap Motions and gestures .
  3. Tap Direct call.
  4. Tap the ON/OFF switch located at the top right corner of the screen to enable or disable direct call feature. When the switch is on the right side or shows green means the direct call feature is enabled.


How to use the direct call feature?
Assuming that you have enabled the direct call feature, then you can use the following methods to make a call using the direct call feature.

Method #1: While reading a message
While you're reading a message from a particular contact, you can easily make a call to that contact with direct call feature by using the following steps:
  1. Open Messaging app.
  2. Tap the required conversation from a particular contact. All messages from that contact are displayed here.
  3. Bring your phone near your ear. Once the phone vibrates, it will automatically call the contact whose message you're reading.

Method #2: While viewing a call log detail
While you're viewing a call log of a particular contact, you can easily make a call to that contact with direct call by using the following steps:
  1. Open Phone app.
  2. Tap Logs tab.
  3. Tap the required call log to view the log detail.
  4. Bring your phone near your ear. Once the phone vibrates, it will automatically call the contact whose log you're viewing.

Method #3: While viewing a contact detail
While you're viewing a contact detail of a particular contact in Contacts app, you can easily make a call to that contact with direct call by using the following steps:
  1. Open Contacts app.
  2. Tap the required contact to view its detail.
  3. Bring your phone near your ear. Once the phone vibrates, it will automatically call the contact whose detail you're viewing.

Looking the function, the direct call feature will be able to provide you an alternative way to make a call with more easily, especially for those of you who want to be able to control the phone without always having to touch it physically. Another good thing about this feature is it doesn't consume a lot of power to run so that you can let this feature remains on without having to worry your battery will be drained out quickly.

Samsung Galaxy S5: How to Use Reject Calls with Messages Feature in Android 4.4.2 Kitkat

Have you ever been in a situation where you couldn't accept the calls but had a little time to explain the reason to the caller why you did so, for instance when you were in a meeting or when you were busy of doing something? If that so, you can save yourself from that problem by using the reject call with message feature. This feature will be able to save your time because it will let you quickly send a response message and reject the call at the same time.


How to customize call rejection messages?
If necessary, you can create a new rejection message as well as edit or remove the required one. You can do so by using the following steps:
  1. Open Phone app.
  2. Tap or long press the Recent apps key to open up the additional options and then select Settings.
  3. Tap Call.
  4. Tap Call rejection.
  5. Tap Rejection messages. All default rejection messages are displayed here.
  6. Adding a new rejection message:
    If necessary, you can add more call rejection messages to the list by using the following steps:
    • Tap .
    • Write your own rejection message here.
    • Tap Save button.
    • The rejection message will be added to the rejection messages list.
  7. Editing a rejection message:
    If necessary, you can edit a rejection message by using the following steps:
    • Tap the required rejection message you want to edit.
    • Now, you can edit the message.
    • Tap Save button to save the change.
  8. Removing a rejection message:
    If necessary, you can remove rejection messages from the list by using the following steps:
    • Tap .
    • Select the required rejection messages you want to remove.
    • Tap Done button.
    • The selected rejection messages will be deleted from the list.


How to reject call with message?
You can use this feature to easily send a response message when rejecting calls. See the following steps to do so:
  1. When an incoming call is received, tap upward Reject call with message (it's located at the bottom of the screen).
  2. Select the required rejection message you want to use to reject the call.
  3. The message will be sent and the call will be rejected.

Since this feature lets you send a quick response message and reject the call at once then this feature will be helpful to be used when you have to reject the call but you want the caller knows the reason why you do so without having to spend a lot of time to explain it by sending a message separately or by calling back the caller.

Samsung Galaxy S5: How to Block Unwanted or Unknown Calls in Android 4.4.2 Kitkat

Have you ever felt so annoyed when unwanted persons kept calling you? Or, have you ever been in a situation when you didn't want to receive any call? Or, have you ever wanted to be able to block unknown calls? If that so, you can save yourself from those problems by using the reject calls feature which will let you block incoming calls according to your need. When a blocked number calls you, the caller will hear the tone once or twice and then will be rejected whilst you won't be notified (either by ringtone or call notification) so that you won't be bothered again with those unwanted or unknown calls.


How to block all incoming calls?
You can do so by using the following steps:
  1. Open Phone app.
  2. Tap or long press the Recent apps key to open up the additional options and then select Settings.
  3. Tap Call.
  4. Tap Call rejection.
  5. Tap Auto reject mode and then select All incoming calls.
  6. Now, you'll see is displayed on the status bar as a sign that all incoming calls will be blocked or rejected.


How to block incoming calls from specific phone numbers or criteria?
You can do so by using the following steps:
  1. Open Phone app.
  2. Tap and then select Settings.
  3. Tap Call.
  4. Tap Call rejection.
  5. Tap Auto reject mode and then select Auto reject numbers.
  6. Tap Auto reject list.
  7. Add a phone number or criteria to the auto reject list:
    • Tap .
    • Enter the phone number or criteria in the enter number field or tap to select contacts from call logs or Contacts app.
    • If necessary, you can change the criteria by tapping Match criteria and then select from the following options:
      • Exactly the same as: select this option to block the phone number which is exactly the same as the number you have entered in the enter number field.
      • Starts with: select this option to block all the phone numbers that are started with the number you have entered in the enter number field.
      • Ends with: select this option to block all the phone numbers that are ended with the number you have entered in the enter number field.
      • Includes: select this option to block all the phone numbers contain with the number you have entered in the enter number field.
    • Tap Save button to add the phone number or criteria to the auto reject list.
    • Now, incoming calls from the selected phone numbers or criteria in the auto reject list will be blocked or rejected.
  8. Remove a phone number or criteria from the auto reject list:
    • Tap .
    • Select the required phone numbers or criteria you want to remove from the auto reject list.
    • Tap Done button.
    • The selected phone numbers or criteria will be deleted from the auto reject list.


How to block incoming calls from unknown callers?
If you don't want to receive incoming calls from those who have not been added to the Contacts app, then you can block all incoming calls from them by using the following steps:
  1. Open Phone app.
  2. Tap and then select Settings.
  3. Tap Call.
  4. Tap Call rejection.
  5. Tap Auto reject mode and then select Auto reject numbers.
  6. Tap Auto reject list.
  7. Check the box next to Unknown to activate it.
  8. Now, all incoming calls from unknown callers will be blocked or rejected.

As a note, even though you're not notified when blocked phone numbers call you, but you still can find out who they are in the call logs. All blocked calls will be labelled with to distinguish them with other call logs.

Samsung Galaxy S5: How to Set SD Card as the Default Storage in Internet App in Android 4.4.2 Kitkat

Keeping the internal storage has free space enough is a thing that you need to do to make sure your phone can work well and doesn't encounter any error caused by low internal storage. Given that fact, it's no wonder if some of the stock apps have been equipped with an option to let the user switch the default storage of the app from the internal storage to the SD card. So does with the stock browser app that lets you to directly save all downloaded files to the SD card so that you don't need to worry your internal storage will quickly run out, especially if you like downloading many things from the internet.


How to save downloaded files to the SD card in Internet app?
Assuming that you have attached a SD card into your phone, then you can change the default storage in Internet app by using the following steps:
  1. Open Internet app.
  2. Tap or long press the Recent apps key to open up the additional options and then select Settings.
  3. Tap Content settings.
  4. Tap Default storage and then select SD card.
  5. Now, all of downloaded files will be saved to the Download folder in the SD card.

As a note, the Internet app will re-use the internal storage as the default storage when you reset the Internet app settings or perform clear data for this app from the app manager. So, when you have to do those two actions for any reason then you have to set back the SD card as the default storage manually if you still want your downloaded files to be saved directly to the SD card.

Samsung Galaxy S5: How to Use Speed Dial Feature in Android 4.4.2 Kitkat

Speed dial is an old feature that will allow you to assign contacts to speed dial numbers and then let you quickly dial the contact by long pressing the assigned speed dial number. I do believe that most of you have ever known/used the speed dial since this feature can be found in all of Samsung Galaxy S series. What make it different is you're now allowed to assign up to 999 contacts in the speed dial numbers.


How to assign a contact to a speed dial number?
Before using speed dial feature, you have to assign the required contacts to the speed dial numbers. You can do so by using the following steps:
  1. Open Phone app.
  2. If necessary, tap the Keypad tab.
  3. Tap or long press the Recent apps key to open up the additional options and then select Speed dial. FYI, the speed dial number 1 is specially set for the voice mail so you still have 998 speed dial numbers left.
  4. Tap + Add contact in the required speed dial number and then select the required contact.
  5. In the speed dial information window, tap OK button. Feel free to check the box in the left side of the "Do not show again" option before tapping OK button so that this window won't be displayed again.
  6. The selected contact has been assigned to the selected speed dial number.
  7. To add more contacts to speed dial numbers, repeat from the step #4.


How to remove a contact from a speed dial number?
If necessary, you can remove contacts from speed dial by using the following steps:
  1. Open Phone app.
  2. If necessary, tap the Keypad tab.
  3. Tap and then select Speed dial.
  4. Tap in the right side of the required contact you want to remove from speed dial.
  5. The contact has been removed from the selected speed dial number.
  6. To remove more contacts from speed dial numbers, repeat from the step #4.

How to use speed dial feature?
If you have assigned contacts to speed dial numbers, then you can use this feature to call the contacts with more easily. See the following steps to do so:
  1. Open Phone app.
  2. If necessary, tap Keypad tab.
  3. Call a single-digit speed dial number(speed dial number 1 up to 9):
    To call a single-digit speed dial number, you just need to tap and hold the number. As the example, if you have assigned a contact in speed dial number 6, then you can call the contact simply by tapping and holding 6 then the phone will automatically call the contact.
  4. Call a multi-digit speed dial number(speed dial number 10 up to 999):
    To call multi-digit speed dial number, you have to enter the numbers and then tap and hold the last number. As the example, if you have assigned a contact in speed dial number 456 then you can call the contact by tapping 4 and 5 and then tap and hold 6, the phone will automatically call the contact.

As a note, if you're like me who have difficulty to remember a lot of speed dial numbers, then it'd better if you put the most favourite/important contacts in the top 10 or in the special numbers so that you can easily remember in which speed dial number the contact you want to call is assigned with. Also, it will be able to help you save yourself from the problem of calling the wrong contacts.

Samsung Galaxy S5: How to Change Default Search Engine in Internet App in Android 4.4.2 Kitkat

The address bar in the stock browser app has two functions. First, it can be used to access a webpage when you enter a webpage address/URL in it. Second, it can be used as the search field of the default search engine when you enter a search term/word in it. By default, the Internet app uses google.com as the default search engine so that this app will automatically search a search term you have entered in the address bar by using the google.com and give you the results in a few second later, help you search anything in internet with more easily. However, this app also provides you with some popular search engines in case you don't like the default or want to use other search engines.


How to change default search engine in Internet app?
You can do so by using the following steps:
  1. Open Internet app.
  2. Tap the address bar and you'll see a box (in the left side of the address bar) with a search engine logo inside it.
  3. Tap the box and then select from the following options:
    • Google Search: select this option if you want to set google.com as the search engine. FYI, this option is enabled by default.
    • Ask Jeeves: select this option if you want to set uk.ask.com as the search engine.
    • Yahoo! UK & Ireland: select this option if you want to set uk.search.yahoo.com as the search engine.
    • Bing: select this option if you want to set bing.com as the search engine.
  4. The default search engine has been changed.
  5. Now, when you type a search term in the address bar, the Internet app will automatically search that term by using the selected search engine.

As a note, while you're searching something using search engine, you will probably find a nice website or article. You can then make it easier either by bookmarking that website so that you can directly access the website without having to search it again or you can save that article for offline reading so that you can read it later without having to connect to the internet.

Samsung Galaxy S5: How to Set Homepage in Internet App in Android 4.4.2 Kitkat

You probably ever noticed that when you open the stock Browser app in Samsung Galaxy S5, it automatically opens a new window with the Samsung website is loaded as the default homepage. In case, if you don't like that default to be your homepage, you can change the homepage by utilizing the available options so that it can be fit with your need. Also, set the right homepage will be able to provide you a better way to use the Internet app.


How to change homepage in Internet app?
You can do so by using the following steps:
  1. Open Internet app.
  2. Tap or long press the Recent apps key to open up the additional options and then select Settings.
  3. Tap Set homepage and then select from the following options:
    • Default page: select this option if you want to set the Samsung website as your homepage.
    • Current page: select this option if you want to set the currently opened webpage as your homepage.
    • Quick access: select this option if you want to set the webpages that have been added to the quick access list to be displayed as the homepage.
    • Most visited: select this option if you want to set the most visited webpages to be displayed as the homepage.
    • Other: select this option if you want to set other webpage as your homepage. If you select this option, you'll be asked to enter the webpage address and then tap OK button.
  4. Tap Done button to save the changes.
  5. You'll be asked whether you want the selected homepage to be shown when you open new tabs or not. If you tap Cancel button then the Internet app will use quick access as the homepage when you open new tabs, while if you tap OK button then the Internet app will use the selected homepage as the homepage when you open new tabs. FYI, this window won't appear when you select quick access as your homepage.
  6. The homepage has been set. Now, when you open Internet app, a new window will be opened and display the selected homepage.

As a note, the homepage you have set will be reverted back to the default when you reset the Internet app settings or when you perform clear data for this app via app info or application manager.

Samsung Galaxy S5: How to Use Reader Mode in Internet App in Android 4.4.2 Kitkat

Have you ever felt annoyed with those extra things within a webpage that might have distracted your focus while reading the main article/post? Or, do you like reading a long web post, such as a synopsis of a film or a review of a product, like me? If that so, you probably have to try using reader mode when reading them in the stock browser app in Samsung Galaxy S5. This feature will be able to provide you a better way for reading since it'll eliminate all the things that you may not need to read, e.g: widgets, webpage header, frame, advertisements, etc so that you can focus on what you read well.


How to use the reader mode feature in Internet app?
You can do so by using the following steps:
  1. Open Internet app.
  2. Tap the address bar and then type the required address of a webpage and then tap Go.
  3. Once the webpage is fully loaded, tap located in the left side of the address bar to enable reader mode.
  4. While you're in the reader mode, you can do the following actions:
    • Adjusting the font size (go to the step #5).
    • Sharing the webpage link (go to the step #6).
    • Saving the page for offline reading (go to the step #7).
    • Using night mode (go to the step #8).
    • Adjusting the zoom level (go to the step #9).
  5. Adjusting the font size.
    If necessary, you can adjust the font size for better reading by using the following steps:
    • Tap to increase the font size. If the icon turns gray means the font can't be increased anymore or it has reached the biggest size.
    • Tap to decrease the font size. If the icon turns gray means the font can't be decreased anymore or it has reached the smallest size.
  6. Sharing the webpage address.
    When you find a nice webpage, you will probably want to share the link with your friends. Luckily you can do so easily by using the following steps:
    • Tap .
    • Select the required share method you want to use (e.g: Email, Bluetooth, Wi-Fi Direct, etc) and then follow the on-screen instructions.
  7. Saving the page for offline reading.
    If necessary, you can save the page to read it later offline by using the following steps:
    • Tap and then select Save page.
    • The webpage will be saved.
  8. Using night mode.
    You can reverse the color between the background and the font by enabling night mode so that you can get a better display when reading in a low-light environment. You can do so by using the following steps:
    • Tap and then check the box next to Night mode to enable it.
    • The background color will turn black and the font will turn white.
  9. Adjusting the zoom level.
    If necessary, you can adjust the zoom level for better reading by using the following steps:
    • Pinch the screen with two fingers to zoom out.
    • Spread two fingers apart together on the screen to zoom in.
  10. If you want to exit from the reader mode, you can tap to disable it and revert the page back to the original state.

As a note, when you're in the reader mode and then save the page then next time you load the page it'll be loaded in the reader mode automatically. And, since reader mode also disables navigation widgets thus you have to exit from this mode when you want to open other pages within the same website.

Samsung Galaxy S5: How to Use Quick Access Feature in Internet App in Android 4.4.2 Kitkat

Internet app as the stock browser app in the Samsung Galaxy S5 has been equipped with various features to let you easily and quickly access your favourite webpages, one of which is the quick access feature. You can add any webpage to the quick access and when you have set the quick access list as your homepage then you can open those webpages easily from here. If needed, you can also delete the webpages from the list or reorder their positions.


How to add a webpage to the quick access?
You can easily add a webpage to the quick access by using the following steps:
  1. Open Internet app.
  2. Tap the address bar and then enter the required address of a webpage and then tap Go.
  3. Once the webpage is fully loaded, tap or long press the Recent apps key to open up the additional options and then select Add to Quick access.
  4. If necessary, you can change the title of the webpage.
  5. Tap Save button.
  6. The webpage has been added to the quick access.


How to use the quick access feature in Internet app?
In case you have added some webpages to the quick access list and have set the quick access as your homepage, then you can use this feature to do some actions as described in the following steps:
  1. Open Internet app.
  2. The quick access list appears as your homepage and displays all webpages you have added to the quick access as a shortcut.
  3. Open a webpage from the quick access list:
    • Tap the required quick access of a webpage you want to access.
    • The webpage of the selected quick access will be loaded.
  4. Delete a webpage from the quick access list:
    • Tap and hold the required quick access of a webpage you want to remove from the list and then drag it to the Delete icon located at the top of the screen.
    • The selected quick access of a webpage will be removed from the list.
  5. Re-order webpages positions in the quick access list:
    • Tap and hold the required quick access of a webpage and then drag it to the desired position.
    • Release to place it.
    • The selected quick access of a webpage will be placed in the new position.

Basically, quick access feature has some similarities with bookmarks since both these features will let you mark your favourite webpages so that you can easily re-load them anytime you want in condition that you're still connected to the internet.