Showing posts with label Fix. Show all posts

Samsung Galaxy S4: How to Fix Can't Find Hidden Pictures in Gallery app in Android 4.4 Kitkat

Today an insider told me that she couldn't find some pictures that have been hidden by her using the hide items options in the Gallery app. Normally, when you hide a picture in the Gallery app by using the hide items option, then you can find/unhide them easily by using the show hidden items option in the Gallery app. Sadly to say that in some cases, some of hidden pictures are suddenly missing and can't be found both in the show hidden items option in Gallery app or in the default folder where you save the picture files in the My Files app.

See also: How to Hide or Show Hidden Pictures in the Gallery app in the Samsung Galaxy S4 with Android 4.4 Kitkat

I've read somewhere out there and found that in the Android 4.4 Kitkat, all hidden files using that method will be moved to the another hidden folder in the internal storage. That's why you can't find them in their default folder. You have to move them to another unhide folder manually to display them back in the Gallery app.


How to find hidden pictures in Android 4.4 Kitkat?
I realize, a picture can be so meaningful for someone therefor I summarize this method here to help those of you who may be experiencing this problem and want to get those hidden-then-lost pictures back. I've tested this method and it worked. So, here they are:
  1. Open My Files app.
  2. Tap the Menu key and then select Settings.
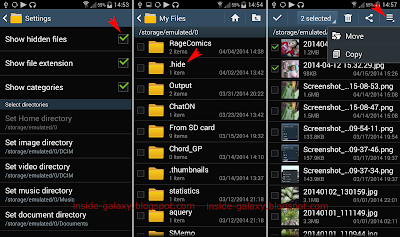
  3. Check the box besides the Show hidden files option to enable this option.
  4. Tap the Back key.
  5. Tap All files.
  6. Tap Device storage.
  7. Scroll down to find the folder named .hide and then tap it to open it.
  8. Tap Island (I don't know why Samsung used it as the folder name. I think it may be different in other phones so please let me know if your phone has another folder name).
  9. Now you should see all pictures you have hidden by using the hide items option in the Gallery app are displayed here.
  10. Copy/move and then paste the desired hidden pictures to another folder. Use the following steps if you don't know how to do so:
    • Select the desired pictures you want to copy/move.
    • Tap the three horizontal line icon located at the top right corner of the screen and then tap Copy to copy the selected files or tap Move to cut the selected files.
    • Navigate to the required folder you want to paste the files.
    • Tap Paste here.
  11. Once the selected files are copied or moved to another folder, they should be displayed again in the Gallery app.

As a note, this method also can be applied to retrieve hidden video files that you have hidden using the same way from the Gallery app. You can also perform this method by using another third-party File Manager app (e.g: ES File explorer, Astro File Manager, etc).
Samsung Galaxy S4: How to Fix Can't Remove Facebook Photo Albums in the Gallery App in Android 4.4 Kitkat

By default, you'll be presented with some sync options while you're installing the Facebook app in your phone, one of which is the sync Gallery option that will allow you to sync your Facebook photo albums with your phone so that you can view them directly from the Gallery app. If you chose to skip/disable this option at that time, then you can enable/activate the sync option by adding your Facebook account to the Gallery app.

See also: How to Sync Facebook Photo Albums with Gallery App in the Samsung Galaxy S4 with Android 4.4 Kitkat

As with other sync processes, the sync process between your Facebook photo albums and Gallery app can cause your phone becomes slower than before, and it'll be worse if you have a ton of photos on your Facebook account. In some cases, the sync process may cause the Gallery app crashes or slows or doesn't work properly. If the problem start irritating you, then you can fix them by stopping sync process or removing the Facebook account from the Gallery app.


How to remove Facebook photo albums in Gallery app temporarily?
FYI, these steps only stop syncing process and hide the Facebook photo albums in the Gallery app without removing the Facebook account from the Gallery app. These steps work best if the synced photos are only in a small amount. Here are the steps:
  1. Open the Gallery app.
  2. Tap the Menu key and then select Settings.
  3. Under the Accounts section, tap your Facebook account.
  4. Clear the checkbox next to Sync Gallery to stop syncing process.
  5. You can also hide the Facebook photo albums temporarily by using the following steps:
    • While you're in the Gallery app, tap the Menu key and then select Content to display.
    • Clear the checkbox next to Content in Facebook.
    • Tap OK button.
    • Now, the Facebook photo albums shouldn't be displayed in the Gallery app.


How to remove Facebook photo albums in Gallery app permanently?
These steps will remove your Facebook account from the Gallery app, but it won't remove your Facebook account in the Facebook app. These steps work best if you have a lot of photos in your Facebook account. Here are the steps:
  1. Open the Gallery app.
  2. Tap the Menu key and then select Settings.
  3. Under the Accounts section, tap your Facebook account.
  4. Tap Remove account button located at the top right corner of the screen.
  5. Tap Remove account button to confirm removing the account.
  6. Now, the Facebook photo albums will be removed from the Gallery app permanently unless you sync them again with the Gallery app.

Each method mentioned above has their own advantages. Removing the Facebook photo albums temporarily will keep the synced photos and will allow you to sync with them again with ease as well as speed up the Gallery load times as long as the synced photos are only in a small amount, while removing the Facebook photo albums permanently will be able to speed up the Gallery load times and avoid crashes especially if you have a lot of photos in your account.

Samsung Galaxy S4: How to Fix Can't Find the Google Voice Typing Option in Android 4.4 Kitkat

In my previous post, I wrote that the microphone icon wouldn't be displayed in the keyboard if the Google voice typing option was disabled. So, in order to display the microphone icon in the keyboard, then we have to enable Google voice typing option in the language and input settings.

See also: How to Fix Missing the Microphone Icon in the Samsung Galaxy S4 Keyboard

A couple days back, some insiders confirmed that they couldn't find the Google voice typing option under the language and input settings when they wanted to enable it to display the mic icon in the keyboard. Apparently, this problem is occur if the Google search app has not been installed yet or if the Google search app is disabled. So, to get back the Google voice typing option, you need to install and/or enable the Google search app.


How to fix can't find the Google voice typing option in Android 4.4 Kitkat?
Depending on the causes, here are the steps to fix this problem:
Method I: Installing the Google search app
By default, the Google search app is a stock app and it can't be uninstalled, but for any reason if the Google search app has not been installed yet, then to get back the Google voice typing option you have to install this app first. You can do so by using the following steps:
  1. Open the Play Store.
  2. Tap the Magnifying glass icon and then enter "google search" in the search field. Tap the Google search on the pop up menu to start searching.
  3. In the search result list, tap the Google search app.
  4. Tap Install button.
  5. Tap Accept button to start installing.

Method II: Enabling and updating the Google search app
If the Google search app has been installed in your phone, but you still can't find the Google voice typing option, maybe the Google search app is disabled. You have to enable and then update the Google search app to get back the Google voice typing option. You can do so by using the following steps:
  1. Go to Settings.
  2. Tap More tab.
  3. Tap Application manager.
  4. Swipe the screen to the right until you see the Disabled tab.
  5. If you see the Google search app or com.google.android.googlequicks.. is listed here then tap the app to open the app info screen.
  6. Tap Enable button to enable this app.
  7. Now, open the Play Store app to update the Google search app. 
  8. Tap the three horizontal line icon at the top-left corner of the screen.
  9. Tap My Apps.
  10. Under the Updates section, you should see that the Google search update is available.
  11. Tap Google search app.
  12. Tap Update button.
  13. Tap Accept button to start updating.

Once you done these steps, you should see the Google voice typing option is available under the language and input settings. By default, this option is enabled. But, in some cases, this option is disabled. If so, you have to enable this option manually to get back the mic icon in the keyboard. If you don't know how to do so, you can see the complete steps in the link I've mentioned above.

Samsung Galaxy S4: How to Fix Can't Find Capture Icon in the Video Player App in Android 4.4 Kitkat

While you're playing a video in the video player app, you'll be presented with some options that you can use to control the playback, such as rewind or forward the playback, adjust the volume, etc. Even you'll be given with a take-a-screenshot button or capture icon to make you easier to take a screenshot while playing a video.

See also: How to Play a Video Using the Video Player App in the Samsung Galaxy S4 with Android 4.4 Kitkat

A few days ago, an insider told me that she can't find the capture icon while she was playing a video in the video player app. As a note, the option to display the capture icon is enabled by default therefore if you can't find the capture icon make sure that the capture option in the settings menu while playing a video is not disabled.


How to fix can't find the capture icon while playing a video in the video player app?
To get this option, make sure the capture option is enabled. You can enable this option by using the following steps:
  1. Open the Video Player app.
  2. Tap the required video to play it.
  3. Tap the Menu key and then select Settings.
  4. Mark the checkbox next to Capture to enable this option.
  5. Tap Close button.
  6. Now you should see the capture icon is displayed at the top of the screen while playing a video.

Basically, you can take a screenshot of the playback by using the palm motion or using combination of the Power button and the Home button, but using the capture button to take a screenshot while playing a video is much easier to do. Other advantage when you use the capture icon is this option will give you a full screen screenshot no matter how you hold (horizontally or vertically) the phone while playing a video.

Samsung Galaxy S4: How to Fix Can't Enable Anti Shake in the Camera App in Android 4.4 Kitkat

By default, the Volume key is assigned as the zoom key in the Camera app, but after this phone updated to Android 4.3 Jelly Bean you can assign the Volume key as the camera key or the record key. Surely it'll be useful for those of users who want to be able to take pictures or record videos by using the physical button or for those of users who have difficulty to take pictures using the on-screen button, for instance those users who like diving where taking pictures using the physical button is easier to do while the phone is using waterproof case.

See also: How to change the Volume key Function in the Camera App in the Samsung Galaxy S4 with Android 4.4 Kitkat

As a note, using the physical key as the camera key will increase shake and it makes the picture become unfocused. So, aside from holding the phone as steady as possible when taking pictures, you can also turn on anti shake to reduce shake and help focus when the camera is moving. A few days back, an insider asked me why the anti shake option in her phone was grayed out so that she couldn't use it. After did some investigations, it turns out that the anti shake option will automatically be disabled when the auto night detection is enabled. So, when you experience this problem, you have to turn off the auto night detection to make you able to use the anti shake option.


How to fix anti shake option is grayed out in the Camera app?
Below are the steps to do so:
  1. Open the Camera app.
  2. Tap the Menu key and then select Settings.
  3. Under the Camera tab, scroll down, tap Auto night detection and then select Off to disable this option.
  4. Now, the anti shake option should be available.
  5. To enable Anti shake, tap Anti shake and then select On.

Because the auto night detection must be disabled when you want to use anti shake, then if in the certain condition you need to set the Volume key as the shutter key but you're in the low-light condition, then you can compensate the lack of light by turning on flash.

Samsung Galaxy S4: How to Fix Self Portrait Photos Flipping in Android 4.4 Kitkat

By default, the Camera app in the Samsung Galaxy SIV uses the rear camera to take pictures. Even so, the app also gives you an option in the more options which will let you to switch between the rear and front camera. By using the front camera, you can take self portrait photos.

See also: How to Use Camera App to Take Pictures in the Samsung Galaxy S4 with Android 4.4 Kitkat

Still about the front camera, a few days back an insider asked me why her self portrait photo was saved as a mirror image(her left side becomes the right side). FYI, when the front camera is activated, you'll be provided an option called save as flipped which will allow you to flip your self portrait photos or not. By default, this option is disabled so that the self portrait photo will be saved as a normal image. If you're experiencing the self portrait photos flipping problem, then the save as flipped option may have been accidentally enabled. So, to fix this problem, you have to disable this option.


How to disable the save as flipped option in the Camera app?
If you don't want the front camera flips your self portrait photos, then you have to disable the save as flipped option by using the following steps:
  1. Open the Camera app.
  2. Tap to switch to the front camera.
  3. Tap the Menu key and then select Settings.
  4. Tap the Settings tab.
  5. Scroll down to find Save as flipped. Tap this option and then select Off to disable this option.
  6. Now, the pictures that are taken by the front camera will not be flipped.

By knowing these steps, now when your self portrait photos are saved as a mirror image, you can fix it by disabling the save as flipped option in the Camera app while the front camera is enabled.

Samsung Galaxy S4: How to Fix Can't Remove Picasa Album from Gallery App in Android 4.4 Kitkat

If you notice, there some sync options available under your Google account and all of them are enabled by default. One of sync options available is an option to sync with your Picasa web albums. When this option is enabled, then your Picasa albums will be displayed in the Gallery app and they will be labelled with Picasa icon .

See also: How to Activate Google Account in the Samsung Galaxy S4

A couple days ago, an insider sent me an email and told me that he want to remove Picasa albums from Gallery app because it slowed down his phone whenever he opened Gallery app, unfortunately he can't remove the albums because when he was selecting an album he wasn't given an option to delete it. FYI, given Picasa albums come from another source, then to remove it you need to disable sync process between your phone and Picasa web albums and then clear the Gallery app data.


How to completely remove Picasa album from Gallery app?
Generally, there are two methods available that you can use to remove Picasa album, through the Settings menu or through the Gallery app.


Method #1: Via Settings menu
  1. Go to Settings.
  2. Tap Accounts tab.
  3. Tap Google.
  4. Under Accounts section, tap your Google account.
  5. Scroll to the very bottom and then clear the checkbox next to Sync Picasa Web Albums.
  6. Tap the Back button twice to go back to the Settings menu and then tap More tab.
  7. Tap Application manager.
  8. Swipe the screen to the right until you see All tab.
  9. Scroll down to find Gallery, then tap it.
  10. Tap Clear cache button and then tap Clear data button (it won't erase any photo you save in your phone, it just repopulates them and revert back the Gallery app to the default settings).
  11. Now, the Picasa web albums should be removed from your Gallery app.


Method #2: Via Gallery app
  1. Open Gallery app.
  2. Tap the Menu key then select Settings.
  3. Under Accounts section, tap your Google account.
  4. Scroll to the very bottom and then clear the checkbox next to Sync Picasa Web Albums.
  5. Now, go to Settings by swiping down the top of the screen then tap Settings icon.
  6. Tap More tab.
  7. Tap Application manager.
  8. Swipe the screen to the right until you see All tab.
  9. Scroll down to find Gallery, then tap it.
  10. Tap Clear cache button and then tap Clear data button (it won't erase any photo you save in your phone, it just repopulates them and revert back the Gallery app to the default settings).
  11. Now, the Picasa web albums should be removed from your Gallery app.

I personally like to use sync features to backup my pictures but I don't like to display albums from another sources(including with Picasa web albums) because sync process--especially if it contains lot of pictures--sometimes makes the phone slower or even crash when opening Gallery app. So, if this problem also occurs on your phone, you can use these steps to completely remove Picasa albums from your Gallery app.

Samsung Galaxy S4: How to Fix Can't Delete Folder in Apps Menu in Android 4.4 Kitkat

A few days ago, an insider sent me an email and asked why she can't delete a folder that has been created after she had updated her phone to Android 4.4 Kitkat, even when the folder is empty. If you notice, in Android 4.3 Jelly Bean we can delete a folder in apps menu by tapping and holding the folder and then drag it to the Remove icon located at the top of the screen. Actually, this option is not removed, but in Android 4.4 Kitkat you need to do an extra step to be able to remove a folder in the apps menu.


How to delete folder in apps menu in Android 4.4 Kitkat?
Below are the steps to do so:
  1. Go to Apps through Home screen.
  2. Tap the Menu key then select Edit.
  3. Tap and hold the required folder you want to delete and then drag it to the Remove icon located at the top of the screen. Release to delete the folder. FYI, if the folder contains some apps, when you delete the folder then the apps will not be uninstalled but they will be placed again in apps menu.
  4. Tap Save button to save the changes.
  5. The selected folder has been deleted.

I personally love this Android version than the old one because it doesn't give me any problem and it makes my phone work better than before though in this Android version, sometimes we need to do an extra step to do some things as you can see in the steps above. However, if you also have the difficulty to remove a folder in the apps menu post update to Android 4.4 Kitkat, now you can delete them easily by using these steps :)

Samsung Galaxy S3: How to Fix Can't Use the Volume Key to Zoom In or Out in the Camera App in Android 4.3 Jelly Bean

It seems that Android 4.3 Jelly Bean has been bringing some problems to the users since it launched at the first time. A few days ago, some insiders left their comments and asked why the zoom function of the Volume key didn't work in the Camera app after they had updated their Samsung Galaxy SIII to Android 4.3 Jelly Bean.

See also: How to Fix Camera Flashes when Alarm Goes Off in Android 4.3 in the Samsung Galaxy S3

After some further investigations, I've found that there were two things that can caused the zoom function of the Volume key didn't work, the camera mode and the Home screen mode.


How to fix can't zoom in or out using the Volume key in the Camera app?
If you're also experiencing this problem, you can check the following steps to make the zoom function of the Volume key works again:
  1. Check the camera mode
    Some camera modes (e.g: panorama mode) will automatically disable the zoom function. So, to make the zoom function works, you need to change the camera mode to another mode. You'll be informed with the error message "cannot zoom in or out in this mode" if you're using a camera mode where the zoom function is not allowed to use.
  2. Check the home screen mode
    If your phone is using the easy mode as its home screen mode then it will automatically disable the zoom function. So, to make the zoom function works, you need to set the home screen mode to the standard mode. You can do so by using the following steps:
    • Go to Settings.
    • Tap My device tab.
    • Tap Home screen mode and then select Standard.
  3. Use the pinch to zoom feature
    If the step #1 and #2 didn't work, you still be able to zoom in or out by pinching the screen with two fingers.

For the record, I've tested these steps in the Samsung Galaxy SIV with Android 4.4 Kitkat and it worked. So, I can conclude that these steps should be worked in another Samsung Galaxy phones with Android 4.3 Jelly Bean or above.

Samsung Galaxy S4: How to Fix Can't Find Floating Keyboard Icon in Android 4.4 Kitkat

When I was writing about new options and features were brought by Android 4.4 Kitkat in my Samsung Galaxy SIV, there was a new feature called floating keyboard I didn't include because the feature was suddenly gone and I can't find it. FYI, the floating keyboard feature will make the keyboard floats and movables to any parts of the screen so that you can use the whole screen to display currently open application.

See also: New Options and Features in Android 4.4 Kitkat in the Samsung Galaxy S4

After some further investigations, I found that floating keyboard will be automatically disabled when I turned on magnification gestures feature. I guess, it's because the magnification gestures feature doesn't work in the keyboard therefore the user is only allowed to display the keyboard in the normal state. So, if you're also experiencing the same problem with me(can't find the floating keyboard icon) then you can bring it back by turning off the magnification gestures.


How to disable magnification gestures?
There are two methods available that you can use to disable this feature, through the Settings menu or through the device options.


Method #1: Settings menu
  1. Go to Settings.
  2. Tap My device tab.
  3. Scroll down to find Accessibility, then tap it.
  4. Scroll down to find Magnification gestures, then slide the ON/OFF switch to the left to disable this option.
  5. Now, go to a screen or an app where you can enter text (e.g: Messaging app, Email app, Browser app, etc).
  6. Tap and hold the key in the left side of the space bar and then select the floating keyboard icon to switch between normal and floating keyboard.


Method #2: From the device options
This method can be used if you have been added the accessibility shortcut to the device options. Well, here are the steps:
  1. In any screen, long tap the Power key.
  2. On pop up menu select Accessibility.
  3. Scroll down to find Magnification gestures, then slide the ON/OFF switch to the left to disable this option.
  4. Now, go to a screen or an app where you can enter text (e.g: Messaging app, Email app, Browser app, etc).
  5. Tap and hold the key in the left side of the space bar and then select the floating keyboard icon to switch between normal and floating keyboard.

I personally prefer to use the normal keyboard than the floating one because the floating keyboard makes the keys are smaller than those in the normal keyboard. The small keys in floating keyboard make me have difficulty to use them well. So, how about you? Do you like to use floating keyboard?

Samsung Galaxy S4: How to Fix Missing Microphone Button on Samsung Keyboard

In the stock Samsung keyboard, there are some keys that have several functions, for instance a key in the left side of Space bar(it's usually displayed with a Settings/Cog wheel icon), when you long tap this key, you will see some options available, such as Keyboard settings, Smiley, Clipboard, Microphone, etc. Those hidden button sometimes make some users who want to use one of them have difficulty to find the button.

See also: How to Find Mic Button on Samsung Keyboard

But, in certain case, the Mic button is completely not available though the user have had long tapped the key in the left side of Space bar, as experienced by one of insider named Linda. She says that she can't find Mic button though she has had long tapped the key in the left side of Space bar when she want to use it to voice to text.


How to fix missing mic button on Samsung keyboard?
If you're also experiencing the same problem, you can make the Mic button available again in your keyboard by following the steps below:
  1. Go to Settings.
  2. Tap My device tab.
  3. Scroll down to find Language and input, then tap it.
  4. Check the box in the left side of Google voice typing to enable this option. Enable this option will make the Mic button available on your Samsung keyboard and vice versa.
  5. Now, open an app that requires you to use keyboard, such as Messaging app.
  6. On keyboard, long tap the key in the left side of Space bar. You should see the Microphone icon displayed in the pop up menu as one of available option.

Well, with this post I also want to apologize to Linda for so late answer. I hope it's not too late. I personally seldom use Mic button to voice to text and more prefer to use keyboard to compose a text message, that's why I don't know much about this feature. So, how about you? Do you often use Mic button on your Samsung keyboard?

Samsung Galaxy S3: How to Fix Can't Find the Wi-Fi Direct Option on Android 4.3

In Android 4.3, there are some options that changed its location in the Settings menu causing some users are having trouble to find them when they want to use them. As happen with one of the insider named Maureen who has the difficulty to change the Bluetooth name in her phone after she did update the phone to the Android 4.3. She said that she couldn't find the rename option in the Bluetooth menu, where the option is usually located. Apparently, in the recent update you have to change the device name to change the Bluetooth name.

See also: How to Fix Can't Change the Bluetooth Name on Samsung Galaxy S3 with the Android 4.3

Another problem with the similar causes also experienced by another insider named Richard who has send me an email and said that he could no longer find the Wi-Fi Direct option in the Settings menu when he want to activate this option to allow him transferring some stuff to another phone.


How to find Wi-Fi Direct option in Android 4.3?
FYI, in Android Jelly Bean 4.2 and above, the Wi-Fi Direct has been moved to the Wi-Fi menu. Well, here are the steps to locate the Wi-Fi Direct option:
  1. Go to Settings.
  2. Tap My Connections tab.
  3. If necessary, slide the switch next to Wi-Fi option to the right to enable this option and allows you accessing the menu.
  4. Tap Wi-Fi Direct button.
  5. Tap Scan button to search another Wi-Fi Direct enabled device within range.
  6. Now, you're ready to use Wi-Fi Direct to transfer files with another Wi-Fi direct enabled devices.

Indeed, the appearance of the Settings menu in the Android ICS and the Android Jelly Bean(especially the Android 4.3) has some differences. So, digging the Settings menu to explore each option available is one things that you might consider to do to know the Settings menu more better. Well, hope this helps :)

Samsung Galaxy S3: How to Fix Keyboard Always Replace the Typed Word After Update to Android 4.3

An insider has leave his comment here and ask why after he did update his phone to the Android 4.3, the auto correct on his phone tend to rein in what should be typed which will not letting him to type anything anymore without having to correct whatever he really wants to type. Seems the auto correct in this recent update is the stubborn auto-correct and in some cases it's really annoying the user who need to type with the different language than the phone.

See also: How to Turn On or Off Auto Correct on Samsung Galaxy S3

At the first time, I thinks that it's about predictive text, but apparently this issue is brought by the new option in the stock keyboard app called auto replacement which will auto replace the word you're typing with the most probable word. Due to the cause, to stop the keyboard always replacing a word the user should turn this option off.

How to disable auto replacement on Android 4.3?
Generally, there are two methods to turn off auto replacement that you can choose which best suit you.
Methods #1: Through the Settings menu
Below are the steps to do so:
  1. Go to Settings.
  2. Tap My device tab.
  3. Tap Language and input.
  4. Tap the cogwheel icon next to Samsung keyboard to access the settings menu.
  5. Slide the switch next to Auto replacement to the left to disable this option.

Method #2: Through the Messaging app
Actually you can do this step using any app which requires you to use keyboard. But, as the example we'll use the Messaging app to do so:
  1. Open Messaging app then create new message.
  2. Tap on Enter messages field to bring up the keyboard.
  3. Tap the Settings icon on the virtual keyboard.
  4. Slide the switch next to Auto replacement to the left to disable this option.

By disabling this option, now whenever you're typing a word then tap the space bar or punctuation mark then the keyboard should not replace your word with the most probable word which in certain case this is might be not the word you want to type. So, hope this helps :)

Samsung Galaxy S3: How to Fix Can't Open Multi Window Panel Using Back Button After Update to the Android 4.3

Lot of Samsung Galaxy S3 users out there starts reporting that they're encountering multiple issues once they did update their phone to the Android 4.3. Some of issues occurs because when the user wants to enable or disable certain option, they need to do some extra things to make it works, such as when the user wants to get rid camera flashes when receiving new email or call, the user must turn on the flash notification option and turn it off again to make it works.

See also: How to Fix Camera Flashes When Receiving New Email or Calls in Android 4.3 in Samsung Galaxy S3

Another issue with the similar causes which also occurs in Android 4.3 is the difficulty to get back the functionality of the multi window feature. If previously the user will be able to bring up the multi window panel by long pressing the Back button, now in Android 4.3 the user can't do so, though they already checked the multi window option through the Settings menu. To fix this problem, you need to do another steps instead of just turned on the multi window option.


How to enable multi window feature on Android 4.3?
Below are the steps with a little tweaks revealed by a user in XDA-developer forum that you need to do to allow you brings up the multi window panel using the Back button:
  1. Go to Settings.
  2. Tap My Device.
  3. Tap Home screen mode.
  4. Select Easy mode and then followed by tapping Apply button.
  5. Now, go back to the Settings menu.
  6. Tap My Device.
  7. Tap Home screen mode.
  8. Select Standard mode and then followed by tapping Apply button.
  9. Now, go back to the Settings menu.
  10. Tap My Device.
  11. Tap Display.
  12. Enable Multi window by ticking the box next to this option. When the box is ticked means this option is enabled.

Once you've done the step above, now you should be able to open up the multi window panel by long pressing the Back button. So, hope this helps :)

Samsung Galaxy S3: How to Fix Can't Change Bluetooth Name on Android 4.3

One more, an insider named Maureen has dropped her question to me through the email to ask why her phone shows the device name as SGH-I747 instead of a different name as she had configured before she did update the phone to the Android 4.3 when she use the phone to transfer contact files with her friend using the Bluetooth connection. As we all know that Bluetooth is one of the most used mode of connectivity to do the file transfer or share the internet data to another Bluetooth capable devices, so the appropriate Bluetooth name will help us a lot to recognize the device much more easier. Unfortunately, in her mail she said that now she also no longer can't find the option to rename the Bluetooth name through the Bluetooth settings menu as the way she did prior the update.

See also: How to Change the Bluetooth Name on Samsung Galaxy S3

Apparently, the changes in the appearance of the Settings menu brings a little difficulties to the user to do some settings, for instance when the user wants to change the Bluetooth name. Now, in Android 4.3 you can change the Bluetooth name through the device name in the about device menu instead of the Bluetooth settings menu.


How to change the device name in Android 4.3?
Due to rename option in the Bluetooth settings menu is no longer available, then you can follow the steps below to change the Bluetooth name in the Android 4.3:
  1. Go to Settings.
  2. Tap More.
  3. Tap About device.
  4. Tap Device name.
  5. In the Device name field, type the desired device name you wish to use.
  6. Tap OK button.
  7. The device name has been changed.

For the record, once you change the device name, this will not only change the Bluetooth name, but also change the Wi-Fi direct name and the name of the entire of the apps. So, hope this helps :)

Samsung Galaxy S3: How to Fix Missing Applications After Update to the Android 4.3

Seems these days you would have to read lot of posts about problem occurs in the Samsung Galaxy SIII with the Android 4.3, as if I could say that this update brings more problems compared with all of the previous updates. One of the most common problem experienced by the user once they updated their phone to this new operating system is that they start receive recurring old download in their notification list and sadly it's can't be cleared from there. To fix this problem, you should clear all the download histories in the Download app or clear cache and data in the Downloads or Download manager through the Settings menu.

See also: How to Fix Recurring Old Download Notifications in Samsung Galaxy S3 with Android 4.3

Once you done the steps listed in the link above, the old download notification should no longer appear in the notification list. Unfortunately, an insider has told me through the email that she can't find the Downloads app through the app drawer when she wants to clear the download histories. After some further investigation, apparently this app is disabled after update to the Android 4.3 and it should be enabled again to bring them back into the app drawer.


How to fix missing apps in Android 4.3?
A confusing part to enable disabled apps in Android 4.3 is the difference between the old and the new application manager to list the disabled apps. If previously you can find the disabled app is listed in the very bottom of the All screen in application manager, now all the disabled apps will be listed under Turned off screen. Well, here's the steps to enable disabled apps in Android 4.3:
  1. Go to Settings.
  2. Tap More.
  3. Tap Application manager.
  4. Swipe the screen to the left until you find Turned off screen. You can find all of the disabled apps in here.
  5. In this case, tap Downloads.
  6. Tap Turned on button to enable the apps.
  7. Restart the phone.

Once the phone is turned on, now you should see the Downloads app in the app drawer and let you clear the download histories from there. For the record, you can also use the steps above to enable another disabled app or to bring back the missing apps after updating the phone to the Android 4.3. So, hope this helps :)

Samsung Galaxy S3: How to Fix Freezes or Auto Reboot When Accessing Clipboard After Update to the Android 4.3

It's turned out that the update to the Android 4.3 brings some problems to the Samsung Galaxy SIII users, though actually some of them are not the real problem because they were triggered by the new option in this new operating system or that was because one app is linked with another one which is not turned on and resulting the app crashes whenever the user use it. As has been said by one of the insider through his email that the Gallery app in his phone always crashes whenever he use the Share menu

See also: How to Fix Gallery App Crashes When Using the Share Menu in Samsung Galaxy S3 With the Android 4.3

However, seems the users continuously reporting that they experience another problem once they updated their phone to the Android 4.3. One of which is they said that the phone always freezes or reboot whenever they tried to bring up the clipboard from the stock keyboard.


How to fix the phone freezes or rebooted when accessing clipboard?
If you're also experiencing the same problem after updating your phone to the Android 4.3, then you can follow the steps below that has been confirmed by one of the user in the androidcentral forum who has been managed to fix this problem:
  1. Go to Settings.
  2. Tap More.
  3. Tap Application manager.
  4. Swipe to the All screen.
  5. Scroll down to find TestService, then tap it.
  6. Tap Force close button followed by tapping OK button.
  7. Restart the phone.

Once your phone is turned on, now try to access the clipboard from any app which requires you to use the keyboard, such as Messaging app, or else. If you're lucky, then you should be able to access the keyboard without having to make your phone freezes or reboot. And as it used to be, you can share your own steps to fix this problem through the comment below :)

Samsung Galaxy S3: How to Fix Gallery App Crashes When Using the Share Menu After Update to the Android 4.3

Apparently, updating the Samsung Galaxy SIII to the Android 4.3 brings some problems to the users. One of the most frequently asked problem by the insider through the emails or comments is about camera flashes when the alarm goes off or when receiving new email or calls. In fact, this issue is triggered by the new option in Android 4.3 called Flash notification. Basically, this option was designed for the deaf or low-vision users so they will be much more easier to know the notification by the flash light rather than the notification on the screen.

See also: How to Fix Camera Flashes when Alarm Goes Off in Android 4.3 in Samsung Galaxy S3

Another problem occurs in this phone once updated to the Android 4.3 is Gallery app freezes or stopped working when the user open the photo or video files and hit the share menu.


How to fix Gallery app stopped working when using the share menu?
Gallery app and Paper artist app are linked, so if you turn the Paper artist app off then the Gallery app will force close or crashes when you hit the share menu. To fix this problem you need to turn back on the Paper artist app by following the steps below:
  1. Go to Settings.
  2. Tap More.
  3. Tap Application manager.
  4. Swipe the screen to the left to find the Turned off screen.
  5. Scroll down to find Paper artist app, then tap it.
  6. Tap Turn on button to turn this app on.
  7. Restart the phone.

Due to this problem is caused by inactive Paper artist app, so by turning this app back on the problem of Gallery app crashes when the share menu is pressed should no longer happen. So, hope this helps :)

Samsung Galaxy S3: How to Fix Camera Flashes When Alarm Goes Off After Update to the Android 4.3

An insider named Heather has sent me an email to ask why her phone give her a camera flashes when the alarm on her phone goes off. She said that the flash light is so bright and disturbs her. This issue begin occurs once she update the phone to the Android 4.3.

See also: How to Fix Recurring Old Download Notifications in Android 4.3 in Samsung Galaxy S3

Apparently, some of users who already updated their phone to the Android 4.3 also encounter the same problem where their phone does the camera flash when the alarm goes off or when receiving an incoming email or calls. Well, it's actually not the "real" problem because it's triggered by the new option under accessibility option called flash notification, so you don't need to worry.


How to get rid camera flashes when the alarm goes off or when receiving new email or calls on Android 4.3?
If you feel bothered with this issue, then below are the steps to fix it:
  1. Go to Settings.
  2. Tap My device.
  3. Tap Accessibility.
  4. Scroll down to find Flash notification option. Check the checkbox next to this option to turn it on and then uncheck the checkbox again to turn it off.
  5. Restart the phone.

As confirmed by Heather, she said that once she done the step above, now her phone's camera no longer flashes whenever the alarm on her phone goes off. So, hope this helps :)

Samsung Galaxy S3: How to Fix Recurring Old Download Notifications

One of the insider has leave her comment here to ask why the notification list in her phone repeatedly shows old downloads and can't be cleared. She realized that this issue occurs once she updated the phone to the Android 4.3. She said that she already done removed all the files in the Download folders through the My files app, but that's not works.

See also: How to Use Notification Bar on Samsung Galaxy S3

Indeed, this issue won't damage the phone, but not actual download notifications sometimes become so annoying. So, if you're also encountering the same problem once you perform update on your phone, then below are some possible methods that you can do to fix them:

Method #1: Clear all download histories in the Download app
The first method that you can do is by clearing all the download histories in the Download app by following the step below:
  1. Go to Apps through the Home screen.
  2. Tap Downloads.
  3. Clear all download histories in the Internet downloads and Other downloads tab by ticking all the box in the left side of the download history, and then tap the Trash can icon to delete all of them.

Method #2: Clear cache and data of the Download app
If the #1 is not works, then try to clear cache and data of the Download app through the Settings menu as listed in the step below:
  1. Go to Settings.
  2. Tap Application manager.
  3. Swipe to the All screen.
  4. Scroll down to find Downloads, then tap it.
  5. Tap Clear cache button.
  6. Tap Clear data button followed by tapping OK button.
  7. Tap Force stop button followed by tapping OK button.
  8. Restart the phone.

Method #3: Clear cache and data of the Download manager
If both of the steps above are not works, then try to follow the steps listed below:
  1. Go to Settings.
  2. Tap Application manager.
  3. Swipe to the All screen.
  4. Scroll down to find Download manager, then tap it.
  5. Tap Clear cache button.
  6. Tap Clear data button followed by tapping OK button.
  7. Tap Force stop button followed by tapping OK button.
  8. Restart the phone.

Well, these are the possible methods that you can do to fix recurring download notification after updating your phone to the Android 4.3. As usual, I didn't include the factory reset as one of methods to fix this problem due to the risks. However, if you know another methods that works to fix this problem, then I'll appreciate if you willing to share them through the comment below :)