Showing posts with label Contacts. Show all posts

Samsung Galaxy S5: How to Make a Call in Android 4.4.2 Kitkat

Making a call is a basic function of a phone thus no wonder if all of the phones always provide a stock Phone/Contacts app to their users so that they can make a call to the required contact with ease. In Samsung Galaxy S5, you're provided with various methods to make a call, ranging from the common methods to the advanced ones.


How to make a call?
Actually, there are various methods that can be used to make a call to the required contact, but in this post we'll learn how to make a call with 6 different methods. each of them has their own advantage so that you can use the one that best suit your need.


Method #1: Entering the number
It's the most common method that you can use to make a call to those you have added to the contacts app or those you have not. See the following steps to do so:
  1. Open Phone app.
  2. If necessary, tap Keypad tab.
  3. Enter the phone number you want to call to. While you're entering the number, you will see prediction above the entered number. You can either tap the prediction or tap to see all matching contacts to select one of them.
  4. Tap to make a call to the entered number.


Method #2: From the Logs or Contacts app
You can use this method to easily make a call to those who have ever called you or have ever been called by you or those you have added to the Contacts app. See the following steps to do so:
  1. Open Phone app.
  2. Tap Logs or Contacts tab.
  3. Tap the required contact you want to call to.
  4. Tap to make a call to the selected contact.


Method #3: From the Favourite
You can use this method to easily make a call to those you have added to the favourite list or to those that you communicate with frequently. See the following steps to do so:
  1. Open Phone app.
  2. Tap Favorites tab.
  3. Tap the required contact you want to call to and the phone will automatically call to the selected contact.


Method #4: Using Easy Call Feature
While you're viewing contacts list in the call logs, favourite contacts list or Contacts app, you can easily call to the required contact simply by swiping the contact from left to the right and the phone will automatically call to the selected contact. If it didn't work, make sure you have enabled the easy call feature in the Phone app settings.


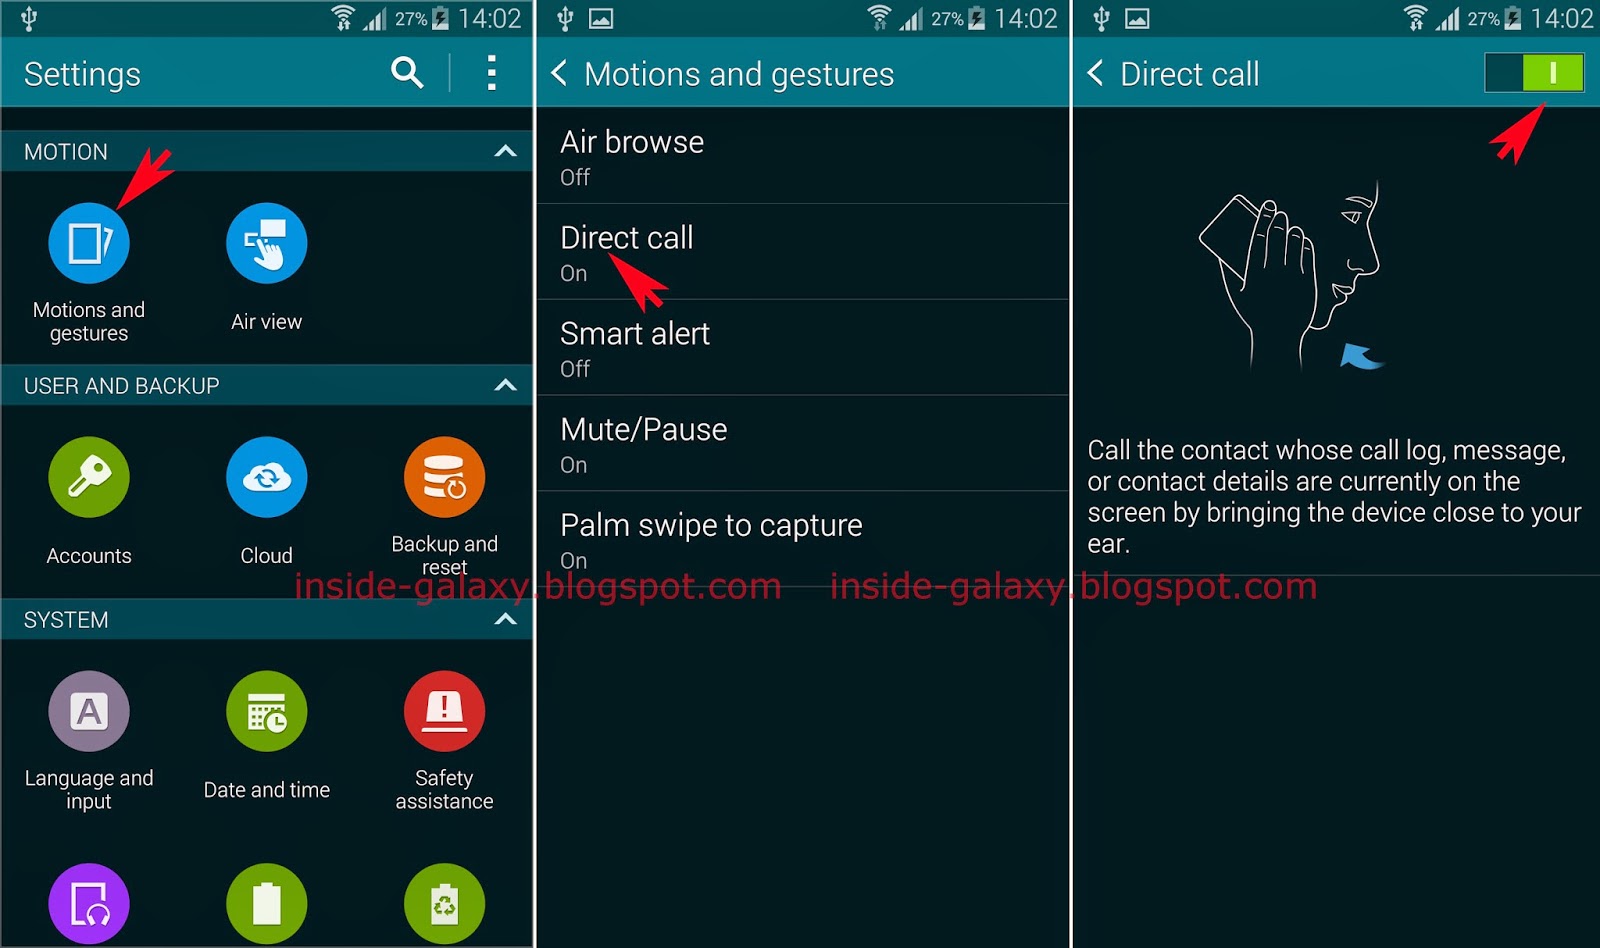
Method #5: Using Direct Call Feature
You can easily make a call to the contacts whose messages, call logs or contacts detail are being displayed on the screen simply by bringing the phone near your ear. Soon after the phone vibrates, it will automatically call the contact. If it didn't work, make sure you have enabled the direct call feature in the settings menu.


Method #6: Using Speed Dial Feature
Speed dial feature lets you assign a contact to a speed dial number and easily call the contact simply by long tapping the speed dial number(if it's multi-digit speed dial number, enter the speed dial number and then long tap the final number) without you have to enter the complete phone number and tap the call icon. In this phone you can add up to 999 speed dial numbers.

Samsung Galaxy S5: How to Enable and Use Easy Call and Easy Text Features in Android 4.4.2 Kitkat

By default, while you're viewing your contacts list, you can easily call or send a message to a particular contact simply by swiping it to the right or to the left. Since it's not a new feature, some of you may have seen or used this feature in other Samsung Galaxy phones. The different is now you're provided with an option which will let you enable or disable this feature.


How to enable or disable easy call and easy text features?
You can do so by using the following steps:
  1. Open Phone app.
  2. Tap or long press the Recent apps key to open up the additional options and then select Settings.
  3. Tap Contacts.
  4. Depending on your current settings, tap Swipe to call or send msg to enable or disable this option. When the checkbox next to this option is checked means the easy call and easy text features are enabled.


How to use easy call and easy text features?
Assuming that you have enabled this feature, then you can use it to make a call or send a message with more easily from your contacts list. See the following steps to do so:
  1. Open Phone app.
  2. Tap Logs or Favourites or Contacts tab.
  3. Making a call with easy call feature:
    • Find the required contact you want to make a call to.
    • Swipe the contact from left to the right to call the contact.
  4. Sending a message with easy text feature:
    • Find the required contact you want to send a message to.
    • Swipe the contact from right to the left to start writing a message to the contact.
    • Send the message when you have finished writing it.

I personally prefer to keep this feature on since for me it's easier to swipe the contact to make a call or send a message while I'm viewing my contacts list than if I have to tap the contact and then tap the small make-a-call/send-message icons. At the first time use you will probably swipe to a wrong direction, but the more you use this feature the less you do the wrong swipe.

Samsung Galaxy S5: How to Enable and Use Direct Call Feature in Android 4.4.2 Kitkat

Direct call is a motion feature that can be found in the Samsung Galaxy S5. This feature lets you easily call those whose logs, messages or contact details are being displayed on the screen simply by bringing your phone near your ear, allows you to make a call without physically touching the call icon.


How to enable or disable the direct call feature?
You can do so by using the following steps:
  1. Swipe down the top of the screen to open up the notification panel and then tap to go to the settings menu.
  2. With the settings menu is displayed in grid view, scroll down to the Motion section and then tap Motions and gestures .
  3. Tap Direct call.
  4. Tap the ON/OFF switch located at the top right corner of the screen to enable or disable direct call feature. When the switch is on the right side or shows green means the direct call feature is enabled.


How to use the direct call feature?
Assuming that you have enabled the direct call feature, then you can use the following methods to make a call using the direct call feature.

Method #1: While reading a message
While you're reading a message from a particular contact, you can easily make a call to that contact with direct call feature by using the following steps:
  1. Open Messaging app.
  2. Tap the required conversation from a particular contact. All messages from that contact are displayed here.
  3. Bring your phone near your ear. Once the phone vibrates, it will automatically call the contact whose message you're reading.

Method #2: While viewing a call log detail
While you're viewing a call log of a particular contact, you can easily make a call to that contact with direct call by using the following steps:
  1. Open Phone app.
  2. Tap Logs tab.
  3. Tap the required call log to view the log detail.
  4. Bring your phone near your ear. Once the phone vibrates, it will automatically call the contact whose log you're viewing.

Method #3: While viewing a contact detail
While you're viewing a contact detail of a particular contact in Contacts app, you can easily make a call to that contact with direct call by using the following steps:
  1. Open Contacts app.
  2. Tap the required contact to view its detail.
  3. Bring your phone near your ear. Once the phone vibrates, it will automatically call the contact whose detail you're viewing.

Looking the function, the direct call feature will be able to provide you an alternative way to make a call with more easily, especially for those of you who want to be able to control the phone without always having to touch it physically. Another good thing about this feature is it doesn't consume a lot of power to run so that you can let this feature remains on without having to worry your battery will be drained out quickly.

Samsung Galaxy S5: How to Enable and Use Priority Senders in Messaging App in Android 4.4.2 Kitkat

Have you ever wasted your time just to find a conversation from particular contact because you had a lot of conversations in Messaging app? Well, though this app has the search function, but some of you may not really like using this feature and prefer to scroll up or down the screen to find a conversation. If that so, you can save yourself and your time by utilizing the priority senders feature. This feature lets you set contacts as priority contacts and display their contacts icon to open up the conversations in the priority senders list so that you can reach them with more easily and quickly, no matter how many conversations you have.


How to enable or disable the priority senders feature in Messaging app?
You can do so by using the following steps:
  1. Open Messaging app.
  2. Tap or long press the Recent apps key to open up the additional options and then select Settings.
  3. Depending on your current settings, tap Priority senders to enable or disable this option. When the checkbox next to this option is ticked means the priority senders feature is enabled and it will be displayed above the conversations list.


How to use the priority senders feature in Messaging app?
If the priority senders is enabled, then you can add contacts to the priority senders list (or delete them if needed) as well as rearrange the contacts so that you can be easier to reach their messages. See the following steps to use the priority senders feature in Messaging app:
  1. Open Messaging app.
  2. Add contacts to the priority senders list.
    You can add up to 25 contacts to the priority senders list by using the following steps:
    • Tap to add contacts to the priority senders.
    • Tap Inbox to add contacts that have ever sent you messages to the priority senders or tap Contacts to add contacts from the Contacts app to the priority senders.
    • Select the required contacts and then tap Done button.
    • The selected contacts will be added to the priority senders list and they will be displayed above the conversations list.
  3. Remove contacts from the priority senders list.
    If necessary, you can remove contacts from the priority senders list by using the following steps:
    • Long tap a contact in the priority senders list.
    • Tap Edit list of priority senders,
    • Tap on the required contacts you want to remove from the list.
    • Tap Done button to save the changes.
  4. Rearrange the contacts in the priority senders list.
    If necessary, you can also change the contacts position in the priority senders list by using the following steps:
    • Long tap a contact in the priority senders list.
    • Tap Edit list of priority senders.
    • Tap and hold a contact and then drag it to the required position.
    • Release to place the contact in the new position.
    • Tap Done button to save the changes.

When you have added some contacts to the priority senders, you can easily and quickly reach them to send a message or read/reply/forward a message simply by tapping the contact icon in the priority senders list. Therefore, this feature will be more useful if you add your important/favourite contacts to the priority senders so that you can save your time by skipping the scroll up/down the screen section just to find the conversation.

Samsung Galaxy S4: 4 Methods to Send a Message

Given send a message is one of the most common method used by the users to communicate with others, no wonder if Samsung Galaxy SIV has provided the stock Messaging app to facilitate their user when they want to send a message. In this phone, you're also presented with some methods to send a message which you can choose the best one suit your need.


4 Methods to send a message
From what I've known, there are four methods available that you can use to send a message. You can see them below:


Method #1: Send a message from Messaging app
This is the basic method usually used by the user to send a message. You can compose a new message directly from the stock Messaging app.
See also: How to Create and Send SMS or MMS in the Samsung Galaxy S4


Method #2: Send a message from Call Log
Best use this method to send a message to a contact in the recent call or missed call. Here are the steps:
  1. Open Phone app.
  2. Tap Logs tab. All of your call histories will be displayed here.
  3. Tap the desired contact you wish to send a message with.
  4. Tap the Yellow closed-envelope icon to create new message to the selected contact.
  5. Type your message in the Enter message field.
  6. If necessary, you can also attach file into your message by tapping the Attachment button and then select a file type and select the desired file you wish to attach.
  7. Tap Send button to send the message.


Method #3: Send a message from Contacts app
This method will facilitate you to send a message to a contact you've added to the Contacts app. Here are the steps:
  1. Open Contacts app.
  2. Tap the desired contact you wish to send a message with, or you can also search for certain contact by entering the contact's name or number in the Search field. All matching contacts will be displayed. Tap the desired contact to display the contact details.
  3. Tap the Yellow closed-envelope icon to send message to the selected contact.
  4. Type your message in the Enter message field.
  5. If necessary, you can also attach file into your message by tapping the Attachment button and then select a file type and select the desired file you wish to attach.
  6. Tap Send button to send the message.


Method #4: Send a message using easy text feature
This method will allow you to access the create new message screen by using a single gesture in any contact list(call log, Contact app, favourite contact). Here are the steps:
  1. Open Contacts app or Call log or Favourite contact list where you can see the contact list.
  2. Swipe the desired contact from right to the left.
  3. You'll be automatically redirected to the create new message screen.
  4. Type your message in the Enter message field.
  5. If necessary, you can also attach file into your message by tapping the Attachment button and then select a file type and select the desired file you wish to attach.
  6. Tap Send button to send the message.

Each method has their own advantage, so by knowing all available methods to send a message, now you can choose which one that best suit your need in order to help you to be able to send a message more faster and easier.

Samsung Galaxy S4: How to Block Unwanted or Unknown Text Messages

I believe most of phone's users have been choosing a message as one of their favourite method to communicate with others. That's why no wonder if most of smartphones available today--including with the Samsung Galaxy SIV--have provided the stock Messaging app for their users, so the user will be more easier if they want to send or receive a message in their phone without having to install the app first.

See also: How to Create and Send SMS or MMS in the Samsung Galaxy S4

Aside from sending and receiving a message, the stock Messaging app also allows you to block text messages from certain contact matches with the criteria you've specified before, block text messages contain with certain phrase as well as block text messages from unknown senders. This of course will help you to keep your inbox clean from those unwanted or unknown text messages.


How to add or remove a contact in the spam number list?
If you wish to block or unblock text message from certain contact, you can do so by following the step below:
  1. Open Messaging app.
  2. Tap the Menu key then select Settings.
  3. Scroll down to the Spam message settings section.
  4. Tick the box next to Spam settings to enable block text message feature.
  5. Tap Add to spam numbers.
  6. Tap Add button.
  7. Tap Match criteria. Here you'll see four options available, they are:
    • Exactly the same as: this option allows you to enter the full phone number you wish to block.
    • Starts with: this option allows you to enter the beginning of the phone number you wish to block.
    • Ends with: this option allows you to enter the end of the phone number you wish to block.
    • Includes: this option allows you to enter a part of the phone number you wish to block.
  8. Type the phone number in the Enter number field according to the match criteria you've just selected. Or, tap the Contact icon to pick up the desired contact you wish to block from Logs or Contacts app.
  9. Tap Save button.
  10. All phone numbers and criteria you have added will be listed below the Add button.
  11. To unblock blocked phone number or criteria, long tap the desired phone number or criteria and then select Delete. This will remove the selected blocked number or criteria from the spam number list.


How to add or remove a phrases in the spam phrase list?
If you wish to block text messages contain certain phrase, you can do so by following the step below:
  1. Open Messaging app.
  2. Tap the Menu key then select Settings.
  3. Scroll down to the Spam message settings section.
  4. Tick the box next to Spam settings to enable block text message feature.
  5. Tap Add to spam phrases.
  6. Tap Add button.
  7. Enter a phrase you wish to block in the Enter text field. FYI, it's a case sensitive so it'll different if you type "Dear" with "dear".
  8. Tap Save button followed by tapping OK button to confirm.
  9. All blocked phrases will be listed below the Add button.
  10. To unblock blocked phrase, long tap the desired phrase and then select Delete. This will remove the selected phrase from the spam phrase list.

How to block text message from unknown sender?
If you wish to block text message from contacts you haven't added to your Contacts app, you can do so by following the step below:
  1. Open Messaging app.
  2. Tap the Menu key then select Settings.
  3. Scroll down to the Spam message settings section.
  4. Tick the box next to Spam settings to enable block text message feature.
  5. Tick the box next to Block unknown senders.


How to see all blocked messages?
Below are the step to do so:
  1. Open Messaging app.
  2. Tap the Menu key then select Spam messages. All blocked messages will be displayed here.

FYI, you won't receive a notification or message tone when a blocked message is received. They will be redirected to the spam message folder so your inbox will stay clean and you won't lose any received message. But, if you wish to block text messages without log, I believe that there's should be an app available in the Google Play Store which has a feature to do so.

Samsung Galaxy S4: How to Change Message Tone with Three Easy Ways

I believe that send a message has been being one of the most favourite way to communicate with others for most of phone's user, including with the Samsung Galaxy SIV users. That's why, this phone has included the stock Messaging app as one of pre-installed app in order to facilitate their user when they want to send a message. With this app, you're allowed to send text message or multimedia message.

See also: How to Create and Send SMS or MMS in the Samsung Galaxy S4

Aside from sending messages, the stock Messaging app also allows you to receive incoming messages, either text or multimedia messages. To make you more easier to know that you have incoming message, you can change the message tone as your wish. In this phone, you're allowed to assign default message tone for all incoming messages as well as assigning different message tone for certain contact.


How to change message tone?
For the record, make sure your phone is not being in the silent mode. Well, generally, there are 3 methods available that you can use to change message tone as listed below.


Method #1: From the Settings menu
By default, Messaging app is using the value of the default notification sound as message tone. So, if you have not changed the settings in the Messaging app and assigned individual message tone in particular contact, then you can use the steps below to change the message tone for all incoming messages:
  1. Go to Settings.
  2. Tap My device tab.
  3. Tap Sound.
  4. Tap Default Notification sound.
  5. Select the desired message tone from the list.
  6. Tap OK button.
  7. The default notification sound has changed.


Method #2: From the Messaging app
Use this method if you wish to use different message tone from the default notification sound for all incoming messages, but it'll not applied for the particular contact that have assigned for individual message tone. Well, below the steps to change the message tone from the Messaging app:
  1. Open Messaging app.
  2. Tap the Menu key and then select Settings.
  3. Scroll down to find Notification settings section.
  4. Tick the box next to Notifications to enable this option. Enable this option will make the phone play sound and show icon in status bar when you receive a new message.
  5. Tap Select ringtone.
  6. By default, the phone uses default ringtone which mean the Messaging app will use the ringtone you have assigned in the default notification sound as mentioned in method #1. If you wish to use different message tone, you can do so by selecting the desired message tone you wish to use from the list.
  7. Tap OK button.
  8. The Message tone has changed.


Method #3: From the Contacts app
Use this method if you wish to use different message tone for the particular contact. Below are the steps to assign message tone for particular contact:
  1. Open Contacts.
  2. Tap the desired contact you wish to change its message tone.
  3. Tap Edit button.
  4. Scroll down to find Message alert, and then tap it.
  5. By default, the Contacts app uses default ringtone which means when you receive a new message from the contacts listed in the Contacts app, the phone will play sound you have assigned in the default notification sound as mentioned in method #1. If you wish to use different message tone for the selected contact, you can do so by selecting the desired message tone you wish to use from the list.
  6. Tap OK button.
  7. Tap Save button.
  8. The different ringtone has assigned in the selected contact.

By knowing these steps, now you can assign the message tone for incoming messages from all contacts or from particular contact.

Samsung Galaxy S4: How to Change Ringtone with Two Easy Ways

Samsung Galaxy SIV users usually have lot of contacts in their Contacts app. However, add all contacts to the Contacts app will be able to help you to organize and customizing them per your wish. When you're adding a contact, you're allowed to do some customizations, such as add photo to a contact, assign an individual ringtone and else by utilizing provided options.

See also: How to Add New Contact in Contacts App in the Samsung Galaxy S4

By assigning an individual ringtone in certain contact, when he calls you, the phone will ring the individual ringtone you have assigned for him previously. While for other contacts that not assigned with the individual ringtone, you can assign a default ringtone for them through the Settings menu or the Phone app.


How to set default ringtone?
To make it works, make sure you're not in the silent mode and the volume has adjusted well by pressing the Volume up key.
Method #1: From the Settings menu
  1. Go to Settings.
  2. Tap My device tab.
  3. Tap Sound.
  4. Tap Ringtones.
  5. To select ringtone from the Samsung default ringtone go to the step #6, while to use your own music/mp3 file go to the step #7.
  6. Use Samsung default ringtone:
    • Select the desired ringtone you wish to use from the ringtone list.
    • Tap OK button.
    • Every time you receive a call, the phone will ring the selected ringtone.
  7. Use your own music or mp3 file as default ringtone:
    • Tap Add button.
    • Tap Sound picker to pick a song from the music player app.
    • Select the desired song you wish to use.
    • Tap Done button.
    • Every time you receive a call, the phone will ring the selected music/mp3 file.


Method #2: From the Phone app
  1. Open Phone app.
  2. Tap the Menu key and then select Call settings.
  3. Scroll down to find Ringtone and sound settings section, and then tap Ringtones and keypad tones.
  4. Tap Ringtones.
  5. To select ringtone from the Samsung default ringtone go to the step #6, while to use your own music/mp3 file go to the step #7.
  6. Use Samsung default ringtone:
    • Select the desired ringtone you wish to use from the ringtone list.
    • Tap OK button.
    • Every time you receive a call, the phone will ring the selected ringtone.
  7. Use your own music or mp3 file as default ringtone:
    • Tap Add button.
    • Tap Sound picker to pick a song from the music player app.
    • Select the desired song you wish to use.
    • Tap Done button.
    • Every time you receive a call, the phone will ring the selected music/mp3 file.

FYI, the step above will be applied for incoming calls from all contacts, either from those who have added in Contacts app or those who have not, except from those who have assigned with the individual ringtone.

Samsung Galaxy S4: How to Block Unwanted or Unknown Incoming Calls

Most of smartphone available today has equipped with lot of advanced features which will allow the user to do more activities with their phone. However, basic activities such as making calls remains one of the most frequently done by the users. It's probably the reason why most of them--including with the Samsung Galaxy SIV--provide the stock Phone app and Contacts app inside them. Both of these apps of course will be able to facilitate the users when they want to make a call.

See also: How to Make a calls in Samsung Galaxy S4

Aside from make a call, you can also receive incoming calls in this phone. Even by utilizing the auto reject call feature, you're able to set your phone to block incoming calls from unwanted or unknown contacts or from contacts that match with the criteria that you have previously set in the auto reject list.


How to enable and set up auto reject call feature?
As a note, it will not work to block calls from private numbers or from internet/VoIP calls. Well, here are the steps to do so:
  1. Go to Settings> tap My Device tab> tap Call. Or, Open Phone app> tap the Menu key> tap Call settings.
  2. Tap Call rejection.
  3. Tap Auto reject mode. Here you'll see 3 options available, they are:
    • Off: select this option to turn off auto reject call feature.
    • All numbers: select this options if you wish to block incoming calls from all contacts listed in the Contacts app.
    • Auto reject numbers: select this option if you wish to block incoming calls from contacts or contacts that match with the criteria you have added in the auto reject list.
  4. In this case, select Auto reject numbers.
  5. Tap Auto reject list.
  6. Tick the box next to Unknown option to block incoming calls from contacts that not listed in the Contacts app.
  7. Tap Create to add number or criteria to the auto reject list.
  8. Tap Match criteria. Here you'll see 4 options available, they're:
    • Exactly the same as: select this option if you wish to block call from the contact which is exactly the same as the contact you have added in the reject list. To see the complete steps, go to the step #9.
    • Starts with: select this option if you wish to block call from contact that start with the number you have added in the reject list. To see the complete steps, go to the step #10.
    • Ends with: select this option if you wish to block call from contact that end with the number you have added in the reject list. To see the complete steps, go to the step #11.
    • Includes: select this option if you wish to block call from contact containing with the number you have added in the reject list. To see the complete steps, go to the step #12.
  9. To block call from certain phone number:
    • Select Exactly the same as.
    • Enter a full phone number in the Enter number field or you can also tap the Contact icon to pick up the desired contact you wish to block, either from Logs or Contacts app.
    • Tap Save button to add the phone number or contact to the reject list.
    • Incoming call from this number or contact will be rejected.
  10. To block call from contact which start with certain number:
    • Select Starts with.
    • Enter the number, eg: 0034
    • Tap Save button to add the criteria to the reject list.
    • All incoming call from the contact which is start with 0034 will be rejected.
  11. To block call from contact which is end with certain number:
    • Select Ends with.
    • Enter the number, eg: 1166
    • Tap Save button to add the criteria to the reject list.
    • All incoming call from the contact which is end with 1166 will be rejected.
  12. To block call from contact which is contain certain number:
    • Select Includes.
    • Enter the number, eg: 5678
    • Tap Save button to add the criteria to the reject list.
    • All incoming call from the contact which is contain with 0034 will be rejected.
  13. You can see all blocked phone numbers or contacts as well as the criteria you have made in the auto reject call list.

After activating the auto reject mode and adding contacts in the auto reject list as well as making criteria for contacts you wish to block, all incoming call from them will be blocked or redirected to your voice mail if you activate it. FYI, You still be able to see the call log from the blocked contact in the call logs and they will be labelled with the rejected call icon .

Samsung Galaxy S4: How to Make a Call

Make a call is the most common method used by the users to communicate with others. That's why most of smartphone available today--including with the Samsung Galaxy SIV-- provide a Phone app as one of stock app to facilitate the user when they want to make a call. In this phone, you can also make a call with several methods available.


Six methods to make a call
Well, there are 6 methods available that the user can do to make a call, either with or without using the existing features. You can see them below:
Method #1: Make a call from Phone app
This is the basic method usually used by the user to make a call. Here are the steps:
  1. Open Phone app.
  2. Enter the phone number using the on-screen keypad. While you're entering the phone number, all the matching contacts will be displayed above the keypad. Tap the contact to display the complete phone number.
  3. Tap Call icon.
  4. Tap End call icon to end the call.

Method #2: Make a call from call log/call history
This method is best used to call back the recent calls or missed calls. Here are the steps:
  1. Open Phone app.
  2. Tap Logs tab. All your call histories will be displayed here.
  3. Tap the desired contact you wish to call.
  4. Tap Call icon.
  5. Tap End call icon to end the call.

Method #3: Make a call from Contacts app
This method will allow you to easily call a contact that has been added in the Contacts app. Here are the steps:
  1. Open Contacts app.
  2. Tap the desired contact you wish to call, or you can also search for certain contact by entering the contact's name or number in the Search field. All the matching contacts will be displayed. Tap the contact to display the contact details.
  3. Tap Call icon.
  4. Tap End call icon to end the call.

Method #4: Make a call using easy call feature
This feature will allow you to easily call a contact in Contact app simply by using a single gesture. Here are the steps:
  1. Open Contacts app.
  2. Swipe the desired contact from left to the right.
  3. The phone will automatically dial the contact.
  4. Tap End call icon to end the call.

Method #5: Make a call using direct call feature
This feature will allow you to make a call to the contact detail currently displayed in the screen (in the message, call log, favourites, groups or Contacts app) by holding the phone near to your ear. First, you need to enable the direct call feature to be able to use this method. Here are the steps:
  1. Go to Settings.
  2. Tap My device tab.
  3. Tap Motions and gestures.
  4. Enable Motion by sliding the switch next to the option to the right.
  5. Tap Motion.
  6. Enable Direct call by sliding the switch next to the option to the right.
  7. Now open a detail call log, or open a message or open a contact detail which will display the phone number of certain contact.
  8. Hold the phone near your ear. The phone will automatically dialed the number currently displayed in the screen.
  9. Tap End call icon to end the call.

Method #6: Make a call using speed dial feature
This feature will allow you to assign up to 8 contacts to the speed dial key which will make you more easier and faster when you want to call them later. Long press the desired speed dial key and the phone will automatically dial the contact which you have set previously in the speed dial key.
See also: How to Assign, Edit and Use Speed Dial in Samsung Galaxy S4


By knowing all of methods mentioned above, now you can make calls using the method that best suits your needs.

Samsung Galaxy S4: How to Set Up, Edit and Use Speed Dial Contacts

One of the reason why the Samsung Galaxy SIV users add their contacts to the Contacts app is to facilitate them when they want to use certain contact later, for instance when they want to make a call.

See also: How to Add New Contact in Contacts App in the Samsung Galaxy S4

Well, you may have lot of contacts stored in the Contacts app, but generally you have some favourite contacts or the most frequently dialed contacts. Instead of do search for certain contact in Contacts app or enter the phone number in Phone app, you can assign up to 8 contacts for speed dial so you can call them more faster and easier.


How to assign a contact to a speed dial key?
Below are the steps to do so:
  1. Open Phone app then tap Keypad tab.
  2. Tap the Menu key then select Speed dial setting.
  3. Here you'll see 9 speed dial keys which you can assign for the speed dial number(except the number 1 key because it's usually have assigned by default for the voice mail).
  4. Tap the speed dial key you wish to use.
  5. Select the desired contact.
  6. The selected contact will be assigned in the selected speed dial key.
  7. To assign another available speed dial key, repeat from the step #4.


How to edit speed dial key?
If you have accidentally made a mistake when assigning certain contact on speed dial setting and want to replace with the correct one or even want to remove them, then you can do so by following the steps below:
  1. Open Phone app then tap Keypad tab.
  2. Tap the Menu key then select Speed dial setting.
  3. Long tap the desired speed dial key you wish to edit.
  4. You'll see two options available in the pop up menu, they are:
    • Replace: select this option if you wish to replace current contact in the speed dial key with the new one.
    • Remove: select this option if you wish to remove current contact from the speed dial key.

How to use speed dial?
After assigning certain contact in the speed dial key, now you can call them easily by following the steps below:
  1. Open Phone app.
  2. Tap the Keypad tab.
  3. Tap and hold the required speed dial key until the contact number you've set previously dialed.

Given the advantage of this feature, then it'll more useful if you assign the important or favourite contacts in the speed dial setting so you'll be much more easier and faster when you want to call them.

Samsung Galaxy S4: How to Delete Contact in Contacts App

Nowadays, almost every one has their own phones to communicate with others, either by making a call or sending a message. Due to that reason, save all of your contacts are a needed thing that you should do to facilitate you when you want to use them later. Luckily, Samsung Galaxy SIV has provided the stock Contacts app which will allow you to easily add all of your contacts and do some customizations on them.

See also: How to Add New Contact in Contacts App in the Samsung Galaxy S4

Nevertheless, in certain condition you may want to delete a single or multiple contacts when you no longer want to keep them or even deleting all of your contact list when you want to sell the phone or send the phone back to the service center to get a fix or replacement.


How to remove contact?
To do so, kindly follow the steps listed below:
  1. Open Contacts app. All your contact list will be displayed.
  2. To delete a single contact go to the step #3, to delete multiple contacts go to the step #4, while to delete all contacts go to the step #5.
  3. Delete a single contact:
    • Long tap the desired contact you wish to delete.
    • In pop up menu select Delete.
    • Tap OK button.
    • The selected contact will be deleted.
  4. Delete multiple contacts:
    • Tap the Menu key then select Delete.
    • Tick the box next to the desired contacts you wish to delete.
    • Tap Delete button.
    • Tap OK button.
    • All selected contacts will be deleted.
  5. Delete all contacts:
    • Tap the Menu key then select Delete.
    • Tick the box next to the Select all option to select all of your contacts.
    • Tap Delete button.
    • Tap OK button.
    • All of your contact list will be deleted.

By knowing how to remove contact in Contacts app, now you can easily delete a single, multiple or even all of your contacts according to your situation and need.

Samsung Galaxy S4: How to Import or Export Contacts in Contacts App

Add all of your contacts in the Contacts app is the best way to facilitate you to organize them and make you more easier when you want to use them later, such as make a call or send a message. No more worries about forgetting phone number of the certain person you wish to call/text with. Moreover, if you add the new contacts to the phone memory, you'll be provided with more options to customize them, such as add photo to contact, assign different ringtone for each contact, add multiple phone numbers, etc.

See also: How to Add New Contact in the Contacts App in the Samsung Galaxy S4

Aside from add the new contacts, the Contacts app also lets you easily copy contacts by utilizing the import/export option available in this app. Here, you're allowed to import contact file you saved in the internal storage or SD card as well as to import the SIM card contact to the phonebook. And, you're also allowed to export your contact list to the internal storage or SD card as contact file as well as to export the contact list to the SIM card.


How to import or export contacts?
Below are the steps to do so:
  1. Open Contacts app.
  2. Tap the Menu key and then select Import/Export.
  3. Here you can see some import/export options available. They are:
    • Import from USB storage: Select this option to import contact file (.vcf) you saved in the internal storage to the phonebook. To see the detail steps, go to the step #4.
    • Export to USB storage: Select this option to export contact list as .vcf file and then save it to the internal storage. To see the detail steps, go to the step #5.
    • Import from SD card: This option will available if you attach a SD card on your phone. Select this option to import contact file (.vcf) you saved in the SD card to the phonebook. To see the detail steps, go to the step #6.
    • Export to SD card: This option will available if you attach a SD card on your phone. Select this option to export contact list as .vcf file and then save it to the SD card. To see the detail steps, go to the step #7.
    • Import from SIM card: This option will available if you attach a SIM card on your phone. Select this option to import SIM card contacts to the phonebook. To see the detail steps, go to the step #8.
    • Export to SIM card: This option will available if you attach a SIM card on your phone. Select this option to export contacts to the SIM card. To see the detail steps, go to the step #9.
  4. Import contact from internal storage:
    • Select Import from USB storage.
    • Tap Device.
    • Here you'll see three option available which you can choose the best one suit your needs: Import one vCard file to import a single .vcf file, Import multiple vCard files to import some .vcf files and Import all vCard files to import all .vcf files available in the internal storage.
    • Tap OK button.
    • Select vCard file you wish to import.
    • Tap OK button.
    • The selected .vcf file will be imported shortly.
  5. Export contact to internal storage:
    • Select Export to USB storage.
    • Tap OK button.
    • Your contact list will be exported as .vcf file and will be saved into the "/storage/emulated/0/Contacts_xxx.vcf".
  6. Import contact from SD card:
    • Select Import from SD card.
    • Tap Device.
    • Here you'll see three option available which you can choose the best one suit your needs: Import one vCard file to import a single .vcf file, Import multiple vCard files to import some .vcf files and Import all vCard files to import all .vcf files available in the SD card.
    • Tap OK button.
    • Select vCard file you wish to import.
    • Tap OK button.
    • The selected .vcf file will be imported shortly.
  7. Export contact to SD card:
    • Select Export to SD card.
    • Tap OK button.
    • Your contact list will be exported as .vcf file and will be saved into the "/storage/extSdcard/Contacts_xxx.vcf".
  8. Import contact from SIM card:
    • Select Import from SIM card.
    • Tap Device.
    • Select the desired SIM card contact you wish to import by ticking the box in the left side of each contact, or tick the box in the left side of Select all option to import all of your SIM card contacts to the phonebook.
    • Tap Done button.
    • The selected contacts will be imported shortly.
  9. Export contact to SIM card:
    • Select Export to SIM card.
    • Select the desired contact you wish to import by ticking the box in the left side of each contact, or tick the box in the left side of Select all option to import all of your contacts to the SIM card.
    • Tap Done button.
    • Tap OK button.
    • The selected contacts will be exported shortly to the SIM card.
    • FYI, due to the limitation of the SIM card, only the contact's name and the default phone number which will be saved in the SIM card.

The available options under the import and export menu in the Contacts app of course will be able to help you to manage, backup or copy contacts. If you wish to add contact from another sources, you can utilize the import option. While, if you wish to backup or want to copy your contact list to another phone, you can utilize the export option. Well, hope this helps :)

Samsung Galaxy S4: How to Add New Contact in the Contacts App

Contacts app is one of pre-installed apps in the Samsung Galaxy SIV that you can use to organize all your contacts. This app will allow you to add new contact to make you more easier if you want to use them later, such as when you want to make a call or send a message. In addition, the contact's information you have entered will also be used by other applications to facilitate your activities, such as the Messaging app will use the contact info to identify incoming text messages or the Phone app will use the contact information to identify incoming calls, etc..


How to add new contact in the Contacts App?
As the example, we'll save the new contact to the phone memory because it'll provide more option to customize contact. Well, here are the steps to do so:
  1. Open Contacts app.
  2. Tap the Plus button in the right side of the search field to add new contact.
  3. Tap the Name field and then type the contact's name.
  4. To add photo to contact:
    • Tap the contact's picture box in the left side of the Name field.
    • You'll see some options available which you can use to select from where you wish to pick up the picture you wish to use as contact's picture, they are: Image(Gallery app), Pictures by people(tagged people in pictures), Take picture(take the picture using Camera app), or S Memo.
    • If necessary, you can crop the picture.
    • Tap the Done button.
    • The selected picture will be applied as the contact's picture.
  5. Tap the Phone number field and then type the contact's phone number.
  6. If necessary, tap the Email address field and then type the contact's email address.
  7. If necessary, tap Groups to add this contact into the existing group or to the new group.
  8. To assign ringtone:
    • Tap Ringtone.
    • Select the desired ringtone you wish to use.
    • Tap OK button.
  9. To assign message tone:
    • Tap Message alert.
    • Select the desired message alert you wish to use.
    • Tap OK button.
  10. To change vibration pattern:
    • Tap Vibration pattern.
    • Select vibration pattern you wish to use.
    • Tap OK button.
  11. If necessary, you may also add additional information for the contact by tapping the Add another field button, such as Phonetic name, Organisation, etc.
  12. Tap Save button to save the contact.

After you add all of your contacts into the Contacts app, now you can make a call or send a message to the desired contact easily without having to worry about forgetting a phone number or other contact info.

Samsung Galaxy S3: How to Sync with Blackberry Contacts

Before Android smartphones dominate the market, you may have been familiar with the Blackberry smartphone. The ability to send and receive email at that time, as well as the Blackberry Messenger services (BBM) make this smartphone to get their own place. Now, when the smartphone market flooded with Android phones, lot of Blackberry users decide to migrate to Android smartphone, including the Samsung Galaxy SIII.

If you are one of Blackberry users who decide to migrate to the Samsung Galaxy SIII, you might also want to migrate the data from your Blackberry to your shiny Samsung Galaxy SIII. One of the important data you might want to migrate is the contacts. Luckily, you can easily transfer your Blackberry contacts to your new Samsung Galaxy SIII.


How to transfer Blackberry contacts to Samsung Galaxy S3?
Basically, there are 3 steps you need to do, first of all you need to export contacts from your Blackberry as .csv file, import .csv file into Gmail contacts and followed by syncing them with your phone. Well, here they are:
Export Blackberry contacts
  1. On your computer or laptop, open the Blackberry desktop software and connect the device.
  2. Click Organizer menu in the left side of the screen.
  3. Click the Configure settings button.
  4. On the pop-up window select the Address Book option , then in the following pop up windows select ASCII exporter/importer option to generate .csv contact files as this type of file is allowed to import on the Gmail contacts.
  5. Select One way sync from device, then save the file with .csv extension to export the contact to .csv file. Select the files as the targets and the setup will finish.
  6. Now you'll see in the Organizer menu the checkbox in the left side of the Address Book option is ticked.
  7. Click the Sync button located at the bottom right corner to start exporting.
  8. Click Yes button to confirm exporting contacts.
  9. The app will count the number of contact being exported, if the number is correct then click the Yes button to finish exporting.

Import exported .csv file into Gmail contacts
  1. On your computer launch the web browser by clicking the browser icon on the desktop or access it through the Start button then all programs.
  2. On the browser address bar type gmail.com to navigate to Gmail and then sign in using your Google account associated with your device.
  3. On your Gmail, click Contacts.
  4. Click More.
  5. In the drop down menu select Import.
  6. Click Choose File to select the .csv file that you've just exported from your Blackberry.
  7. Click the Import button.
  8. Finish. Now, the .csv file has been imported into your Gmail contacts.
  9. Sign out from gmail.com

Sync Gmail contacts with the Samsung Galaxy S3
  1. On your Galaxy SIII, go to Apps through Home screen.
  2. Scroll to Settings, then tap on it.
  3. Tap Accounts and sync.
  4. Tap your Google account.
  5. Here you can choose what you would like to sync by ticking the checkbox next to the option or you can tick all the options displayed on your screen, then tap Sync now button to synchronize the contacts.
  6. Finish. Now your imported contacts Blackberry has been synced with your Galaxy SIII.
  7. If you have not activated your Google account on your phone, then you need to activate it first to allow your phone to sync your phone with your Gmail contacts.
    See also: How to Activate Google Account on Samsung Galaxy S3

Well, by knowing these steps, now you can easily transfer your Blackberry contacts to your Samsung Galaxy SIII. So, hope this helps :)

Samsung Galaxy S3: How to Sync with iPhone Contacts

Samsung Galaxy SIII is a great Android-based smartphone which offering modern looks and advanced features for their users. That's why no wonder if so many people end up deciding to choose this phone as their devices. Even, there are some cross-platform smartphone users, such as the iPhone users from Apple whom decided to switch to use the Samsung Galaxy SIII.

Well, if you're one of them, while you use iPhone as your device, you might have been familiar to use iCloud to backup your data, including your iPhone contacts. The good news, you can easily transfer your iPhone contacts that you already backup to iCloud to your Samsung Galaxy SIII .


How to transfer iPhone contacts from iCloud to your Samsung Galaxy S3?
First you need to export your iPhone contact as .vrf file then import this file into your Gmail contacts followed by syncing them with your phone. Well, here are the steps to do so:
On your PC or laptop
  1. Launch web browser by clicking the Browser icon on the desktop or access it through Start button then All program.
  2. On the browser address bar type icloud.com to navigate to iCloud and then sign in using your Apple ID.
  3. Select Contacts.
  4. Click the Settings (cogwheel) icon located at the bottom left corner.
  5. On the pop up menu select the Select All option.
  6. Click the Settings (cogwheel) icon again and then on the pop up menu select Export to export contacts into a .vrf file.
  7. Sign out from icloud.com
  8. Now, in the browser address bar type gmail.com to navigate to Gmail and then sign in using your Google account associated with your device.
  9. On your Gmail, click Contacts.
  10. Click More.
  11. In the drop down menu select Import.
  12. Click Choose File to select the .vrf file that you've just exported from iCloud.
  13. Click the Import button.
  14. Finish. Now, the .vrf file has been imported into your Gmail contacts.
  15. Sign out from gmail.com

On your Samsung Galaxy S3
Follow the steps listed below to sync your Gmail contacts with your phone:
  1. Go to Settings.
  2. Tap Accounts and sync.
  3. Tap your Google account.
  4. Here you can choose what would you like to sync by ticking the checkbox next to the option or you can tick all the options displayed on your screen, then tap Sync now button to synchronize the contacts.
  5. Finish. Now your imported iPhone contacts has been synced with your Galaxy SIII.
  6. If you have not activated your Google account on your phone, then you need to activate it first to allow your phone to sync your Gmail contacts with your phone.
    See also: How to Activate Google Account on Samsung Galaxy S3

Well, after knowing the steps as mentioned above, now you can easily import your saved iPhone contacts in iCloud to your shiny Samsung Galaxy SIII. So, hope this helps :)

Samsung Galaxy S3: How to Add Photo to Contact

In Samsung Galaxy S3 you can easily add new contact to stay keep in touch with them through My People app or directly trough your Contacts app then saved it to your SIM or phone storage.

See also: How to Add Contact on Samsung Galaxy S3

Here you can also add photo to the required contact to personalize them. But, you should remember that you can do this only with the contact that you've saved on your phone, not the SIM. Well, there are two ways you can do to assign a photo to the contact: through Contacts app or through Gallery app.


How to add photo to contact through Contacts app?
Here are the steps you need to do if you want to set photo to contact through Contact app:
  1. Go to Apps through Home screen.
  2. Tap Contacts.
  3. Tap the required contact you wish to add a photo.
  4. Tap the Edit icon to edit the contact.
  5. Tap on the blank contact image.
  6. Now you will see two options available on pop up menu. They are:
    • Image: Select this option if you want to use image from your Gallery as photo contact.
    • Take picture: Select this option if you want to take the picture using camera then use it as photo contact.
  7. Tap Done button.
  8. Tap Home button to return to the standby mode.
  9. Finish. Now you have managed to add photo to the selected contact through Contacts app.

How to add photo to contact through Gallery app?
While if you want to set photo to contact through Gallery app, then kindly follow the steps listed below:
  1. Go to Apps through Home screen.
  2. Tap Gallery.
  3. Go to the required folder where you save the photo you want to add to contact.
  4. Tap the required photo.
  5. Tap the Menu key.
  6. On pop up menu select Set as.
  7. Tap Contact Photo.
  8. Tap the required contact you wish to add its photo.
  9. Tap Done button.
  10. Tap Home button to return to the standby mode.
  11. Finish. Now you have managed to add photo to the selected contact through Gallery apps.

By knowing how to add photo to contact in two different methods, now you can do it using one of the methods mentioned above that best suits you. So, hope it helps :)

Edited: Nov, 3rd 2013

Samsung Galaxy S3 : How to Assign Different Message Tone in Different Contact

Some insiders asked me through the comments they leave in a couple of articles on this blog about how to set a different message tone for each contact so they could hearing a different message tone when receiving an incoming message from different contact. Unfortunately the stock messaging app on the Samsung Galaxy SIII does not provide the option to do so, you can only set the same message tone for all contacts.

See also: How to Change the Message Tone on Samsung Galaxy S3

Well, let's thanks to the Google Play Store as the official market for Android phones which provide you many choices of the applications to fill the shortage in stock applications. For example, in this case you can set a different message tone for each contact using a third-party messaging apps that you can get on the Play Store .


How to set different message tone for each contact?
As an example, we will use the Handcent SMS app to do so:
  1. Download install Handcent SMS app through the Play Store.
  2. Once the installation is completed, launch the app.
  3. All the conversation in the stock messaging app will be automatically retrieved on this app.
  4. Tap the desired message from certain contact you wish to change the message tone.
  5. Tap the Menu key then select Personalization.
  6. Tap Notification settings.
  7. Tap Notification sound.
  8. Select the desired message tone, either from the default tones or from your own music or tones.
  9. Tap OK button to save the changes.

So simple to do, right? Now, you can easily assign different message tone on each contact. As a note, you can only set the message tone to a contact who has been sent you a message. So, hope this helps :)

Samsung Galaxy S3: How to Dial and Save a Recent Call or Number

You can view the call histories on the Samsung Galaxy SIII through the call log menu in the Phone app. Here you can see a list of incoming calls, outgoing calls and missed calls. You can either redial, save the phone numbers or may remove some or all of the existing call logs.

See also : How to Delete Call Logs on Samsung Galaxy S3

Well, as we have known the way to remove the call logs in the previous post --you can see the steps in the link above-- then in this post we will learn about how to dial and/or save the recent call or number to the phone book, either as new contact or to update an existing contact.


How to dial a recent call or number?
To do so, kindly follow the steps listed below:
  1. Open Phone app.
  2. Tap the Logs tab.
  3. Here you can see a list of recent calls.
  4. Tap the desired contact or phone numbers you wish to dial.
  5. Tap the Call icon to make a call.

How to save a recent call or number?
You can either add the recent number as a new contact or add it to an exiting contact by following the steps listed below:
  1. Open Phone app.
  2. Tap the Logs tab.
  3. Here you can see a list of recent calls.
  4. Tap the desired contacts you wish to save.
  5. Here you will see two options available, they are:
    • Create contact: tap this option to create new contacts for the recent number.
    • Update existing: tap this option to add the recent number to an existing contact.
  6. Tap the required option you wish to use.
  7. Tap the Done button to save the changes.

Well, by knowing how to call or save recent call or number as mentioned in both of the steps above, now you can easily to dial and/or add the recent number as a new contact or update an existing contact. So, hope this helps :)

Samsung Galaxy S3: How to Set or Clear Mark as Default on the Certain Contacts

One of the insiders named Sara was asked me how to assign non-default numbers to the speed dialing on her Samsung Galaxy SIII. First of all, you might be wondering why the numbers need to set as default? Well, it'll be useful if you have several phone numbers in a single contact and you want to send a message using easy text features, then the messaging app will automatically use the default number as the recipient.

See also: How to Use Easy Text Feature on Samsung Galaxy S3

Back to the Sara's case, if the certain phone number in contacts was marked as default, then you can only assign the default number to the speed dialing. So, in order to make you be able to assign another numbers in a contact to speed dialing, then first you need to clear the default number.

See also: How to Set and Use Speed Dialing on Samsung Galaxy S3


How to mark contact as default?
For those of you who don't know the steps, then here I show you how to do so:
  1. Open Contacts app.
  2. Tap the desired contact name you wish to mark one of the numbers as default.
  3. Tap the Menu key then select Mark as default.
  4. Now, you'll see the mark as default screen display radio button next to all the phone numbers in the contacts. When the radio button shows green means the phone numbers is set as default.
  5. To change the default number, tap the radio button next to another phone numbers you wish to set as default. The radio button will turn green.
  6. Tap Done button to save the changes.

How to clear mark as default?
For certain reason you might want to remove mark as default in certain contacts, as with Sara who want to set all phone numbers linked in a single contact to speed dialing. To do so, the mark as default should be cleared to enable you assign all of them to speed dialing. Well, here are the steps:
  1. Open contacts app.
  2. Tap the required contact name you wish to clear it default.
  3. Long tap in the phone number marked as default.
  4. On pop up menu select Clear default.
  5. Now the mark as default has been removed.

Once the default number is removed, now you can assign some or all of the numbers in a single contacts to a speed dialing. If you don't know how to assign contacts to speed dialing, you can see the steps to do so in the link mentioned above. So, hope this helps :)