Showing posts with label Gallery. Show all posts

Samsung Galaxy S5: How to Transfer Files Using Wi-Fi Direct in Android 4.4.2 Kitkat

Wi-Fi direct is a connectivity feature available in the Samsung Galaxy S5(it's my favourite one). This feature lets you transfer files to another Wi-Fi direct enabled devices that are connected in the same Wi-Fi network. By using this feature you can transfer multiple files at once at a speed up to 250Mbps, lets you transferring large file or multimedia content with ease and fast.


How to enable or disable Wi-Fi Direct?
Before transferring files using Wi-Fi direct with your Samsung Galaxy S5, you have to enable it first by using the following steps:
  1. On any screen, swipe down the top of the screen to open up the notification panel.
  2. Tap to go to the settings menu.
  3. With the settings menu is displayed in grid view, scroll down to the Network connections section and then tap Wi-Fi .
  4. When Wi-Fi is off, slide the ON/OFF switch to the right to turn it on.
  5. Tap the required network you want to connect to. If the network is secured, enter the password and then tap Connect button.
  6. Now, long tap the Recent apps key or tap to open up the additional options and then select Wi-Fi Direct. The device will scan all available Wi-Fi direct enabled devices automatically.
  7. Tap the required device you want to connect to. If the selected device accepting your request to connect, then your phone will be connected to the selected devices.
  8. Wi-Fi direct is now enabled and you'll see the Wi-Fi direct icon is displayed on the status bar which means you're now ready to use Wi-Fi direct to transfer files with the connected devices.
  9. To disable Wi-Fi direct, tap End connection button and then tap OK button.

How to transfer files using Wi-Fi Direct?
Once the Wi-Fi direct is enabled, now you can use it to transfer files. As the example, we'll try to transfer photos via Gallery app and My Files app using Wi-Fi direct from the Samsung Galaxy S5 to the Samsung Galaxy S4 that have connected in the same Wi-Fi network.


Method #1: From Gallery app
  1. Open Gallery app.
  2. Tap an album.
  3. Tap and then select Select.
  4. Select the desired photos you want to share with.
  5. Tap and then select Wi-Fi Direct .
  6. Select the device you want to share with and then tap Done button.
  7. The selected photos will be sent.


Method #2: From the My Files app
  1. Open My Files
  2. Tap Images.
  3. Tap and then select Select.
  4. Select the desired photos you want to share with.
  5. Tap and then select Wi-Fi Direct .
  6. Select the device you want to share with and then tap Done button.
  7. The selected files will be sent.

As a note, since the Wi-Fi direct needs quite a lot of power to run, then it'd better if you turn this feature off once you have finished transferring files so that your battery won't be drained quickly.

Samsung Galaxy S4: How to Fix Can't Find Hidden Pictures in Gallery app in Android 4.4 Kitkat

Today an insider told me that she couldn't find some pictures that have been hidden by her using the hide items options in the Gallery app. Normally, when you hide a picture in the Gallery app by using the hide items option, then you can find/unhide them easily by using the show hidden items option in the Gallery app. Sadly to say that in some cases, some of hidden pictures are suddenly missing and can't be found both in the show hidden items option in Gallery app or in the default folder where you save the picture files in the My Files app.

See also: How to Hide or Show Hidden Pictures in the Gallery app in the Samsung Galaxy S4 with Android 4.4 Kitkat

I've read somewhere out there and found that in the Android 4.4 Kitkat, all hidden files using that method will be moved to the another hidden folder in the internal storage. That's why you can't find them in their default folder. You have to move them to another unhide folder manually to display them back in the Gallery app.


How to find hidden pictures in Android 4.4 Kitkat?
I realize, a picture can be so meaningful for someone therefor I summarize this method here to help those of you who may be experiencing this problem and want to get those hidden-then-lost pictures back. I've tested this method and it worked. So, here they are:
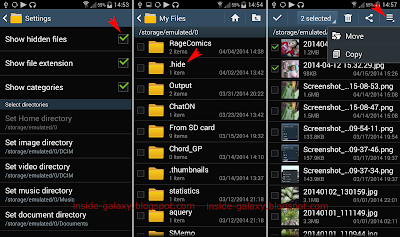
  1. Open My Files app.
  2. Tap the Menu key and then select Settings.
  3. Check the box besides the Show hidden files option to enable this option.
  4. Tap the Back key.
  5. Tap All files.
  6. Tap Device storage.
  7. Scroll down to find the folder named .hide and then tap it to open it.
  8. Tap Island (I don't know why Samsung used it as the folder name. I think it may be different in other phones so please let me know if your phone has another folder name).
  9. Now you should see all pictures you have hidden by using the hide items option in the Gallery app are displayed here.
  10. Copy/move and then paste the desired hidden pictures to another folder. Use the following steps if you don't know how to do so:
    • Select the desired pictures you want to copy/move.
    • Tap the three horizontal line icon located at the top right corner of the screen and then tap Copy to copy the selected files or tap Move to cut the selected files.
    • Navigate to the required folder you want to paste the files.
    • Tap Paste here.
  11. Once the selected files are copied or moved to another folder, they should be displayed again in the Gallery app.

As a note, this method also can be applied to retrieve hidden video files that you have hidden using the same way from the Gallery app. You can also perform this method by using another third-party File Manager app (e.g: ES File explorer, Astro File Manager, etc).

Samsung Galaxy S4: How to Fix Can't Remove Facebook Photo Albums in the Gallery App in Android 4.4 Kitkat

By default, you'll be presented with some sync options while you're installing the Facebook app in your phone, one of which is the sync Gallery option that will allow you to sync your Facebook photo albums with your phone so that you can view them directly from the Gallery app. If you chose to skip/disable this option at that time, then you can enable/activate the sync option by adding your Facebook account to the Gallery app.

See also: How to Sync Facebook Photo Albums with Gallery App in the Samsung Galaxy S4 with Android 4.4 Kitkat

As with other sync processes, the sync process between your Facebook photo albums and Gallery app can cause your phone becomes slower than before, and it'll be worse if you have a ton of photos on your Facebook account. In some cases, the sync process may cause the Gallery app crashes or slows or doesn't work properly. If the problem start irritating you, then you can fix them by stopping sync process or removing the Facebook account from the Gallery app.


How to remove Facebook photo albums in Gallery app temporarily?
FYI, these steps only stop syncing process and hide the Facebook photo albums in the Gallery app without removing the Facebook account from the Gallery app. These steps work best if the synced photos are only in a small amount. Here are the steps:
  1. Open the Gallery app.
  2. Tap the Menu key and then select Settings.
  3. Under the Accounts section, tap your Facebook account.
  4. Clear the checkbox next to Sync Gallery to stop syncing process.
  5. You can also hide the Facebook photo albums temporarily by using the following steps:
    • While you're in the Gallery app, tap the Menu key and then select Content to display.
    • Clear the checkbox next to Content in Facebook.
    • Tap OK button.
    • Now, the Facebook photo albums shouldn't be displayed in the Gallery app.


How to remove Facebook photo albums in Gallery app permanently?
These steps will remove your Facebook account from the Gallery app, but it won't remove your Facebook account in the Facebook app. These steps work best if you have a lot of photos in your Facebook account. Here are the steps:
  1. Open the Gallery app.
  2. Tap the Menu key and then select Settings.
  3. Under the Accounts section, tap your Facebook account.
  4. Tap Remove account button located at the top right corner of the screen.
  5. Tap Remove account button to confirm removing the account.
  6. Now, the Facebook photo albums will be removed from the Gallery app permanently unless you sync them again with the Gallery app.

Each method mentioned above has their own advantages. Removing the Facebook photo albums temporarily will keep the synced photos and will allow you to sync with them again with ease as well as speed up the Gallery load times as long as the synced photos are only in a small amount, while removing the Facebook photo albums permanently will be able to speed up the Gallery load times and avoid crashes especially if you have a lot of photos in your account.

Samsung Galaxy S4: How to Sync Facebook Photo Albums with Gallery App in Android 4.4 Kitkat

As we all know that Facebook has been being one of the most popular social media since a couple years back. Having a Facebook account allows you to stay connected with others' users, create status, share picture, etc. Even though this app is quite popular but the Samsung Galaxy SIV didn't include it as one of the pre-installed apps therefore you have to install this app by yourself through the Google Play Store if you want to use this app in your phone.

See also: How to Download and Install Free Apps From the Google Play Store in the Samsung Galaxy S4

So, if you already have a Facebook account and often upload your photos to your account from various devices, then you can sync your Facebook photo albums with your phone so that you can view them directly from the Gallery app and use all available options in this app, for instance set a Facebook photo as the wallpaper, contact photo, etc or share the photo to your contacts easily from the Gallery app.


How to sync Facebook photo albums with Gallery app?
FYI, these steps only allow you to view the Facebook photo albums and use the available options in the Gallery app, but it won't allow you to edit or delete the photos. Well, assuming that you already have the Facebook app in your phone, then here are the steps to sync:
  1. Open the Gallery app.
  2. Tap the Menu key and then select Settings.
  3. Tap located at the top right corner of the screen and then select Sync apps with Facebook.
  4. Enter your Facebook username and password and then tap Log in button.
  5. You'll be asked whether you want your phone to post to Facebook for you. Tap OK button if you want or tap Not now button if you don't. I personally prefer to choose Not now button.
  6. Mark the checkbox besides the Sync Gallery option to allow your phone synchronizes your Facebook photo albums with Gallery app.
  7. Tap Done button. Your Facebook account will be added in the Accounts section in the Gallery app settings and the phone will start syncing. The sync process may take a few minutes or so, depending on how many photos on your Facebook account.
  8. To avoid large data for syncing process, you can set your phone only sync your Facebook photo albums when you're connected with the Wi-Fi network by turning on the Sync only via Wi-Fi option.
  9. Once the sync process is completed, you'll see all your Facebook photo albums are displayed and labelled with the Facebook icon in the Gallery app.

Please note that your phone may become slower than before because it must load the Facebook photo albums, especially if you have a lot of photos on your Facebook account.

Samsung Galaxy S4: How to Use Buddy Photo Share in the Gallery App in Android 4.4 Kitkat

If you like taking picture with your friends and then want to share the picture with them, then you can do that thing easily in this phone by utilizing the buddy photo share feature that you can find in the Gallery app. In order to be able to use this feature, first you have to enable the face tag feature in the Gallery app and then tag your contacts to the recognized faces on the pictures. Once done, you can easily share the picture to the tagged contacts through the email message or multimedia message.


How to share a picture using buddy photo share?
Below are the steps to do so:
  1. Open the Gallery app.
  2. Tap an album and then tap the required picture to view it.
  3. If you have not tagged your contacts on the picture yet, then you have to tag them first. If you don't know how to do so, you can see the complete steps here.
  4. If you have already tagged your contacts on the picture then you can share the picture easily to the tagged contacts by tapping the Menu key and then select Buddy photo share.
  5. On the "Send picture to" menu, check the box next to the tagged contacts you want to share the picture with. FYI, by default this feature uses the email message as the share method, but if the tagged contacts has no email message then this feature will use the multimedia text as the share method. If the contact has email address and phone number, then you can change the share method by tapping the contact name and then select which email or phone number(if the contact has more than one email addresses or phone numbers) you want to use to share the picture.
  6. Tap OK button.
  7. The picture will be sent to the selected contacts by using the selected share method.

Basically, you can share any picture you have in your phone by utilizing the share menu, but by using the buddy photo share feature you will be easier and faster to share the picture to the contacts you have tagged on the photos.

Samsung Galaxy S4: How to Enable and Use Face Tag in the Gallery App in Android 4.4 Kitkat

Gallery app has been equipped with several useful features, one of which is the face tag feature. Turning on this feature will help you to recognize faces on the pictures and then allow you to tag your contacts with ease. After you've added a contact to the recognized face then you'll be easier to make a call, send a text or email message or share the picture to the contact. By default, this option is disabled, so in order to make you able to use this feature you have to enable it first from the Gallery app settings.


How to enable or disable face tag in the Gallery app?
Below are the steps to do so:
  1. Open the Gallery app.
  2. Tap the Menu key and then select Settings.
  3. Depending on your current settings, tap Face tag to enable or disable this option. When the box next to this option is ticked means the option is enabled. When this option is enabled, you'll see the yellow box appears around the recognized faces in the picture.


How to use face tag?
Once the face tag feature is activated, you can tag your contacts to the recognized faces by using the following steps:
  1. Open the Gallery app.
  2. Tap an album and then tap the required picture to view it.
  3. The yellow box will appear around the recognized face on the picture.
  4. Tap the yellow box and you'll see two options available:
    • Me: select this option if the recognized face is you.
    • Add name: select this option if the recognized face isn't you. You'll be prompted to select or add a new contact.
  5. After the contact is added to the recognized face, when you tap the picture the yellow box will be replaced with the grey box contains with the contact name you've tagged. When you tap the tag, you'll be presented with some available options, such as:
    • : Tap this option to make a call to the tagged contact.
    • : Tap this option to send a text message to the tagged contact.
    • : Tap this option to send an email message to the tagged contact.
    • : Tap this option to edit or remove tag.


How to tag a contact in a picture manually?
If the device doesn't recognize the face on a picture because the face angle or other conditions, then you can tag your contact to that face manually by using the following steps:
  1. Open the Gallery app.
  2. Tap an album and then tap the required picture to view it.
  3. Long tap on the unrecognized face.
  4. Move the blue block to the face. If necessary you can adjust the blue box size.
  5. Tap Save button.
  6. Select or add a contact.
  7. After the contact is added to the recognized face, when you tap the picture the yellow box will be replaced with the grey box contains with the contact name you've tagged. When you tap the tag, you'll be presented with some available options, such as:
    • : Tap this option to make a call to the tagged contact.
    • : Tap this option to send a text message to the tagged contact.
    • : Tap this option to send an email message to the tagged contact.
    • : Tap this option to edit or remove tag.

If you have activated the face tag feature, your phone will learn to recognize contacts in the pictures automatically therefore if you ever tagged a contact in the past then your phone will suggest you the contact name when you tag the same contact in other pictures.

Samsung Galaxy S4: How to Enable and Use Pan to Browse Images in Android 4.4 Kitkat

Samsung Galaxy SIV is equipped with some motions that will help you controlling and interacting with your phone easily, one of which is pan to browse images. Enabling this motion will allow you to browse and move around the image which is zoomed in in the Gallery app, allows you to take a look at other parts of the image simply by using a single tap.


How to enable or disable pan to browse images?
Below are the steps to do so:
  1. Go to Settings.
  2. Tap My device tab.
  3. Scroll down to find Motions and gestures, and then tap it.
  4. Slide the ON/OFF switch next to Motion to the right to enable it.
  5. Tap Motion.
  6. Slide the ON/OFF switch next to Browse an image to the right to enable it. When you tap this option when it's enabled, you'll be presented with the following options:
    • Try it: select this option to try using pan to browse images in the short tutorial given by this phone.
    • Advanced settings: select this option to adjust the pan sensitivity.

How to use pan to browse images?
Once the pan to browse images feature is activated, now you can use this feature to scroll through the image which is zoomed in in the Gallery app by moving the device in any direction. Here are the steps to use it:
  1. Open the Gallery app.
  2. Tap an album and then tap the required image to view it.
  3. Zoom in the image by spreading two fingers apart on the screen or by tapping and holding the screen at two points and then tilt the device forwards.
  4. When the image is zoomed in, tap and hold a point on the screen and then move the device left or right to pan vertically or move the device up and down to pan horizontally.
  5. Release to stop panning.

Please note that this feature is not applicable when you use it on the image which is not zoomed in. Anyway, aside from using pan to browse image, basically you can also move around the image that is zoomed in by flicking the screen, but for me using pan to browse image is easier and simpler than flicking the screen. So, how about you? Which feature do you like best when you want to move around the image, panning to browse image or flicking the screen?

Samsung Galaxy S4: How to Enable and Use Tilt to Zoom in Android 4.4 Kitkat

In some cases, you may want to zoom in or out while viewing images in the Gallery app to get larger and more detail image or while browsing webpages in the Internet app to get larger or closer view. To meet that need, the Samsung Galaxy SIV has provided you some methods to zoom in or out, one of which is by tilting the device back and forth. To make you able using this method, you have to enable this feature through the motion menu.


How to enable or disable tilt to zoom?
Below are the steps to do so:
  1. Go to Settings.
  2. Tap My device tab.
  3. Scroll down to find Motions and gestures, and then tap it.
  4. Slide the ON/OFF switch next to Motion to the right to enable this option and then allow you to access all of the motion options available under this menu.
  5. Tap Motion.
  6. Slide the ON/OFF switch next to Zoom to the right to enable this option. If you tap Zoom when it's enabled, then you'll be given with the following options:
    • Try it: tap this option to try using tilt to zoom in the short tutorial given by this phone.
    • Advanced settings: tap this option to adjust the tilt sensitivity.

How to use tilt to zoom?
Once tilt to zoom is activated, you can use this feature to zoom in or out in the Gallery app and in the Internet app.

I. Using tilt to zoom in the Gallery app:
  1. Open the Gallery app.
  2. Tap an album and then tap the required image to view it.
  3. Tap and hold the screen at two points with your fingers and then tilt the device backwards to zoom out or tilt the device forwards to zoom in.
II. Using tilt to zoom in the Internet app:
  1. Open the Internet app.
  2. Type the URL or webpage address in the address bar and then tap Go.
  3. Once the webpage is fully loaded, tap and hold the screen at two points with your fingers and then tilt the device backwards to zoom out or tilt the device forwards to zoom in.

By knowing this method, now you have one more alternative method to zoom in or out other than the default pinch-to-zoom feature that you can use while viewing images in the Gallery app or browsing webpages in the Internet app.

Samsung Galaxy S4: How to Hide or Show Hidden Video from the Video Player App in Android 4.4 Kitkat

The "Hide items" and the "Show hidden items" are new features available in the Gallery app that have been brought by Android 4.4 Kitkat. By using this feature you're allowed to hide or show hidden photos or videos directly from the Gallery app. FYI, this feature only works for those that are saved in the internal storage, while if you want to hide those that are saved in the SD card you can use the old method by adding a full stop (.) in front of the photo or video name via My Files app or another third-party File manager app.

See also: How to Hide or Show Hidden Pictures or Videos in the Gallery app in the Samsung Galaxy S4 with Android 4.4 Kitkat

Unfortunately, both these methods, either using the hide items feature or adding a full stop only work in the Gallery app and they don't work in the Video player app because the hidden videos will still be displayed there. However, if you wish to hide a video from the Video player app, you can do so with ease by adding .nomedia extension behind the video file name via another third-party File manager app.


How to hide a video from the Video player app?
These steps are tested by using ES File Explorer app:
  1. Download install ES File Explorer from the Play Store and then follow the on-screen instructions to complete installation.
  2. Once the installation is completed, open the app.
  3. Navigate to a folder where you save the video file you wish to hide.
  4. Long tap the required video file to select it.
  5. Tap the Rename button at the bottom of the screen to rename the video file.
  6. Add .nomedia behind the video name, for example: video_name.mp4 become video_name.mp4.nomedia
  7. Tap OK button to save the change.
  8. The selected video won't be displayed in the Video player app as well as in the Gallery app.


How to show hidden video in the Video player app?
You can show the hidden video with .nomedia extension by removing .nomedia from the video file name via ES File Explorer app.


For the record, aside from hiding videos from the Gallery app and Video player app, these steps also can be applied to hide pictures from the Gallery app and hide music from the Music player app. It's because .nomedia extension will mark a file as having no multimedia data so that the file shouldn't be scanned and indexed by multimedia apps(Gallery app, Music player app and Video player app).

Samsung Galaxy S4: How to Add a Note in a Photo in Android 4.4 Kitkat

Gallery app has several useful features that won't only allow the user to view their photos, but also will allow the user to do something more with their photos. One of which is the edit photo feature that will allow you to edit a photo directly from the Gallery app by utilizing some basic picture-editing functions available. From here, you can also add an effect or two from the various stylize effects available.

See also: How to Edit a Photo in Android 4.4 Kitkat in the Samsung Galaxy S4

This app also has another useful feature named photo note that will allow you to add a note or text to your photos. It's like turning over a printed photograph and then write a note/text on its back. By using this feature you can write any information related with the photo, such as event, place or date of the photo.


How to add a note/text in a photo?
Below are the steps to do so:
  1. Open Gallery app.
  2. Tap the required album.
  3. Tap the required photo you want to add a note.
  4. Once the photo is opened, tap the Menu key and then select Photo note.
  5. The photo will be turned over to let you write a text on its back.
  6. While you're in the photo note screen, you can use the following options:
    • Pen icon : use this option to adjust the pen settings (style, thickness and colour).
    • Eraser icon : use this option to erase your text.
    • Undo icon : use this option to erase the last change done to the picture and then revert it to an older action.
    • Redo icon : this option is only available after the undo icon is used. You can use this option to reverse the undo action.
    • Enlarge icon : use this option to enlarge the photo by double tapping the screen.
  7. When you have completed adding a note, tap the Check mark icon located at the top right corner or the screen to save the changes. FYI, a photo with a note will have a folded edge to differentiate it with other photos.
  8. Next time, you can view the photo note by tapping the folded edge on the top right corner of the photo.

Though Gallery app has an option that will automatically provide information for the photo, but by using the photo note feature to add a text in a photo will make it more classic and personal. So, have you ever used this feature? If yes, what text do you usually write?

Samsung Galaxy S4: How to Edit a Photo in Android 4.4 Kitkat

Aside from allowing the users to view all pictures that are saved in the phone(either in the phone memory or SD card), Gallery app also has been equipped with some useful features that will allow the users to do something else more than just viewing the pictures, such as create a photo collage feature that will allow you to combine between two and four pictures into a single snapshot of the event.

See also: How to Create a Photo Collage in Android 4.4 Kitkat in the Samsung Galaxy S4

Another useful feature that is owned by the Gallery app is the edit photo feature. This feature will provide you some basic editing functions(such as adjust brightness or rotate the picture) and provides various picture-editing effects.


How to edit a picture?
Below are the steps to do so:
  1. Open Gallery app.
  2. Tap the required album and then tap the required picture you want to edit.
  3. Once the picture is opened, tap Edit button located at the top of the screen.
  4. Tap and hold the screen and then on pop up menu select Selection mode to select an area.
  5. While you're in the edit picture screen, you can use the following options:
    • Rotate : use this option to rotate the photo(rotate left, rotate right, flip horizontally, flip vertically).
    • Crop : use this option to select parts of the photo and then trim the selected parts.
    • Colour : use this option to add color enhancement to the photo.
    • Effect : use this option to add various stylize effects to the photo.
    • Portrait   : use this option to adjust the photo using tools (e.g: red-eye fix, airbrush face, etc).
    • Sticker : use this option to add decorations to the photo, such as brush sticker, comic sticker, etc.
    • Drawing : use this option to draw on the photo.
    • Frame : use this option to add a decorative frame around the photo.
  6. Once done, tap Save button. It'll be saved as a new file in the same album and the original file will be left untouched.

In my opinion, for a regular user like me, the picture-editing options in the edit picture feature are more than enough to meet my need to edit a picture. I personally often use this feature to crop or add effect in a picture. So, how about you? Have you ever use edit picture feature? If yes, which option do you often use?