Samsung Galaxy S4: How to Enable and Use Panorama Mode in Camera App in Android 4.4 Kitkat

Have you ever wanted to take a wide landscape image or commonly referred as panoramic photo as you can see in the header of a webpage for instance? If so, you can easily do so by using panorama mode in the stock Camera app in the Samsung Galaxy SIV. Panorama mode works by taking consecutive multiple shots that will allow you to capture landscape image up to 360 degree in a full rotation and then stitches them into a single picture.


How to take a panoramic photo?
Before taking a panoramic photo, here are some tips that will help you to have a better panoramic picture:
  • Take a panoramic photo in a good light situation. If you take the photo in a low-light situation or at night, make sure the phone is moved slowly to let the phone gets enough light to make a good low-light shot.
  • Don't change the phone position--if possible--by holding the phone as steady as possible.
  • Don't move the phone too fast to avoid missing frame and make sure to follow the guiding frame while moving the phone.


Now, you're ready to take a panoramic photo by using the following steps:
  1. Open Camera app.
  2. Enable panorama mode by tapping and then select Panorama.
  3. Tap to take picture and then move the phone in one direction slowly and steady to let your phone takes another shot well. FYI, because this mode takes multiple shots, make sure to hold the phone as steady as possible and move slowly by following the guiding frame.
  4. To stop shooting tap .
  5. If you didn't stop shooting manually, the phone will automatically stop shooting when the blue frame reaches the end of the guiding frame.

Based on my experience, one thing that makes it hard to have a good panoramic photo is the difficulty to keep the phone position. That's why I can conclude that the result will be much better if you take panoramic photos by using a tool to help you to keep the phone position, for instance by using a panoramic tripod head.

Samsung Galaxy S4: How to Take HDR Photos in Android 4.4 Kitkat

In the Samsung Galaxy SIV, the stock Camera app comes with several camera modes, one of which is the HDR mode. HDR itself is stands for High Dynamic Range. This mode is designed to help the user solves the problem of underexposed or overexposed image. HDR mode works by taking more than one pictures and then merge them to have the final picture with good exposure, soft and rich colors. Given to its function, this mode is best used to take landscape pictures or building where the scene usually has a significant difference between foreground and background (e.g: taking picture of the building under the bright sky).


How to take a HDR picture?
Below are the steps to do so:
  1. Open Camera app.
  2. By default, the camera uses auto as the camera mode. To change the camera mode, tap and then select Rich tone (HDR).
  3. If necessary, you can zoom in or out before taking a picture, either by using the Volume key or the pinch-to-zoom gesture.
  4. By default, the camera focuses in the middle of the screen. If you want to change the focus point, tap on the screen where the camera should be focused. The focus icon will turn green when the focus has been locked.
  5. Tap to take a picture. As a note, to get the best result, make sure to hold the phone as steady as possible while taking a picture because HDR mode needs to take more than one pictures.

FYI, I've tried using HDR mode to take a picture of building when the sky is very bright(see the picture above). The picture that was taken with HDR mode had a better exposure portion than the picture that was taken with Auto mode. So, how about you? Have you ever tried the HDR mode?

Samsung Galaxy S4: How to Use Photo Effects in Camera App in Android 4.4 Kitkat

How well the phone camera works is now become a consideration when a user wants to buy a smartphone. Moreover, widespread use of social media (e.g: Facebook, Twitter, etc) and photo-sharing sites (e.g: Instagram, Flickr, etc) make a lot of peoples like to take photos and then share the photos with others through those media. To meet that need, Samsung Galaxy SIV has been equipped with 13MP rear camera and 2MP front camera as well as the stock Camera app which will help you to get better result when taking pictures. One of the useful features in the Camera app is the various photo effects that will give an artistic touch in your photos.


How to use photo effects in Camera app?
Below are the steps to do so:
  1. Open Camera app.
  2. By default, the camera uses auto as the camera mode. If your Camera app is using another camera mode, change the camera mode to the auto by tapping and then select Auto.
  3. By default, the camera uses no-effect when taking pictures. To give an effect to your photo, tap and then select the desired photo effect you want to use. There are 12 photo effects available:
    • Vignette
    • Grey-scale
    • Sepia
    • Vintage
    • Faded-color
    • Turquoise
    • Tint
    • Cartoon
    • Moody
    • Rugged
    • Oil pastel
    • Fisheye
    As the comparison, you can see the picture below to know the differences among the photo effects.


  4. If you want to take self-portrait photo, switch to the front camera by tapping
  5. If necessary, you can zoom in or out before taking a picture, either by using the Volume key or use pinch-to-zoom gesture.
  6. If necessary, you can change the focus manually by tapping the screen where the camera should be focused. The focus icon will turn green when the focus has been locked.
  7. Tap to take a picture.

Giving the right effect in the picture surely will be able beautifying your photo and make it more artistic, for instance when you take a picture in an old building and use the vintage effect, the photo will look vintage and old as you take the photo in past times. So, from the 12 photo effects available, which one do you like best?

Samsung Galaxy S4: How to Create, Edit and Delete Alarm in Android 4.4 Kitkat

In some conditions, set alarm is needed to remind us or help us not to forget for certain event or activity, for instance set alarm to wake you up in the mornings or set alarm to remind you that you should do something in certain time. In Samsung Galaxy SIV, you're provided a stock clock app contains with alarm function. It's not just a regular alarm, but it's equipped with some options and features which will help you to customize the alarm according to your need.


How to create a new alarm?
You can easily set your phone as alarm to remind you for certain event or activity by using the following steps:
  1. Open Clock app.
  2. Tap Alarm tab.
  3. Tap to create a new alarm.
  4. Specify the day and time:
    • Tap or to adjust the time(hour and minute).
    • Tap the required day (M=Monday, T=Tuesday, W=Wednesday, T=Thursday, F=Friday, S=Saturday, S=Sunday). The days turn green when they're selected.
    • If necessary, check the box next to Repeat weekly to repeat the alarm in the selected days every week. If this option is enabled, you'll see recurring alarm icon is displayed in the left side of the alarm name.
  5. Change the alarm type:
    You can change the alarm type by tapping Alarm type, and then select from the following options:
    • Melody: select this option to play the alarm tone when the alarm goes off.
    • Vibration: select this option to vibrate the phone when the alarm goes off.
    • Vibration and melody: select this option to play the alarm tone as well as vibrate the phone when the alarm goes off.
    • Briefing: select this option if you want to include today's schedule, weather, information and news headline when the alarm goes off. We'll learn further more about it in another post.
  6. Change the alarm tone:
    If you want to use the default tone as the alarm tone, kindly do as follows:
    • Tap Alarm tone.
    • Select the desired alarm tone you want to use.
    • Tap OK button.
    If you want to use your music file as the alarm tone, kindly do as follows:
    • Tap Alarm tone.
    • Tap Add button. You'll be brought to the song list in the Music Player app.
    • Select the desired song you want to use as alarm tone.
    • Tap Done button.
  7. Adjust the alarm volume by sliding the volume bar to the right to increase the volume or to the left to decrease volume.
  8. Specify the alarm location:
    You can set the alarm to ring in the specified location by using the following steps:
    • Slide the ON/OFF switch next to Location alarm to the right to enable it.
    • Tap Location alarm.
    • Enter the required location.
    • Tap Done button.
    • The alarm will ring if you're in the specified location. As a note, if the phone hard to work out with the location you have added, the alarm will ring regardless of the location setting.
  9. Snooze the alarm:
    • Slide the ON/OFF switch next to Snooze to the right to enable it.
    • Tap Snooze and then select the required snooze interval and then define how many times it'll be repeated.
    • Tap Save button.
  10. Enable smart alarm:
    Enabling this option will set the phone to play the sound quietly a few minutes early and slowly increase in volume. Here are the steps:
    • Slide the ON/OFF switch next to Smart alarm to the right to enable it.
    • Tap Smart alarm.
    • Select the required smart alarm interval.
    • Select the required tone.
    • Tap Save button.
  11. Enter the name for the alarm in the Name field.
  12. Tap Save button to save the alarm.
  13. Once the alarm is created, the alarm icon will be displayed on the status bar and on the lock screen and it will disappear when the alarm is turned off.


How to edit an alarm?
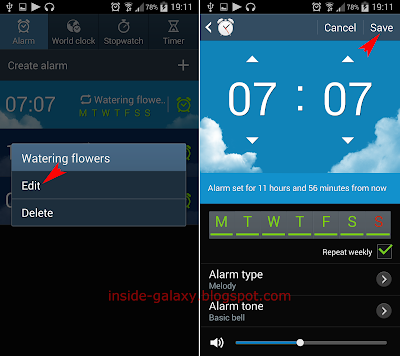
If you have made a mistake when created a new alarm or if you want to adjust the alarm settings, then you can edit the alarm with ease by using the following steps:
  1. Open Clock app.
  2. Tap Alarm tab.
  3. Long tap the required alarm and then select Edit.
  4. Now, you can adjust the required alarm settings.
  5. Tap Save button to save the changes.


How to delete alarm?
If you want to delete old/unused alarms, then you can do so by using the following steps:
  1. Open Clock app.
  2. Tap Alarm tab.
  3. To delete a single alarm go to the step #4, while to delete multiple alarms go to the step #5.
  4. Deleting a single alarm:
    • Long tap the required alarm and then select Delete.
    • The selected alarm will be deleted.
  5. Deleting multiple alarms:
    • Tap the Menu key and then select Delete.
    • Select the required alarms you want to delete, or tap Select all to select all of your alarms.
    • Tap Delete button.
    • The selected alarms will be deleted.

FYI, there are another alarm-related settings available in this phone: 1) Single tap feature which will allow you to turn off or snooze the alarm by single tapping the on-screen icon, 2) Flash notification feature which will set your phone flashes the camera light when the alarm goes off (this feature is designed for those of users who hard hearing because the flash notification will be more noticeable than the alarm tone).

Samsung Galaxy S4: How to Delete Messages or Conversations in Hangouts App in Android 4.4 Kitkat

In some conditions, you may want to delete messages or conversations in Hangouts app once you have set this app as the default messaging app by enabling the SMS messages features in this app. Deleting messages or conversations are usually done by the user when they want to clean up the messaging app, free up some space in their phone or even when they want messages or conversation from certain contact no longer displayed there. As same as other Messaging app, you can delete messages or conversations with ease in Hangouts app.


How to delete a single message within conversation in Hangouts app?
As a note, Hangouts app doesn't allow the user selecting more than one messages within an opened conversation therefore if you want to delete multiple messages within conversation, you have to delete the message one by one by using the following steps:
  1. Open Hangouts app.
  2. Tap the required conversation where the message you want to delete is located.
  3. Long tap the required message and then select Delete.
  4. Tap Delete button to confirm.
  5. The selected message will be deleted.
  6. To delete another message in the same conversation, repeat from the step #3.


How to delete a single conversation in Hangouts app?
Below are the steps to do so:
  1. Open Hangouts app.
  2. You can delete a single conversation while you're in the conversations list (see the step #3) or while opening the conversation (see the step #4).
  3. From the conversation list:
    • Long tap the required conversation. The conversation will be highlighted when it's selected.
    • Tap located at the top right corner of the screen and then tap Delete button to confirm.
    • The selected conversation will be deleted.
  4. While opening a conversation:
    • Tap the required conversation.
    • Tap the Menu key and then select Delete.
    • Tap Delete button to confirm.
    • The opened conversation along with the whole messages inside it will be deleted.


How to delete multiple conversations in Hangouts app?
Hangouts app allows you to multi select conversations so that you can delete more than one conversations with ease by using the following steps:
  1. Open Hangouts app.
  2. Long tap the required conversation. The conversation will be highlighted when it's selected.
  3. Single tap another conversations you want to delete.
  4. Tap to open more options and then select Delete.
  5. Tap Delete button to confirm.
  6. The selected conversations will be deleted.

Deleting messages periodically is a way to keep up the phone storage has enough free space so that the phone can work well and doesn't encounter any error caused by low internal storage.

Samsung Galaxy S4: How to Enable and Use Smart Pause in Android 4.4 Kitkat

Smart pause is claimed as one of advanced features when it comes for the first time in Android Jelly Bean. In Android 4.4 Kitkat, this feature is remain available. If you have not known about it yet, enabling this feature will allow your phone utilizes the front camera to detect your face and will automatically pause the video playback once your face is facing away from the screen.


How to enable or disable smart pause?
Generally, there are two methods that you can use to turn on or off this feature, through the quick settings panel or the settings menu.


Method #1: From the quick settings panel
  1. Swipe down the top of the screen with two fingers to open up the quick settings panel.
  2. Depending on your current settings, tap the Smart pause button to enable or disable smart pause. The button turns green when the smart pause feature is activated.


Method #2: From the Settings menu
  1. Go to Settings.
  2. Tap My device tab.
  3. Scroll down to find Smart screen, and then tap it.
  4. Depending on your current settings, tap Smart pause to enable or disable this option. When the checkbox next to this option is ticked means the smart pause feature is activated.


How to use the smart pause feature?
Theoretically, once you activate the smart pause feature, the video you're currently viewing will be paused when you're facing away from the screen and will be resumed when you're looking back at the screen. There are some conditions that should be fulfilled to make this feature works. You have to be in a well lit condition (not too dark or bright) and the screen isn't in the direct light as well as the front camera is not being used by other apps. FYI, from what I have tried, I only managed to use this feature in the morning or afternoon in outdoor when the sunlight was not being shined brightly, or in indoor but I had to stand up near the window or the door. If you want to try this feature, kindly do as follows:
  1. Open Video player app.
  2. Tap the required video to open it. (don't view the video in pop up play because the smart pause feature won't work!).
  3. Hold the phone as steady as possible and upright, and then move your head in any direction to pause the video and then look back to the screen to resume the video.

Please note that this feature only works if you're using the stock video player app and it won't work while the multi window feature is being activated in your phone. I myself seldom use this feature because I prefer to save my battery life by pausing the video manually than waste it for being used by the device to detect my face all the time while I'm viewing a video just to pause/resume the video. Even so, this feature is great but it'd better if the ability to detect the face is improved so that this feature can be used with ease in any conditions.

Samsung Galaxy S4: How to Enable and Use Smart Rotation in Android 4.4 Kitkat

Samsung Galaxy SIV is equipped with some smart features, one of which is the smart rotation feature. If you have been familiar with auto rotate screen which is also available in most Samsung phones or other Android phones, then you'll notice that the smart rotation has similar function with auto rotate screen. The difference is the auto rotate screen feature rotates the phone based on the orientation of the phone, while the smart rotation features rotates the phone based on the orientation of your face.


How to enable or disable smart rotation?
You can turn on or off this feature by using the following steps:
  1. Go to Settings.
  2. Tap My device tab.
  3. Scroll down to find Smart screen and then tap it.
  4. Depending on your current settings, tap Smart rotation to enable or disable this option. When the checkbox in the right side of this option is ticked means this option is enabled.


How to use smart rotation?
Theoretically, enabling smart rotation will allow your phone detects your face orientation and then rotates accordingly. To make this feature works, make sure your device is in well lit condition and the screen isn't in direct light to make the front camera has no difficulty to recognize your face. Since this feature uses the front camera, make sure it is not being used by other apps while using smart rotation. Well, here the example:
  1. While you're opening an app, hold your phone as steady as possible and upright.
  2. Change both the phone and your face orientation at the same time (e.g: from vertical to horizontal position or vice versa).
  3. You'll see the smart rotation icon is displayed on the status bar and detects your face orientation. If the front camera detects your face, then your phone will rotate accordingly. FYI, I've tested this feature and it worked. I sat and held my phone vertically/horizontally and then I changed my face orientation along with my phone, the phone detected my face and then rotated accordingly.


  4. The smart rotation icon will be displayed again on the status bar to check your face orientation when you change both the phone and your face orientation at the same time.

Please note that this feature will not work while you're in Home screen and apps menu because your phone will rotate vertically no matter how you hold your phone. From what I've tried, this feature is best used if you want to use your phone while lying on the right/left side. By using smart rotation, you'll be easier to use the phone(e.g: reading articles/web post, using any app, etc) because the phone orientation will be the same as your face orientation.