Samsung Galaxy S4: How to Customize the Bottom Shortcuts in the Home Screen

The common method used by the Samsung Galaxy SIV user to speed up their way to access certain app is by adding the shortcut of that app to the Home screen. That's might be the explanation why the Google Play Store has the default settings to add the newly installed app shortcut to the Home screen--if there's an available room--. You're also free to remove the unused app shortcuts in the Home screen or the one that you don't want to be there, allows you to control which app shortcuts you wish to reside on your Home screen.

See also: How to Add or Remove Apps or Widgets to the Samsung Galaxy S4 Home Screen

While you on the Home screen, you would see the five favourite app shortcuts in the bottom. By default, they are likely the Phone, Contacts, Messaging, Internet and Apps which are the most frequently used apps by most of the users. But, if that default doesn't fit with your needs, then you can easily customize them by adding, removing or changing one of them or more to suit your needs.


How to add, remove or change the favourite shortcuts on Home screen?
You can do so by following the steps listed below:
  1. To add shortcut to the bottom shortcuts list:
    • In order to allow you to add app shortcut to the bottom shortcuts, then the apps should be available in the Home screen. If not, first you need to add the app to the Home screen. If you don't know how to do so, you can see the complete steps in the link mentioned above
    • Add the app shortcut to the bottom shortcuts by tapping and holding the app on your Home screen then drag it to available space in the bottom shortcuts list.
    • Release to placed it.
  2. To remove shortcut from the bottom shortcuts list:
    • Tap and hold the bottom shortcut you wish to remove.
    • If you want the shortcut still remain in the Home screen, drag it to the available space in one of the Home screen and then release to placed it.
    • If you want the shortcut no longer displayed in the Home screen, drag it to the Trash can icon located at the top of the screen and then release to delete it.
  3. To change the shortcut in the bottom shortcuts list:
  4. There two methods that you can choose to change the bottom shortcuts. They are:
    • Remove the bottom shortcut first (see in the step #2) and then add the new shortcut to the bottom shortcuts (see in the step #1).
    • Tap and hold the apps in the Home screen and then drag it to the one of existing bottom shortcut. Release to exchange their position.

Given to the main purpose of the bottom or favourite shortcuts in the Home screen is to speed up the way you access those five apps, then it will be more useful if you place your most favourite apps or your most frequently used apps in there. So, hope this helps :)

Samsung Galaxy S4: How to Add or Remove Apps or Widgets in the Home Screen

Indeed, the Samsung Galaxy SIV has comes with the several pre-installed apps to meet the user needs. You can use all of them directly without you need to install it first by yourself. But, in certain case with any reason, you might be not satisfied with them or wants to install another apps to meet your needs. If so, you can easily do that by downloading and install the desired apps from the Google Play Store into your phone.

See also: How to Download and Install Free Apps from the Play Store in Samsung Galaxy S4

By default, the Google Play Store will add the newly installed apps icon to the Home screen in order to make you more easier when you want to access the apps. Moreover, the Samsung Galaxy SIV also supports up to seven Home screen that would be capable enough to accommodate lot of apps or widgets icon.


How to add shortcut of the apps or widgets to the Home screen?
If the apps has no icon in the Home screen or if you wants to add certain app or widget to the Home screen, then you can easily do so by following one of the steps listed below:
Method #1: From the app drawer
Before you do this steps, make sure you have room enough in the Home screen to allow you add new apps or widget icon
  1. Go to Apps through the Home screen.
  2. To add apps go to the step #3, while to add widgets go to the step #4.
  3. Add apps to the Home screen
    • Tap Apps tab.
    • Tap and hold the desired app and then drag it to the Home screen.
    • Release to placed it.
  4. Add Widgets to the Home screen
    • Tap Widgets tab.
    • Swipe the screen to the right or to the left to find the desired widget.
    • Once you find the required one, tap and hold the widget and then drag it to the Home screen.
    • Release to placed it.
    • If necessary, follow the on-screen instruction to complete the steps of adding the widgets.
  5. The selected app or widget will be added to the Home screen.
Method #2: From the Home screen
Before you do this steps, make sure you have room enough in the Home screen to allow you add new apps or widget icon.
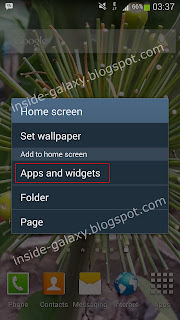
  1. In the Home screen, tap the Menu key then select Add apps and widgets. Or, long tap in the Home screen, then in the pop up menu select Apps and widgets.
  2. To add apps go to the step #3, while to add widgets go to the step #4.
  3. Add apps to the Home screen
    • Tap Apps tab.
    • Tap and Hold the desired app and then drag it to the Home screen.
    • Release to placed it.
  4. Add widget to the Home screen
    • Tap Widgets tab.
    • Find the desired widget by swiping the screen to the left or to the right.
    • Once you find the desired widget, tap and hold the widget and then drag it to the Home screen.
    • Release to placed it.
    • If necessary, follow the on-screen instruction to complete the steps of adding the widgets.
  5. The selected app or widget will be added to the Home screen.


How to remove shortcut of the apps or widgets from the Home screen?
If you want to clean up your Home screen or don't want certain apps or widgets icon resides there, then you can easily remove the icon from the Home screen by following the steps below:
  1. Locate the icon you wish to remove from the Home screen.
  2. Once you find the icon, tap and hold the icon and then drag it to the Trash can icon located at the top of the screen.
  3. Release to remove the icon.
  4. The selected icon will be removed from the Home screen.

Adding certain apps or widgets icon to the Home screen is one of the way to speed up you accessing them. But, too much apps or widgets scattered in the Home screen will make the Home screen in a mess and of course this will also increase the RAM uses (especially those with the animation inside). So, it will be wise if you only add the important or the most frequently used apps or widgets to the Home screen and remove the unused apps or widgets from there to keep your Home screen clean and reduce the RAM uses. Well, hope this helps :)

Samsung Galaxy S4: How to Attach Any File Types into Email Message in Gmail App

Samsung Galaxy SIV has comes with some pre-installed apps to meet the basic needs of the users. One of which is Gmail app which will let you to send or receive email message with others. This ability of course will make you more easier to communicate with others by using email messages. Moreover, this app also has the default ability to allow you to attach picture and video files into your Gmail message.

See also: How to Create and Send Email Message With or Without Attachment Using Gmail App in Samsung Galaxy S4

However, in certain case, you might want to send another file types other than the picture or video files by attaching them into your email message. Indeed, by default Gmail app only allows you to attach picture and video files, but with the help of the third-party File Manager app, now you have the ability to attach any file types into your Gmail messages.


How to attach any file types into Gmail message?
There are several third-party File Manager app available in the Google Play Store, but as the example we'll use the popular one, ES File Explorer app. Well, here are the steps:
  1. Download install ES File Explorer app from the Play Store and then follow the on-screen instruction to complete the installation.
  2. Now, open Gmail app.
  3. Tap Create new email button.
  4. Type the required contact and the subject of the email message in the provided field.
  5. Type your email message in the Compose email field.
  6. Tap the Menu key and then feel free to select either Attach picture or Attach video.
  7. Tap ES File Explorer.
  8. Navigate to the folder where the files you wish to send is saved.
  9. Choose the way you want to use to attach the file. There are two options available that you can choose the one that best suit your need. They are:
    • Normal Android Way (For MMS, Gmail,...)
    • File Way (Try this if above fails)
  10. The selected file will be attached and the email message is ready to be sent by tapping the Send button.

In certain case, utilizing the third-party app to complete the ability of the stock app will be useful to help you optimizing the app performance. And also, by knowing this steps, now you're free to attach any file types into your Gmail message and then send the email to the contact you want. Well, hope this helps :)

Samsung Galaxy S3: How to Fix Can't Find the Wi-Fi Direct Option on Android 4.3

In Android 4.3, there are some options that changed its location in the Settings menu causing some users are having trouble to find them when they want to use them. As happen with one of the insider named Maureen who has the difficulty to change the Bluetooth name in her phone after she did update the phone to the Android 4.3. She said that she couldn't find the rename option in the Bluetooth menu, where the option is usually located. Apparently, in the recent update you have to change the device name to change the Bluetooth name.

See also: How to Fix Can't Change the Bluetooth Name on Samsung Galaxy S3 with the Android 4.3

Another problem with the similar causes also experienced by another insider named Richard who has send me an email and said that he could no longer find the Wi-Fi Direct option in the Settings menu when he want to activate this option to allow him transferring some stuff to another phone.


How to find Wi-Fi Direct option in Android 4.3?
FYI, in Android Jelly Bean 4.2 and above, the Wi-Fi Direct has been moved to the Wi-Fi menu. Well, here are the steps to locate the Wi-Fi Direct option:
  1. Go to Settings.
  2. Tap My Connections tab.
  3. If necessary, slide the switch next to Wi-Fi option to the right to enable this option and allows you accessing the menu.
  4. Tap Wi-Fi Direct button.
  5. Tap Scan button to search another Wi-Fi Direct enabled device within range.
  6. Now, you're ready to use Wi-Fi Direct to transfer files with another Wi-Fi direct enabled devices.

Indeed, the appearance of the Settings menu in the Android ICS and the Android Jelly Bean(especially the Android 4.3) has some differences. So, digging the Settings menu to explore each option available is one things that you might consider to do to know the Settings menu more better. Well, hope this helps :)

Samsung Galaxy S4: How to Create and Send Email Message With or Without Attachment Using Gmail App

Once you activate your Google account on your Samsung Galaxy SIV, then you will be able to use it to access all Google services available in your phone. The most frequently accessed of the Google services is the Google Play Store which is the official market for all Android smartphone. You can use your Google account to access the Play Store, search the desired apps--either the paid version or the free one-- and then install them to your phone.

See also: How to Download and Install Free Apps from the Google Play Store on Samsung Galaxy S4

Aside from the Play Store, another Google services which may be frequent you use is Gmail app. This app will let you to send or receive email messages, with or without attachment inside it. This of course will useful if you're the one who often use email messages to communicate with each others.


How to create and send email message with or without attachment using Gmail app?
Assuming that you already activate your Google account and have an internet connection, then below are the steps to use Gmail app to create and send an email message, either with the attachment or not:
  1. Go to Apps through Home screen.
  2. Tap Gmail.
  3. If this is the first time you use this app, then you'll be presented with the sync settings associated with your Gmail account. You can either to choose to tap Sync now button to start syncing your Gmail right now, or tap Change sync settings button to change your sync settings. Feel free to tap Sync now button.
  4. Wait until the sync process is completed.
  5. Now, tap Create new email button to compose new email message.
  6. Type the required contact you wish to send the email with in the To field. When you type the first letter and there are contacts which is match with it then all matching contacts will be displayed and you're able to tap one of them as your email recipient.
  7. Type the subject of your email in the Subject field.
  8. Write your own email message in the Compose email field.
  9. If you wants to attach picture or video into your email message, then tap the Menu key and select Attach picture to attach picture files into your email message or tap Attach video to attach video files into your email message. Choose the required picture or video files you wish to attach.
  10. Tap Send button to send your email message.

By default, you're only allowed to attach picture or video files into your email message while you use the Gmail app. But, you can improve your ability to attach any file types into your Gmail email message by utilizing third-party File manager app which we'll discuss in the next post. So, stay tuned here to know the complete steps to do so :)

Samsung Galaxy S4: How to Download and Install Free Apps From the Google Play Store

The thing that you might be done once you own the Samsung Galaxy SIV as your device is activating a Google account, either your existing Google account or the new one. That's because you'll need an active Google account to access the Play Store--as well as another Google services-- to download and install apps into your phone.

See also: How to Activate an Existing or New Google Account in Samsung Galaxy S4

Once your Google account is activated on your phone, now you're ready to use it to access Google Play Store, search to find the desired apps then install it to the phone. Google Play Store provides tons of apps that you can choose which best to suit your needs. And the best part of this is that you have lot of choices of a great apps that you can get for free. But, of course the paid version will provide you more options and features than the free one.


How to download and install free apps from the Play Store?
Assuming that you already have the internet connection and an active Google account, then here are the steps you need to do:
  1. Go to Apps through Home screen.
  2. Tap Play Store.
  3. If this is the first time you use the Play store then you'll be presented with the Google Play Terms of services screen, tap Accept button.
  4. Once you're in the Google Play Store screen, tap the Search icon to start searching the apps.
  5. Type the apps name you wish to look for and then tap the Search icon.
  6. The search result of the apps will be displayed.
  7. Tap the required app you wish to install.
  8. Tap Install button.
  9. Tap Accept button.
  10. Wait until the installation process is completed.
  11. Tap Open button to launch the newly installed app.

For the record, with tons of choices in Google Play Store, you should be wise to choose which one you would like to install. Read the apps reviews is the one thing that you might be have to consider to do before you do install certain app into your phone. This will help you to make sure that the apps is clean and has as few as possible troubles. So, hope this helps :)

Samsung Galaxy S4: How to Activate an Existing or New Google Account

As with another Android-based smartphone, activating Google account is one of the most important thing to do to allow you accessing all Google services in your Samsung Galaxy SIV. For instance accessing the Google Play Store to download apps or games, Gmail to send and receive email, Youtube to upload video, etc.

See also: Review and Specifications of the Samsung Galaxy S4

Assuming that you already have an internet connection on your phone, then below are the steps you need to do to activate Google account on your phone, either the existing account or the new one.


Method #1: Activate New Google Account
if you don't already have a Google account or want to create a new Google account, then kindly follow the steps below to do so:
  1. Slide down the top edge of the screen using your finger.
  2. Tap the Settings icon.
  3. Tap Accounts tab.
  4. Tap Add account.
  5. Tap Google.
  6. Tap New.
  7. Type your first name and last name, and then tap the Right arrow button to go to the next steps.
  8. Type the name of your new Google account, and then tap the Right arrow button to go to the next steps.
  9. Type the password twice for your Google account, and then tap the Right arrow button to go to the next steps.
  10. Next, you just need to follow the on-screen instructions to complete the settings for your new Google account.
  11. Once you've done the setup, your new Google account will be listed in the Google account list.
  12. Now, you're ready to use your Google account to access all Google services available on your phone.

How to activate an existing Google account?
If you already have a Google account and want to use it on your phone, then you can simply add that account in your phone by following the steps below:
  1. Slide down the top edge of the screen using your finger.
  2. Tap the Settings icon.
  3. Tap Accounts tab.
  4. Tap Add account.
  5. Tap Google.
  6. Tap Existing.
  7. Type your Google account or Gmail account name in the Email field.
  8. Type the password of your Gmail account in the Password field and then tap the Right arrow button to continue to the next steps.
  9. Next, you just need to follow the on-screen instructions to complete the settings for your existing Google account.
  10. Once you've done the setup, your Google account will be listed in the Google account list and you're ready to use it to access all Google services available on your phone.

Well, these are the methods to activate your existing or new Google account in the Samsung Galaxy SIV. So, hope this helps :)