Samsung Galaxy S5: How to Change Message Tone in Android 4.4.2 Kitkat

The best way to help you quickly knowing that you have an incoming text message is by changing the message tone to the desired one. You can set the message tone to be the same with the general notification sound, even you can set different message tones for your favourite or important contacts.


How to change message tone?
Generally, there are three methods available that can be used to change the message tone. Each method has different advantage so that you can use the one that suit best your need.


Method #1: From the Messaging app settings
This method lets you change the message tone for all contacts. See the following steps to do so:
  1. Open Messaging app.
  2. Tap or long press the Recent apps key to open up the additional options and then select Settings.
  3. Scroll down to the Notifications and then tap it.
  4. If the Notification is off, tap the ON/OFF switch to enable it.
  5. Tap Notification sound.
  6. Select the desired message tone. If you select Default notification sound then it'll use the tone that has been selected in the general notification sound(see method #3).
  7. Tap OK button.
  8. The message tone has been changed.


Method #2: From Contacts app
This method lets you set different message tones for different contacts so that you can easily know when you have a new incoming text message from particular contact. See the following steps to do so:
  1. Open Contacts app.
  2. Tap the required contact you want to change its message tone.
  3. Tap to edit the contact detail.
  4. Tap Add another field button.
  5. Scroll down to find Message tone and then select it.
  6. Tap OK button.
  7. Tap Message tone.
  8. Select the desired message tone. If you select Default notification sound then it'll use the tone that has been selected in the general notification sound(see method #3).
  9. Tap Save button.
  10. The message tone for the selected contact has been changed.


Method #3: From the settings menu
This method can be used if you have chosen the default notification sound as the message tone in the Messaging app settings and you have to remember that it will change the general notification tone too. See the following steps to do so:
  1. On Any screen, swipe down the top of the screen and then tap to go to the settings menu.
  2. With the settings menu is displayed in grid view, scroll down to the Sound and display section and then tap Sound .
  3. Tap Notifications.
  4. Select the desired notification tone.
  5. Tap OK button.
  6. The general notification sound has been changed(including with the message tone).

To make the message tone rings when a text message is received, make sure you didn't choose silent as the message tone and your phone is not in the silent mode. You can check your sound mode by swiping down the top of the screen and make sure the sound button is enabled.

Samsung Galaxy S4: How to Find IMEI Number in Android 4.4.2 Kitkat

IMEI stands for International Mobile Equipment Identity. It's typically a 15-digit unique number that can be used to identify your phone thus it ought to be different with other devices. You can use IMEI number to retrieve information about the phone (e.g: model, brand, hardware info, etc) and since it's unique it can be used to track lost or stolen phones. The IMEI number can also be used by the network provider to block the lost or stolen device from accessing the network so that the device can't be used easily by the thief.


How to get IMEI number?
Actually, there are various methods that can be used to find the IMEI number (all of them should have the same result). But, in this post we'll learn how to get IMEI number by using 5 different methods.


Method #1: From the settings menu
  1. Swipe down the top of the screen to open up the notification panel and then tap to go to the settings menu.
  2. Tap More tab.
  3. Scroll down to the About device and then tap it.
  4. Tap Status.
  5. Scroll down to find IMEI to see your 15-digit IMEI number.


Method #2: Dialing the code
  1. Open Phone app.
  2. In the keypad tab, dial *#06# (you don't need to tap the Call icon since the IMEI number will be displayed as soon as you completely enter the code).


Method #3: Looking under the phone battery
  1. Turn off the phone.
  2. Open the back case.
  3. Pull the battery out.
  4. The IMEI number is usually printed on a sticker that is attached on the phone underneath the battery.


Method #4: Looking on the box
When you buy a new Samsung Galaxy S4, it's usually packaged in the box. The IMEI number is usually printed on a label that is placed over the opening since it usually act as a seal.


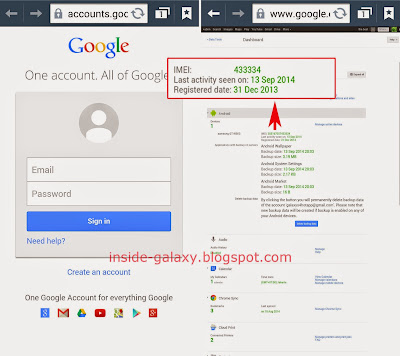
Method #5: Using Google account
Actually you can use this method from any device (phone or PC) as long as you have an internet connection and know the Google account associated with the phone. But, as the example we'll access Google dashboard directly from the phone. See the following steps to do so:
  1. Open Browser app and then access www.google.com/settings/dashboard.
  2. Enter your Google account(username and password) associated with your phone to login to your Google account dashboard.
  3. Tap Android to see your device information(including with the IMEI number).

FYI, since the IMEI number has important function, it will help if you know some methods to retrieve it so that you can easily find it when needed.

Samsung Galaxy S4: How to Turn Off Auto Correct in Android 4.4.2 Kitkat

For some users, enable the auto correct feature may be able to help them to type better because when they're entering text the device will give them some suggestion words to let them correcting or completing the word manually, even the user can set the device to complete or replace a word automatically with the most probable word when the space bar or a punctuation mark is touched. Unfortunately, for some others this feature is annoying since they don't want their words to be corrected or replaced by the device. Therefore if you also don't want to use this feature, then you can easily turn off auto correct feature so that you can type any word you want without having to worry your word will be corrected or replaced.


How to disable the auto correct feature?
You can do so by using one of the two following methods:


Method #1: From the settings menu
  1. On any screen, swipe down the top of the screen to open up the notification panel and then tap to go to the settings menu.
  2. Tap My device tab.
  3. Scroll down to the Language and input and then tap it.
  4. Tap next to Samsung keyboard to open up the Samsung keyboard settings.
  5. If you want to keep the device shows suggestion words but don't like the device replaces your word automatically, then you just need to turn off Auto replacement by sliding the ON/OFF switch next to this option to the left.
  6. If you want the device no longer displays the suggestion words, then you have to turn off Predictive text by sliding the ON/OFF switch next to this option to the left. FYI, it'll automatically disable Auto replacement too.


Method #2: While typing
You can quickly reach the Samsung keyboard settings from any app or screen where you can enter text. As the example, you can see the following steps to know how to turn off auto correct while composing a new text message in the Messaging app:
  1. Open Messaging app.
  2. Tap to compose a new text message.
  3. Tap the Enter message field to display the keyboard.
  4. Long tap the key in the left side of the space bar and then tap to go to the Samsung keyboard settings.
  5. If you want to keep the device shows suggestion words but don't like the device replaces your word automatically, then you just need to turn off Auto replacement by sliding the ON/OFF switch next to this option to the left.
  6. If you want the device no longer displays the suggestion words, then you have to turn off Predictive text by sliding the ON/OFF switch next to this option to the left. FYI, it'll automatically disable Auto replacement too.

For the record, most of insiders who have sent their emails to me said that they would rather enabled the predictive text option without the auto replacement option because in some cases auto replacement often replaces the word with the wrong or unwanted word. So, how about you? Do you disable auto replacement only or with the predictive text as well?

Samsung Galaxy S4: How to Enable and Use Auto Correct in Android 4.4.2 Kitkat

By default, Samsung Galaxy SIV provides the user with the Samsung keyboard to facilitate them when they're using apps that require them to enter text, for instance when they're composing a text message in the Messaging app. This keyboard is equipped with some features that will make your typing activities become easier, one of which is the auto correct feature. By using this feature, you'll be helped to write well and correct because the device will give you some suggestion words based on your input so that you can select one of them to correct or complete your word manually. However, if you don't like correcting your word manually, you can set your phone to correct or complete your word automatically when you tap the space bar or other punctuation marks.


How to enable and customize the auto correct feature?
You can do so by using the following steps:
  1. On any screen, swipe down the top of the screen to open up the notification panel and then tap to go to the settings menu.
  2. Tap My device tab.
  3. Scroll down to the Language and input and then tap it.
  4. If necessary, tap Default and then select Samsung keyboard.
  5. Tap in the right side of the Samsung keyboard to open up the Samsung keyboard settings.
  6. Slide the ON/OFF switch next to Predictive text to the right to enable this option. When this option is enabled, the device will display some suggestion words based on your input. While the predictive text option is enabled, you can do the following customization:
    • Tap Predictive text.
    • If necessary, enable Live word update to make the device automatically updates with popular new words everyday.
    • If necesary, enable Personalized data to make the device use the personal language data that you have entered to make the prediction result better.
    • If necessary, tap Learn from Facebook. When you have logged in to your Facebook, tap this option again to let the device learns your Facebook style to personalized the keyboard.
    • If necessary, tap Learn from Gmail. When you have logged in to your Gmail account, tap this option again to let the device learns your Gmail style to personalized the keyboard.
    • If necessary, tap Learn from Twitter. When you have logged in to your Twitter, tap this option again to let the device learns your Twitter style to personalized the keyboard.
    • If necessary, tap Learn from Messages to let the device learns your Messages style to personalized the keyboard.
    • If necessary, tap Learn from Contacts to let the device learns your Contacts style to personalized the keyboard.
    • If necessary, you can remove all personalized data you have entered by tapping Clear personalized data and then tap OK button.
  7. If necessary, you can also enable Auto replacement by sliding the ON/OFF switch next to this option to the right. When this option is enabled, the phone will auto replace misspelled or incomplete word you're typing with the most probable word when you tap the space bar or a punctuation mark.


How to use the auto correct feature?
If the auto correct feature is enabled, you can use it to help you to type better in any application that requires you to enter text. See the following steps as the example on how to use auto correct while composing a new text message:
  1. Open Messaging app.
  2. Tap to compose a new text message.
  3. Tap the enter message field to display the keyboard.
  4. Using auto correct:
    I. If you only enable predictive text:
    • Type a word and you'll see some suggestion words above the keyboard.
    • Tap to see more suggestion words and then tap the desired suggestion word to correct or complete your word manually.
    II. If you enable predictive text and auto replacement:
    • Type a word and you'll see some suggestion words above the keyboard.
    • If the highlighted word in the suggestion bar is the word you want to type, tap the space bar or a punctuation mark to let the device replaces your word with that highlighted word.
    • If the highlighted word is not the word you want to type, tap to see more suggestion words and then tap the desired suggestion word to correct or complete your word manually.
  5. Adding a new word to the suggestion bar:
    When you have enabled Personalized data in the predictive text option, you can add a new word so that when you type the word it will be displayed in the suggestion bar by using the following steps:
    • Type a new word.
    • Tap to see more suggestion words and then tap your new word.
    • The new word has been added.
  6. Removing a word from the suggestion bar:
    If necessary, you can remove unused or unwanted word from suggestion bar by using the following steps:
    • When you're typing a word, you'll see some suggestion words above the keyboard.
    • If necessary, tap to see more suggestion words.
    • Long tap the required word in the suggestion bar you want to remove.
    • Tap OK button.
    • The selected word will be removed.

As a note, if you usually use your own word or language when typing, you can make the auto correct feature works better by enabling the Personalized data and periodically update your words from available sources (Messages, Facebook, Gmail, etc) to let your device learns with the words that you usually use in those apps.

Samsung Galaxy S5: How to Enable or Disable Text Message Preview in Android 4.4.2 Kitkat

Aside from letting you send messages, the stock Messaging app also lets you to receive messages. By default, when a message is received, you'll be notified with message tone and the notification which will tell you that you have a new message. However, if you want to be able to read the incoming messages with more easily and quickly, you can set your phone to show the sender's name and the content of the received message in the lock screen, on the status bar and in the notification panel so that you can know who's the sender and what's the content of the message without having to open the Messaging app first.


How to show or hide text message preview?
You can do so by using the following steps:
  1. Open Messaging app.
  2. Tap or long press the Recent apps key to open up the additional menu and then select Settings.
  3. Scroll down to find Notifications and then tap it.
  4. If Notifications is off, tap the ON/OFF switch to enable it.
  5. Depending on your current settings, tap Lock screen to enable or disable this option. When the box next to this option is checked means the preview message(the sender's name and the body of message) will be displayed in the lock screen when a new message is received.
  6. Depending on your current settings, tap Status bar to enable or disable this option. When the box next to this option is checked means the preview message(the sender's name and the body of message) will be displayed on the status bar and in the notification panel when a new message is received.
  7. If the preview message is enabled, when a message is received, you'll see the preview in the lock screen, on the status bar and in the notification panel. You can tap the preview to open up the message in the stock Messaging app.

Given the function, this feature will be useful for those of you who want to be able to know who's the sender and what's the content of the message easily and quickly without having to open the Messaging app first, even when the screen is locked. But, this feature will also make others know your messages with ease thus if you like to keep your messages remain private or if you often receive messages contain with sensitive or important message, then you'd better hide the text message preview so that your phone will only notify you that you have a new message without displaying the sender and the content of the message. So, how about you? Do you prefer to show or hide the preview of your incoming message?

Samsung Galaxy S5: How to Enable and Use Delay Message Sending in Android 4.4.2 Kitkat

Have you ever sent a wrong message? Or, have you ever sent a message to a wrong contact? Well, it could be worse if the message contains with the sensitive or important message, but you don't need to worry because the stock Messaging app in the Samsung Galaxy S5 has a feature called delay message sending. This feature will let the phone delays the sending of your message so that the message can be cancelled if needed. If this feature is enabled, the cancel button will be shown for a specified time after you tap the send button to send the message.


How to enable or disable the delay message sending feature?
Since this feature is not enabled by default thus you have to enable it manually by using the following steps:
  1. Open Messaging app.
  2. Tap or long press the Recent apps key to open up the additional options and then select Settings.
  3. Scroll down to find Delay message sending and then tap it.
  4. If the delay message sending is off, tap the ON/OFF switch to enable this option. When the switch is on the right side or shows green means the delay message sending is enabled.
  5. If necessary, you can adjust the delay time by tapping Set delay time and then select from the following options:
    • 3 seconds: select this option if you want the device waits for 3 seconds before sending messages after you tap the send button. This option is enabled by default.
    • 5 seconds: select this option if you want the device waits for 5 seconds before sending messages after you tap the send button.
    • 10 seconds: select this option if you want the device waits for 10 seconds before sending messages after you tap the send button.
    • 20 seconds: select this option if you want the device waits for 20 seconds before sending messages after you tap the send button.
    • 30 seconds: select this option if you want the device waits for 30 seconds before sending messages after you tap the send button.


How to use the delay message sending feature?
With this feature is enabled, when you have finished composing your message and then tap the send button, you'll see the cancel button in the left side of the message. If needed, you can cancel the sending of your message by tapping the cancel button . If you don't tap the cancel button and the selected delay time is over, the message will be sent automatically.


Actually, the delay message sending feature is not a new feature. You may have ever seen or used this feature in other third-party Messaging apps, but it's nice to find this feature in the stock Messaging app. So, how about you? Do you use this feature?

Samsung Galaxy S5: How to Block Unwanted or Unknown Messages in Android 4.4.2 Kitkat

Have you ever wanted to stop an unwanted person to send you a text message? Or, have you ever wanted to stop receiving marketing SMS messages? If that so, you can block all of the unwanted messages by enabling the spam filter feature. This feature lets you block the message from specific phone numbers or unknown senders as well as lets you block messages contain with specific phrases. When a spam message is received, you won't be notified (either with message tone or notification on the status bar) and the message will be redirected to the spam messages folder so that your conversation will be clean from those unwanted or unknown messages.


How to block unwanted messages from specific phone numbers?
You can block specific phone numbers to send you a message by using the following steps:
  1. Open Messaging app.
  2. Tap or long press the Recent apps key to open up the additional options and then select Settings.
  3. Scroll down to find Spam filter and then tap it.
  4. If the spam filter is off, tap the ON/OFF switch to enable it. When the switch is on the right side or shows green means the spam filter is enabled.
  5. Tap Add to spam numbers.
  6. Add a phone number to the spam list:
    • Tap .
    • Enter the phone number in the enter number field or tap to select a contact from call logs or Contacts app.
    • If necessary, you can change the criteria by tapping Match criteria and then select from the following options:
      1. Exactly the same as: this option is enabled by default. Select this option to block the phone number which is exactly the same as the phone number you have entered in the enter number field.
      2. Starts with: select this option to block all the phone numbers that are started with the number you have entered in the enter number field.
      3. Ends with: select this option to block all the phone numbers that are ended with the number you have entered in the enter number field.
      4. Includes: select this option to block all the phone numbers contain with the number you have entered in the enter number field.
    • Tap Save button.
    • The entered phone number will be added to the spam list and all of the messages from this number will be blocked.
  7. Remove a phone number from the spam list:
    • Long tap a blocked number to select it.
    • Tap .
    • Tap OK button.
    • The selected phone number will be deleted from the spam list.


How to block unwanted messages contain with specific phrases?
You may notice that spam messages(e.g: marketing SMS messages) sometimes contain with the same phrases. So, instead of blocking the phone number, you can block the phrases so that all messages contain with the those phrases will be blocked. You can do so by using the following steps:
  1. Open Messaging app.
  2. Tap and then select Settings.
  3. Scroll down to find Spam filter and then tap it.
  4. If the spam filter is off, tap the ON/OFF switch to enable it.
  5. Tap Add to spam phrases.
  6. Add a phrase to the spam list:
    • Tap .
    • Enter the required phrase you want to block. You can enter the phrase up to 32 characters.
    • Tap Save button.
    • Tap OK button.
    • The entered phrase will be added to the spam list and all messages contains with this phrase will be blocked.
  7. Remove a phrase from the spam list:
    • Long tap a blocked phrase to select it.
    • Tap .
    • Tap OK button.
    • The selected phrase will be removed from the spam list.


How to block text messages from unknown senders?
If you only want to receive messages from contacts that you have added to the Contacts app, then you can block all messages from unknown senders by using the following steps:
  1. Open Messaging app.
  2. Tap and then select Settings.
  3. Scroll down to find Spam filter and then tap it.
  4. If the spam filter is off, tap the ON/OFF switch to enable it.
  5. Check the box next to Block unknown messages to enable this option.
  6. All of messages from contacts that have not been added to the Contacts app will be blocked.


How to view spam messages?
You can display all of the blocked messages by using the following steps:
  1. Open Messaging app.
  2. Tap and then select Spam messages.
  3. All blocked messages will be displayed here. If necessary, you can read or even delete blocked messages from here.

As a note, though the spam filter feature only redirects blocked messages to the spam folder instead of delete them, at least by using this feature you won't be disturbed with the notification from the unwanted or unknown messages and you won't see them in your conversations list either.