Samsung Galaxy S5: How to Enable and Use Toolbox in Android 4.4.2 Kitkat

The easiness to install apps sometimes makes you end up having a lot of apps in your phone. In some cases, a lot of installed apps takes more times for you to access your favourite apps. To help you save your time for accessing your favourite apps, Samsung provides you with Toolbox feature that can be used to display up to 5 apps in the floating Toolbox icon, allows you easily and quickly accessing your favourite apps that you have added in Toolbox from any screen no matter what the screen or app is being opened.


How to enable or disable Toolbox?
Since this option is not enabled by default, then you have to activate it first when you want to use it. You can enable or disable Toolbox either through the quick settings panel or the Settings menu.


Method #1: From the quick settings panel
This method allows you quickly turn on or off Toolbox, but it doesn't allow you to customize Toolbox apps thus if you enable Toolbox using this method then Toolbox icon will display apps you have set in the last configuration.
  1. On any screen, swipe down the top of the screen using two fingers to open up the quick settings panel.
  2. Depending on your current settings, tap Toolbox button to enable or disable this option. When the button turns green means Toolbox is enabled.
  3. Now, you will see the floating Toolbox icon contains with five default apps (By default they are: Camera app, Internet app, Memo app, Messaging app and Voice Recorder app) displayed on your screen.


Method #2: from the Settings menu.
This method is little bit longer than method #1, but it will allow you to customize Toolbox apps.
  1. Swipe down the top of the screen to open up the notifications panel.
  2. Tap Settings icon to enter the settings menu.
  3. With the settings menu is displayed in grid view, scroll down to the Sound and display section and then tap Toolbox .
  4. Depending on your current settings, tap the ON/OFF switch located at the top right corner of the screen to enable or disable this option. When the switch is on the right side or shows green means Toolbox is enabled.
  5. When Toolbox is enabled, you will see the floating Toolbox icon contains with five default apps (By default they are: Camera app, Internet app, Memo app, Messaging app and Voice Recorder app) displayed on your screen.
  6. Under Toolbox menu, you can also remove apps from Toolbox (see the step #7), add apps to Toolbox (see the step #8) and change apps in Toolbox (see the step #9).
  7. Remove apps from Toolbox:
  8. You can remove apps from Toolbox by using the following steps:
    • Tap Edit.
    • Clear the checkbox next to the required apps you want to remove from Toolbox.
    • Tap Save button.
    • The app will be removed from Toolbox.
  9. Add apps in Toolbox:
  10. When you have removed apps from Toolbox, you can use the available spot to add another apps. You can do so by using the following steps:
    • Tap Edit.
    • Check the box next to desired app you want to add to Toolbox.
    • Tap Save button.
    • The app will be added to Toolbox.
  11. Change apps in Toolbox:
  12. You can replace apps in Toolbox with another ones by using the following steps:
    • Tap Edit.
    • Clear checkbox in the apps you want to remove from Toolbox and then check the box in another apps you want to add to Toolbox.
    • Tap Save button.
    • The first apps will be replaced with the second ones.


How to use Toolbox?
Once you activate Toolbox either through the quick settings panel or the settings menu, then you'll see the floating Toolbox icon that is displayed on every screen to allow you quickly accessing your favourites apps. Here the example on how to use Toolbox:
  1. As a note, since Toolbox icon will stay on top, then it'll be displayed on every screen.
  2. Move Toolbox icon:
  3. You can change the Toolbox icon position according to your need by using the following steps:
    • Tap and hold the Toolbox icon and then drag it to the required position.
    • Release to place it in the new position.
  4. Edit apps in Toolbox:
  5. Aside from editing Toolbox apps from the Settings menu, you can also quickly edit Toolbox apps by using the following steps:
    • Tap and hold the Toolbox icon and then drag it to the Edit icon located at the top of the screen.
    • In the edit apps screen, you can remove, add or change apps according to your need (you can see the complete steps to edit Toolbox apps within the steps to enable Toolbox from the Settings menu above).
  6. Launch apps in Toolbox.
  7. You can easily and quickly open favourite apps you have added to Toolbox from any screen by using the following steps:
    • Tap Toolbox icon .
    • You'll see apps you have added to Toolbox are displayed in the floating menu.
    • Tap the required shortcut of app you want to use.
    • The app will be opened.
  8. Hide Toolbox icon:
  9. It will not only hide Toolbox icon, but it will also disable Toolbox.
    • Tap and hold Toolbox icon and then drag it to the Delete icon located at the top of the screen
    • The Toolbox icon will be removed and Toolbox feature will be disabled.

Given the function, it'd better if you place your favourite or most frequently used apps in Toolbox so that you' can easily and quickly accessing your favourite apps from any screen without having to return to the Home screen and then look for the apps in Home screen or apps menu.

Samsung Galaxy S5: How to Enable and Use One-Handed Operation in Android 4.4.2 Kitkat

Samsung Galaxy S5 is equipped with a larger screen than its predecessor. With the 5,1 inch screen, this phone surely will be able to give you a better and satisfying experience when you use this phone to do activities which will be better if using a large screen, for instance playing game, watching video, browsing webpages, etc. Unfortunately, for some users this large screen makes them have difficulties to use and control their phones because they have to use two hands to do so, which in some conditions it's rather difficult and inconvenient to be done. Thus, I think it might have been the reason why Samsung added the one-handed operation feature in this phone. By using this feature, the users can make the display becomes smaller and allow them to use and control the phone using one hand with ease.


How to enable or disable one-handed operation?
Below are the steps to do so:
  1. Swipe down the top of the screen to open up the notifications panel.
  2. Tap the Settings icon to enter the settings menu.
  3. With the settings menu is displayed in grid view, scroll down to the Sound and display section and then tap One-handed operation .
  4. Depending on your current settings, tap the ON/OFF switch located at the top right corner of the screen to enable or disable this option. When the switch is on the right side and shows green means the one-handed operation feature is enabled.


How to use one-handed operation?
Once you enable the one-handed operation feature in the settings menu, then you can use it to set up your display become smaller to fit to be used with one hand. Well, here how you can use this feature:
  1. Set up the screen for one-handed operation:
    • For left-handed users: hold the phone with your left hand and then slide your left thumb from the left edge of the screen to the middle and back in a single quick motion.
    • For right-handed users: hold the phone with your right hand and then slide your right thumb from the right edge of the screen to the middle and back in a single quick motion.
  2. Now, the screen size and layout will be adjusted and become smaller than the default size. You'll also be presented with some options that will help you using the one-handed operation feature with more easily.
  3. Adjust the screen size:
    You can enlarge or reduce the screen size by dragging to the top or bottom diagonally.
  4. Use favourite apps:
  5. Favourite apps that are displayed in the side menu will help you to access your favourite apps with ease regardless of what the screen are being opened.
    • Tap to display favourite apps in the side menu.
    • Tap the required app to open it.
    • Tap to hide favourite apps from the side menu.
  6. Edit favourite apps:
  7. By default, the default apps are likely: Phone app, Messaging app, Internet app and the Settings menu. In case you want to edit those default apps, then you can do so by using the following steps:
    • Tap to display favourite apps in the side menu.
    • Tap at the bottom of the side menu to enter to the edit screen.
    • You can add another apps to the side menu by dragging the required app in the main screen to the side menu. FYI, you're allowed to add up to 8 apps in the side menu.
    • You can remove favourite app by tapping in the required app you want to remove from the side menu.
    • Tap at the bottom of the side menu to save the changes.
  8. Use favourite contacts:
  9. Favourite contacts that are displayed in the side menu will help you to access your favourites contacts with ease regardless of what the screen are being opened.
    • Tap to display favourite contacts in the side menu.
    • Tap the required contact to see the contact's information. From here you can make a call, send a message, send an email message, etc with ease and fast.
    • Tap to hide favourite contacts from the side menu.
  10. Edit favourite contacts.
  11. You can add or remove favourite contacts from the side menu by using the following steps:
    • Tap to display favourite contact in the side menu.
    • Tap at the bottom of the side menu to enter to the edit screen.
    • You can add another contact by dragging the required contact's image in the contacts apps to the side menu. This step will automatically add the contact as favourite. FYI, you're allowed to add up to 8 contacts in the side menu.
    • You can remove favourite contact by tapping in the required contact you want to remove from the side menu.
    • Tap at the bottom of the side menu to save the changes.
  12. Use the on-screen icons of the physical buttons:
  13. While the screen is adjusted for one-handed operation, all physical buttons will be displayed as the on-screen icons at the bottom of the screen to help you control your phone with more easily.
    • Tap to open list of recent apps. You can use this icon to replace the function of the Recent apps key.
    • Tap to return to the Home screen. You can use this icon to replace the function of the Home key.
    • Tap to return to the previous screen. You can use this icon to replace the function of the Back key.
    • Tap to decrease the volume. You can use this icon to replace the function of the Volume down key.
    • Tap to increase the volume. You can use this icon to replace the function of the Volume up key.
  14. Tap to return to the full screen.

As a note, if you let your screen off or locked, then the screen size will be back to the original size, therefore you have to re-set up your screen for one-handed operation if you want to use this feature again. Also, you can't set up the screen for one-handed operation if your phone is being connected to the PC by using the USB cable.

Samsung Galaxy S5: How to Change Lock Screen Effect in Android 4.4.2 Kitkat

Unless you use none for your screen lock method, then lock screen will be a part of the Samsung Galaxy S5 that always be seen while you're using this phone, at least once when you unlock the screen to be able to use the phone for the desired activity. That's why for some users personalize the lock screen based on their personal tastes becomes an important thing to do, one of which is by changing the default lock screen wallpaper to the desired one. You can use the default wallpapers or use your own image that you have saved in your phone as your lock screen wallpaper.

See also: How to Change Wallpaper in the Samsung Galaxy S5 with Android 4.4.2 Kitkat

Aside from changing the lock screen wallpaper, change the lock screen effect is another way that can be used to personalize and beautify your lock screen. You can choose the desired effect you want to be played by your phone when you tap any part of the lock screen or when you unlock the screen.


How to change lock screen effect?
In case you want to change your lock screen effect, then you can do so by using the following steps:
  1. Swipe down the top of the screen to open up the notifications panel.
  2. Tap the Settings icon to enter to the settings menu.
  3. With Settings menu is displayed in grid view, scroll down to the Sound and display section and then tap Lock screen .
  4. Make sure you have chosen Swipe as your screen lock method by tapping Screen lock and then select Swipe. It needs to be done because the lock screen effect option only available if you use Swipe.
  5. Now, tap Unlock effect and then select the desired lock screen effect you want to use from the following options (You can see the differences among lock screen effect in the picture below):
    • None: select this option if you want to turn off lock screen effect or don't want to use any lock screen effect.
    • Popping colours: select this option if you want to use popping colours effect as your unlock effect.
    • Stone skipping: select this option if you want to use stone skipping effect as your unlock effect.
    • Watercolour: select this option if you want to use watercolour effect as your unlock effect.
    • Ripple: select this option if you want to use ripple effect as your unlock effect.
  6. Tap the Power key twice to go to the lock screen.
  7. The selected effect will be played when you tap any part of the lock screen or when you flick or swipe your finger in any direction to unlock the screen.

In the past time, some users confirmed that they couldn't find the lock screen effect option and some others confirmed that the lock screen effect option was disabled or grayed out. If you're also encountering the same problem, make sure you're using swipe as your screen lock so that the lock screen effect option will be available under the lock screen menu, also make sure you're using static wallpaper because the lock screen effect option will be disabled or grayed out when you use live wallpaper for your lock screen.

Samsung Galaxy S5: How to Change Wallpaper in Android 4.4.2 Kitkat

Home screen and lock screen are part of the Samsung Galaxy S5 that is always be seen by the users when they use this phone. Thus, most of users usually like to personalize these parts so that they can have a unique and different Home screen and lock screen. The best way to personalize and make these parts different is by setting the wallpaper. You can use the default static wallpaper, the default live wallpaper or other picture you have saved in your phone. You can also set the same or different wallpaper for your Home screen and lock screen.


How to change Home screen wallpaper?
If you want to change the default Home screen wallpaper to the desired one, you can do so by using the following steps:
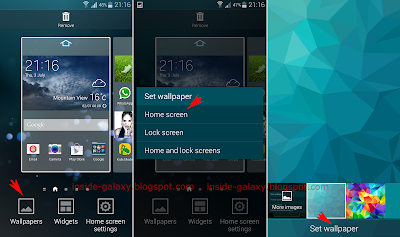
  1. You can access wallpaper menu either through the Home screen or the Settings menu.
  2. Through the Home screen:
    • In Home screen, long tap the Recent apps key or pinch your fingers together on the screen or long tap on any blank area on the Home screen to enter the edit mode.
    • Tap Wallpaper .
    Through the Settings menu:
    • Go to Settings.
    • Under the Sound and display section, tap Wallpaper .
  3. Tap Home screen.
  4. Use the default static and live wallpaper as Home screen wallpaper:
    • Select the desired wallpaper listed in the bottom of the screen (The last two wallpapers, Bubbles and Phase beam, are live wallpapers).
    • Tap Set wallpaper button.
    • The selected image will be set as Home screen wallpaper.
  5. Use your own picture as Home screen wallpaper:
    • Tap More image .
    • Select the source of the picture you want to set as wallpaper (They are commonly: Gallery, Photos, all installed third-party File manager apps, all activated clouds) and then you're free either to tap Just one button or Always button.
    • (As the example, I choose Gallery) Select an album and then select the desired picture you want to set as wallpaper.
    • If necessary, you can adjust the picture size by dragging the blue frame to the desired size.
    • Tap Done button.
    • The selected image will be set as Home screen wallpaper.


How to change lock screen wallpaper?
If you want to change the default lock screen wallpaper to the desired one, then you can do so by using the following steps:
  1. You can access wallpaper menu either through the Home screen or the Settings menu.
  2. Through the Home screen:
    • In Home screen, long tap the Recent apps key or pinch your fingers together on the screen or long tap on any blank area on the Home screen to enter the edit mode.
    • Tap Wallpaper .
    Through the Settings menu:
    • Go to Settings.
    • Under the Sound and display section, tap Wallpaper .
  3. Tap Lock screen.
  4. Use the default static wallpaper as lock screen wallpaper:
  5. FYI, since the default live wallpapers are not available in this menu, then if you want to set live wallpaper for your lock screen you can do so by setting the same wallpaper for your Home screen and lock screen.
    • Select the desired wallpaper listed in the bottom of the screen.
    • Tap Set wallpaper button.
    • The selected image will be set as lock screen wallpaper.
  6. Use your own picture as lock screen wallpaper:
    • Tap More image .
    • Select the source of the picture you want to set as wallpaper (They are commonly: Gallery, Photos, all installed third-party File manager apps, all activated clouds) and then you're free either to tap Just one button or Always button.
    • (As the example, I choose Gallery) Select an album and then select the desired picture you want to set as wallpaper.
    • If necessary, you can adjust the picture size by dragging the blue frame to the desired size.
    • Tap Done button.
    • The selected image will be set as lock screen wallpaper.
  7. Use Travel wallpaper to display recommended destinations as lock screen wallpaper:
  8. FYI, it needs an internet connection to run, use Mobile data instead of connected to a Wi-Fi network may result in additional charges. Also, it won't be displayed in the lock screen while you're playing a music because the lock screen will display song art and music control in full screen.
    • Swipe the screen from the right to the left until you see Travel wallpaper , and then tap it.
    • If necessary, you can change the interval of the travel wallpaper by tapping Interval button and then select desired interval you want to use (Every 6 hours, Every 12 hours, Every 24 Hours).
    • Tap Set wallpaper button.
    • Tap OK button


How to set the same wallpaper for Home screen and lock screen?
In case you want to have the same wallpaper for your Home screen and lock screen, the you can do so by using the following steps:
  1. You can access wallpaper menu either through the Home screen or the Settings menu.
  2. Through the Home screen:
    • In Home screen, long tap the Recent apps key or pinch your fingers together on the screen or long tap on any blank area on the Home screen to enter the edit mode.
    • Tap Wallpaper .
    Through the Settings menu:
    • Go to Settings.
    • Under the Sound and display section, tap Wallpaper .
  3. Tap Home and lock screens.
  4. Use the stock static and live wallpaper as Home and lock screen wallpaper:
    • Select the desired wallpaper listed in the bottom of the screen (The last two wallpapers, Bubbles and Phase beam, are live wallpapers).
    • Tap Set wallpaper button.
    • The selected image will be set as wallpaper.
  5. Use your own picture as Home and lock screen wallpaper:
    • Tap More image .
    • Select the source of the picture you want to set as wallpaper (They are commonly: Gallery, Photos, all installed third-party File manager apps, all activated clouds) and then you're free to tap Just one button or Always button.
    • (As the example, I choose Gallery) Select an album and then select the desired picture you want to set as wallpaper.
    • If necessary, you can adjust the picture size by dragging the blue frame to the desired size.
    • Tap Done button.
    • The selected image will be set as wallpaper.

Aside from beautifying the phone looks and make it unique, some users even set their own wallpapers to reflect who they are. So, how about you? What kind of wallpaper do you like best, the default wallpaper or your own picture?