Samsung Galaxy S5: How to Use Voice Commands to Take Photos in Android 4.4.2 Kitkat

The stock Camera app in Samsung Galaxy S5 provides you with several ways that can be used to take photos, one of which is by using the voice commands. Taking photos with voice commands lets you take photos without you have to tap any on-screen icon or press any physical button so that you will be able to reduce shake and get well-focused photos.


How to enable the voice command feature in the stock Camera app?
By default, the voice command to take photos is off. Thus, you have to turn it on first to be able to take photos with voice commands. You can use the following steps to enable voice command feature in the stock Camera app:
  1. Open the stock Camera app.
  2. Tap to open up the detailed settings menu.
  3. Scroll the settings menu to the very bottom.
  4. Tap Voice control to turn on voice command feature. A window will pop up to show you the voice commands that can be used to take photos, they are: Smile, Cheese, Capture, Shoot.

How to take a photo using voice commands?
When the voice command feature in the stock Camera app is enabled, you can take a photo using one of the default voice commands. As the example, we'll try taking a photo in auto mode with voice command by using the following steps:
  1. Open the stock Camera app. By default, the Camera app uses auto as the shooting mode. FYI, you'll see this icon on the screen as a sign that you can take photos using voice commands.
  2. Aim the camera to the object.
  3. If needed, you can change the focus point by tapping the screen where the camera should focus. When the subject is in focus, the focus frame turns green.
  4. Say "Smile" or "Cheese" or "Capture" or "Shoot" to take a photo.

As a note, voice commands can't be used to take photos when you're using these shooting modes: virtual tour shot, surround shot, sequence shot and sound&shot

Samsung Galaxy S5: How to Set a Part of a Song as a Ringtone in Android 4.4.2 Kitkat

Set a unique ringtone is the best way that can be taken to help you easily know that you have incoming calls since the default ringtones may have been widely used by other users. Fortunately, aside from letting you set a song or other supported sound files as a ringtone, Samsung Galaxy S5 also has the ability to automatically extract the recommended part of a song to use it as a ringtone so that you'll have a unique one. But, you have to remember that you can't manually choose which part of the song that can be used as a ringtone since it'll be chosen automatically by the device.


How to set a part of a song as a ringtone?
You can do so by using some methods. But, in this post, we'll try to set a part of a song as a ringtone by using two different methods: from the general settings menu and from the stock Music Player app.


Method #1: From the general settings menu
You can set the recommended part of a song as a ringtone from the general settings menu by using the following steps:
  1. On any screen, swipe down the top of the screen to open up the notification panel and then tap at the top right to go to the settings menu.
  2. With the settings menu is displayed in grid view, scroll down to the Sound and display section and then select Sound .
  3. Tap Ringtones.
  4. Tap Add button.
  5. Tap Sound picker and then you're free to either tap Always button or Just once button to continue.
  6. Make sure to check the box in the right side of the Auto recommendation at the bottom of the screen to enable this option and let your device extracts the highlights from the song and then use it as a ringtone.
  7. Now, select the required song. You'll get the sound preview when you tap a song so that you'll get an idea how it might sound when it's enabled.
  8. Tap Done button.
  9. The highlighted part of the selected song has been set as a ringtone.


Method #2: From the Stock Music Player App
You can set the recommended part of a song as a ringtone from the the stock Music Player app by using the following steps:
  1. Open the stock Music Player app.
  2. Tap the Tracks tab to see your song list.
  3. Long tap the required song.
  4. Tap at the top right to open up the additional options and then select Set as.
  5. Tap Auto recommendations to select this option and let your device extracts the highlights from the song and use it as a ringtone.
  6. Tap Phone ringtone to select this option and set the highlighted part of the selected song as a ringtone.
  7. Tap Done button.
  8. The highlighted part of the selected song has been set as a ringtone.

Samsung Galaxy S5: How to Delete Email Messages in the Stock Email App in Android 4.4.2 Kitkat

For some reason, you may want to delete some email messages in the stock Email app, for instance: when you want to clean up your email list or when you don't want some email messages are displayed in your email list. Fortunately, you can easily delete a single or multiple email messages in this app with ease.


How to delete email messages in the stock Email app?
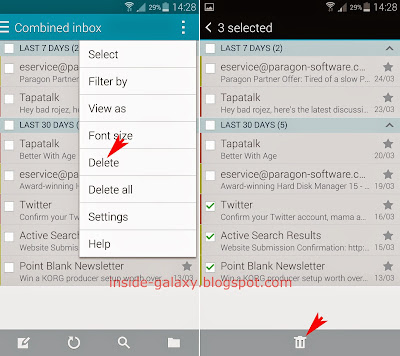
You can delete email messages in inbox or other folders by using some methods. But, in this post, we'll try to delete some incoming email messages in the stock Email app by using two different methods: by using tickboxes in the email list and by using the delete menu


Method #1: By using tickboxes in the email list
By default, the the stock Email app provides tickboxes for all email messages in the email list to let you select them with more easily. If you don't have those tickboxes, you can enable the option to show those tickboxes in the stock Email app settings menu. Well, you can use the following steps to select some email messages using tickboxes and then delete them:
  1. Open the stock Email app. When you have multiple accounts, the combined inbox will be opened by default. This inbox will display all email messages for all accounts.
  2. Tap the tickboxes next to the required email messages you want to delete to select them.
  3. Tap at the bottom of the screen.
  4. The selected email messages have been deleted.


Method #2: By using the delete menu
You can use the following steps to to select some email messages and then delete them by using the delete menu in the additional options:
  1. Open the stock Email app. When you have multiple accounts, the combined inbox will be opened by default. This inbox will display all email messages for all accounts.
  2. Tap or long press the Recent apps key to open up the additional options and then select Delete.
  3. Select the required email messages you want to delete.
  4. Tap at the bottom of the screen.
  5. The selected email messages have been deleted.

Samsung Galaxy S5: How to Change Font Size in the Stock Email App in Android 4.4.2 Kitkat

Since changing the device font size in the general settings menu will only change the font size for options in the stock Email app, if you hard for reading your email messages with the current font size and want to adjust it for better reading then you can easily fix it by changing the font size of the stock Email app so that the email list and the body of the email message will be displayed with the desired font size.


How to change font size in the stock Email app?
You can adjust the font size for the email list and the body of the email message in the stock Email app by using the following steps:
  1. Open the stock Email app.
  2. Tap at the top right corner of the screen or long press the Recent apps key to open up the additional options and then select Font size.
  3. Here you can select the required font size from the following options:
    • Use device font sizes: select this option to change the font size in the stock Email app based on the font size that is being used by your phone.
    • Tiny
    • Extra small
    • Small
    • Medium
    • Large
    • Extra large
    • Huge
  4. The font size in the stock Email app has been changed. 
  5. Now, the stock Email app will use the selected font size to display the email list and the body of the email message.

Samsung Galaxy S5: How to Fix No Tickboxes in the Email List in the Stock Email App in Android 4.4.2 Kitkat

By default, the stock Email app provides a tickbox or checkbox for each email message in inbox or other folders so that you can easily select them and do the required action, e.g: delete the selected email messages, move the selected email messages to other folder, etc. However, if you don't have those tickboxes in your email list, the option to hide them may has been accidentally enabled, therefore disable this option should be able to show those tickboxes back in your email list.


How to show tickboxes in the email list in the stock Email app?
You can do so by using the following steps:
  1. Open the stock Email app.
  2. Tap or long press the Recent apps key to open up the additional options and then select Settings.
  3. Tap Display.
  4. Clear checkbox next to Hide tickboxes to disable this option and show tickboxes in the email list.
  5. Now, press the Back key twice to go back to the inbox and you should see the tickboxes are displayed in the email list to let you multi-select email messages simply by single tapping the required email messages.

Samsung Galaxy S5: How to Read, Reply and Forward an Email Message in the Stock Email App in Android 4.4.2 Kitkat

Set the desired tone as the email messages tone is the best way to help you know that you have a new email message so that you won't miss any important email message and can do the required action immediately, for instance: read the message, reply the message to the original sender or forward the message to other contact.


How to read, reply and forward an email message in the stock Email app?
You can do so by using the following steps:
  1. Open the stock Email app. By default, the combined inbox will be displayed if you have multiple accounts. This inbox will display all incoming messages for all accounts and the new email messages will be displayed at the top of the email messages list.
  2. Tap the required email message you want to read.
  3. Now, you can read the email message.
  4. Once you have finished read the message, if needed, you can reply the message to the original sender (go to the step #5) or forward the message to the other contact (go to the step #6).
  5. Replying the email message:
    • Tap at the bottom of the screen.
    • Write your message in the message field below the Subject field.
    • If needed, you can quote the original message into your message by scrolling down the screen and then check the box next to Original message.
    • Tap to send the email message to its original sender.
  6. Forwarding the email message:
    • Tap at the bottom of the screen.
    • Enter the recipient's email address in the To field.
    • If needed, you can write your message in the message field below the Subject field.
    • Tap to send the message to the selected contact.

Samsung Galaxy S5: How to Scan QR Code in Android 4.4.2 Kitkat

Aside from having the ability to extract text from objects or images, the optical reader app also has the ability to scan QR code and extract information inside it. FYI, QR code (Quick Response Code) is a 2D barcode contains with data that can provide you access to a website URL, plain text, phone number, or other information directly to your phone.


How to scan QR code using the optical reader app?
As a note, if you don't have the optical reader app, you can get it from the Galaxy Apps. To scan QR code using this app, kindly do as follows:
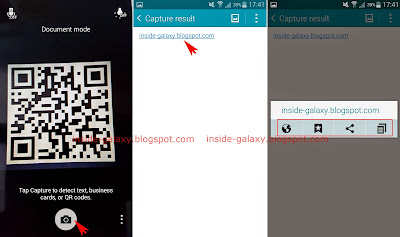
  1. Open the optical reader app.
  2. Point the camera to the QR code.
  3. Tap to capture the code.
  4. The information within the QR code will be displayed on the screen. As the example, if it's a website URL, you can tap it to get the following options:
    • : select this option to open the website URL in the browser app.
    • : select this option to add the website URL to your bookmarks list.
    • : select this option to share the website URL using the available method.
    • : select this option to copy the website URL to clipboard.