Showing posts with label Basic. Show all posts

Samsung Galaxy S5: How to Use Quick Settings Panel in Android 5.0.1 Lollipop

You can quickly enable/disable some options or access the detailed settings of options by utilizing the quick setting buttons in the notifications panel. However, since there are only 10 quick setting buttons available in the notifications panel, if needed you can use the quick settings panel to use more quick setting buttons. By default, you'll be provided with 21 quick settings buttons in the quick settings panel, they are: Wi-Fi, Locations, Sound, Screen rotation, Bluetooth, Mobile data, Ultra power saving, Multi window, Toolbox, Mobile hotspot, Screen mirroring, NFC, Sync, Smart stay, Smart pause, Power saving, Do not disturb, Flight mode, Car mode, Private mode and Touch sensitivity


How to use quick settings panel?
You can do so by using the following steps:
  1. On any screen, swipe down the top of the screen to open up the notifications panel.
  2. Tap at the top right corner of the notifications panel to view all quick setting buttons in the quick settings panel.
  3. Tap the required quick setting button (e,g: Wi-Fi, Mobile data, etc) to enable or disable the option. The button will turn green when it's enabled.
  4. Long tap the required quick setting button to view more detailed settings. For instance, when you long tap Wi-Fi, you'll be brought to a Wi-Fi settings menu.
  5. If needed, you can rearrange the quick setting buttons in the quick settings panel by using the following steps:
    • Tap at the top of the quick settings panel.
    • Below the Set quick setting buttons, drag and drop the required quick setting button (in Active buttons section or in Available buttons section) to rearrange their positions. It'll be useful if you place your favourite or the most frequently used quick setting buttons at the top side of the list so that you can easily find them in the quick settings panel.
    • To reset the layout back to the default, tap Reset (it's located next to Active buttons section). A window will appear to ask you whether you really want to reset the layout, tap Reset button to confirm. The quick settings buttons layout will be reset back to the default.
  6. To go back to the notifications panel, tap at the top right corner of the quick settings panel.
  7. Swipe up the bottom of the screen to close the quick settings panel.

Samsung Galaxy S5: How to Use Notifications Panel in Android 5.0.1 Lollipop

The notifications panel was the first thing that grabbed my attention when I had finished updating my Samsung Galaxy S5 to Android 5.0.1 Lollipop. It's now more interactive after getting some visual changes. The notifications panel can be used for multiple purposes, e.g: enable or disable some features, view more information of indicators appear on the status bar, open up unread notifications in appropriate apps, etc.


How to use notifications panel?
See the following steps as the example of using notifications panel:
  1. Open the notifications panel:
    Swipe down the top of the screen (status bar) to open up the notifications panel.
  2. View the current date and time:
    The current date and time is displayed at the top left corner of the notifications panel.
  3. Launch the settings menu:
    You can quickly go to the settings menu by tapping at the top right corner of the notifications panel. I myself prefer to access the settings menu by using this method than other ones because it's easier and faster.
  4. Access the quick setting panel:
    You can view all quick settings buttons in the quick setting panel by tapping at the top right corner of the notifications panel.
  5. Use quick setting buttons:
    By default, there are 10 quick setting buttons that can be used to quickly enable or disable options. They are: Wi-Fi, Location, Sound, Screen rotation, Bluetooth, Mobile data, Ultra power saving, Multi window, Toolbox and Mobile hotspot. If needed, you can tap and hold the quick setting button to view more detailed settings.
  6. Adjust the screen brightness:
    You can adjust the screen brightness manually by dragging the brightness adjustment bar in the notifications panel to the left or to the right, or you can enable auto brightness feature so that your phone will be able to adjust the screen brightness automatically using its sensor.
  7. Launch S Finder:
    You can easily launch S Finder app by tapping the S Finder button in the notifications panel. Next, you can use this app to find contents on your phone or search more about a search term in the search engine with more easily and fast.
  8. Launch Quick connect:
    You can easily launch Quick connect app by tapping the Quick connect button in the notifications panel. Next, you can use this app to search for nearby devices automatically to connect to them quickly and easily.
  9. Use music playback control:
    When you play a music using the stock Music Player app, the music playback control will be displayed in the notifications panel so that you can easily control (e.g: play/pause/resume/rewind/forward) the music playback.
  10. Launch recommended apps:
    When you connect a headset into your phone, some recommended apps will be displayed on the notifications panel so that you can access them with more quickly. By default they are: Music Player app, Phone app, Video Player app, Voice Recorder app and Youtube app.
  11. Expand notifications:
    When you have a lot of unread notifications, you can swipe down or up the screen to expand notifications.
  12. Open unread notifications:
    When you receive new notifications, e.g: missed calls, text messages, email messages, etc., indicator icons will appear on the status bar. By opening the notifications panel, you can view more information about the icons or notifications. If needed, tap the required notification to open it up in an appropriate app.
  13. Clear notifications:
    Swipe away a notification to remove it from the notifications panel, or you can easily clear all notifications by tapping the Clear button.
  14. Close notifications panel:
    Swipe up the bottom of the screen to close notifications panel.

Samsung Galaxy S5: How to Check Android Version

Samsung Galaxy S5 runs with Android 4.4 Kitkat by default. But, you're allowed to update the software in your phone to the latest Android version, Android 5.0 Lollipop so that you can enjoy some enhancements brought by this Android version, e.g: new features, improved functionality, etc.


How to check Android version?
If you have updated the software in your phone via over the air or other methods, you can check the Android version to make sure that the software in your phone has been updated to the latest one by using the following steps:
  1. On any screen, swipe down the top of the screen to open up the notification panel and then tap at the top right to go to the settings menu.
  2. With the settings menu is displayed in grid view, scroll down to the System section and then tap About device .
  3. See the value of the Android version option. If the value of this option is 5.0, it means that you have updated the software in your phone to the latest Android version, Android 5.0 Lollipop.

Samsung Galaxy S4: How to Update Device Software to Android 5.0 Lollipop

There are some ways available that can be done to update software in your Samsung Galaxy S4 to the latest Android version, Android 5.0 Lollipop, one of which is by updating software via over the air(OTA). First, you have to download the update into your phone. It's recommended for you to use a Wi-Fi connection to download the update because if you use a mobile data connection, it may result in additional charges. Once done, you can install the update and then enjoy the new Android 5.0 Lollipop in your phone.


How to update firmware in Samsung Galaxy S4 to Android 5.0 Lollipop via over the air ?
Assuming that you have connected to a Wi-Fi network, you can update the software in your phone by using the following steps:
  1. On any screen, swipe down the top of the screen to open up the notification panel and then tap at the top right to go to the settings menu.
  2. Tap More tab.
  3. Scroll the screen to the very bottom and then tap About device.
  4. Tap Software update.
  5. Tap Update. Your phone will check for the latest update. If it's available, your phone will automatically download the update. FYI, you can still use your phone while downloading the update.
  6. Once the download process is completed, a window will appear to tell you some information about the update. Tap Install button to install the update.
  7. You'll be asked to reboot your phone. Tap OK button to reboot the phone.
  8. Next, your phone will begin to install the update. Wait until it's completed.
  9. When the installation is completed, the phone will reboot again and then continue to optimizing apps in your phone. Wait until it's completed.
  10. Done. You have successfully updated firmware in your Samsung Galaxy S4 to Android 5.0 Lollipop and you're now ready to use your phone.

Samsung Galaxy S5: How to Set this Phone to Only Download Software Updates via Wi-Fi

One of the way that can be taken if you want to update software in your Samsung Galaxy S5 to the latest one is by updating firmware via over the air (OTA). When the latest update is available, you have to download the update into your phone first before installing it. It's recommended for you to download the update via Wi-Fi connection because the file size is quite large. Download the update via a mobile network connection may result in additional charges, moreover if you're on a limited data plan. Fortunately, you can set your phone to only download the update via Wi-Fi so that it won't consume any of your data.


How to set your Samsung Galaxy S5 only downloads software updates via Wi-Fi?
You can do so by using the following steps:
  1. On any screen, swipe down the top of the screen to open up the notification panel and then tap at the top right to go to the settings menu.
  2. With the settings menu is displayed in grid view, scroll down to the System section and then tap About device .
  3. Tap Software updates.
  4. Check the box next to Wi-Fi only to enable this option. This will set your phone to only download software updates when connected to a Wi-Fi network.

Samsung Galaxy S5: How to Update Device Software to Android 5.0 Lollipop via Over the Air

You can easily update firmware in your Samsung Galaxy S5 to Android 5.0 Lollipop via over the air (OTA). However, since downloading software via a mobile network may result in additional charges, it's recommended for you to use a Wi-Fi connection when downloading software. You have to remember that this update requires at least 3GB of free space in your phone and also make sure that your battery is fully charged or at least 70% so that your phone won't turn off while downloading or updating software.


How to update firmware to Android 5.0 Lollipop via over the air?
Assuming that you have connected your phone to a Wi-Fi network, you can update firmware in your phone to Android 5.0 Lollipop by using the following steps:
  1. On any screen, swipe down the top of the screen to open up the notification panel and then tap  at the top right to go to the settings menu.
  2. With the settings menu is displayed in grid view, scroll down to the System section and then tap About device .
  3. Tap Software update.
  4. Tap Update now.
  5. A pop up window appears to give you some information about the software update. Tap OK button to continue.
  6. Your phone will check for the latest update. If it's available, your phone will download the software. It may take several minutes to download the software, depending on how fast your Wi-Fi connection is. FYI, you still can use your phone while downloading.
  7. Once the download process is completed, a pop up window appears to ask you to install the software. Tap Install button to install the software right now.
  8. Tap OK button to reboot the phone.
  9. Your phone will begin to install the software. Wait until it's completed.
  10. When the installation process is completed, your device will reboot again and then continue to optimizing apps in your phone. Wait until it's completed.
  11. Done. You have successfully update firmware on your phone to Android 5.0 Lollipop and you're now ready to use your phone.

Samsung Galaxy S5: How to Insert or Remove a Micro SIM Card

For some reason, you may need to insert or remove a SIM card in your Samsung Galaxy S5, for instance: when you buy a new or used Samsung Galaxy S5 and need to insert a micro SIM card into it so that you can use your phone to make calls or send text messages, when you want to change your SIM card so that you need to remove the current one from your phone, etc. In this phone, the SIM card slot is located at the top side of the battery socket, under the micro SD card slot. As a note, since the provided slot is designed to hold a micro SD card, if yours is a regular or mini SIM card then you have to trim it first before insert it into your phone. You can either trim your SIM card by yourself or ask help from your carrier's store.


How to insert a micro SIM card?
You can do so by using the following steps:
  1. Turn off the phone.
  2. Lift the back cover with your thumb or finger using the small notch at the top side of the Power button. Make sure to do it gently so that you won't damage your fingernail or the back cover.
  3. Pull out the battery from its place with your thumb or finger using the small notch at the bottom side of the battery socket.
  4. If you have inserted a microSD card into your phone, it'll be easier if you remove this card first before inserting your micro SIM card. You can do so by pressing the microSD card with your finger and then pull it out from the slot.
  5. Insert the micro SIM card into its slot (it's located under the micro SD card slot). Make sure the gold contacts in the card facing downwards and the angled corner of the card is positioned correctly.
  6. Push the micro SIM card into the slot.
  7. If you wish to re-insert your microSD card, now you can re-insert the micro SD card into its slot.
  8. Insert the battery by placing the gold contact in the battery to the contact in the battery socket and then push the battery to its place.
  9. Replace the back cover.
  10. Now, you're ready to turn on the phone.


How to remove a micro SIM card?
You can do so by using the following steps:
  1. Turn off your phone.
  2. Lift the back cover with your thumb or finger using the small notch at the top side of the Power button. Make sure to do it gently so that you won't damage your fingernail or the back cover.
  3. Pull out the battery from its place with your thumb or finger using the small notch at the bottom side of the battery socket.
  4. If you have inserted a microSD card into your phone, you have to remove it first by pressing the microSD card with your finger and then pull it out from its slot.
  5. Now, you can remove your micro SIM card by pressing the micro SIM card with your finger and then pull it out from its slot.
  6. If you wish to change the current micro SIM card with the new/another one, you can insert the micro SIM card to the slot now.
  7. If you wish to re-insert your micro SD card, now you can re-insert the micro SD card to its slot.
  8. Insert the battery by placing the gold contact in the battery to the contact in the battery socket and then push the battery to its place.
  9. Replace the back cover.
  10. Now, you're ready to turn on the phone.

Samsung Galaxy S5: How to Insert or Remove a Micro SD card

Samsung Galaxy S5 allows you to extend your storage by providing you an external card slot that can be used to place a microSD card of up to 128GB capacity. It's quite useful since you can use your microSD card to keep the internal storage has free space enough(e.g: by moving app to microSD card, by setting this card as the default storage in some apps, etc.) so that your phone can work properly and doesn't encounter any issue caused by low internal storage.


How to insert a microSD card?
If you want to extend your storage by inserting the microSD card into your phone, you can do so by using the following steps:
  1. Turn off the phone.
  2. Lift the back cover with your thumb or finger using the small notch at the top side of the Power button. Make sure to do it gently so that you won't damage your fingernail or the back cover.
  3. Pull out the battery from its place with your thumb or finger using the small notch at the bottom side of the battery socket.
  4. Insert the microSD card with the gold contacts in the card facing downwards to the microSD card slot. As a note, since the microSD card slot is located above the SIM card slot, make sure you insert the microSD card into the correct slot. If the card happens to be inserted in the SIM card slot, take your Samsung Galaxy S5 to a Samsung service center to remove the microSD card.
  5. Push the microSD card into the slot.
  6. Insert the battery by placing the gold contact in the battery to the contact in the battery socket and then push the battery to its place.
  7. Replace the back cover.
  8. Now, you're ready to turn on the phone.


How to remove a microSD card?
For any reason, if you want to remove the microSD card from your phone, you can do so by using the following steps:
  1. Turn off your phone.
  2. Lift the back cover with your thumb or finger using the small notch at the top side of the Power button. Make sure to do it gently so that you won't damage your fingernail or the back cover.
  3. Pull out the battery from its place with your thumb or finger using the small notch at the bottom side of the battery socket.
  4. Press the microSD card with your finger and then pull it out.
  5. If you wish to change the current microSD card with the new/another one, you can insert the microSD card to the slot now.
  6. Insert the battery by placing the gold contact in the battery to the contact in the battery socket and then push the battery to its place.
  7. Replace the back cover.
  8. Now, you're ready to turn on the phone.

Samsung Galaxy S5: How to Remove or Insert the Battery

A rechargeable 2800mAh lithium-ion battery inside Samsung Galaxy S5 is stated to be able to provide the user a charge of 2800mAh up to 390 hours of standby (3G) and 21 hours of talk time (3G) without recharge. Moreover, this phone has been also equipped with some features that will let you use your phone more longer without recharge the battery, e.g: ultra power saving mode. However, there are some conditions when you'll probably need to remove or insert the battery in your phone, e.g: when you need to replace the current battery with the new one, when your phone freezes or doesn't respond to anything so that you need to pull the battery out to force shut down your phone, etc. Luckily, the battery in this phone is a removable battery so that you can easily remove or insert it by yourself in case it's needed.


How to remove the battery?
You can do so by using the following steps:
  1. Turn off your phone.
  2. Lift the back cover with your thumb or finger using the small notch at the top side of the Power button. Make sure to do it gently so that you won't damage your fingernail or the back cover.
  3. Pull out the battery from its place with your thumb or finger using the small notch at the bottom side of the battery socket.
  4. Now, you can completely remove the battery.


How to insert the battery?
Assuming that the back cover is still open, you can insert the battery into your phone by using the following steps:
  1. Place the gold contact in the battery to the contact in the battery socket and then push the battery to its place.
  2. Replace the back cover.
  3. Now, you're ready to turn on the phone.

Samsung Galaxy S4: How to Insert or Remove a Micro SD Card

Low internal storage can throw your phone into some troubles, for instance: error when read or save files, apps can't work properly, etc. Thus, it's important for the user to keep the internal storage has enough free space. One thing that can be done to prevent low internal storage is by placing a SD card in your phone to extend your storage. In Samsung Galaxy S4, you're allowed to place up to 64 GB of a micro SD card. Once the SD card is inserted, you can free up your internal storage by setting the SD card as the default storage for Camera app and other apps, moving apps to the SD card, etc.


How to insert a microSD card?
You can insert a microSD card into your phone to extend your storage by using the following steps:
  1. Turn off your phone.
  2. Lift the back cover with your thumb or finger using the small notch at the top side of the Power button. Make sure to do it gently so that you won't damage your fingernail or the back cover.
  3. Insert the SD card to the slot (it's located at the top of the battery socket, next to the SIM card slot). Make sure the gold contacts in the card facing downwards.
  4. Push the SD card into the slot until it engages in the place.
  5. Replace the back cover.
  6. Now, you're ready to turn on the phone.


How to remove a microSD card?
For any reason, if you want to remove the SD card from your phone, you can do so by using the following steps:
  1. Turn off your phone.
  2. Lift the back cover with your thumb or finger using the small notch at the top side of the Power button. Make sure to do it gently so that you won't damage your fingernail or the back cover.
  3. Push the SD card until it disengages from the slot and then pull it out.
  4. Replace the back cover.
  5. Now, you're ready to turn on the phone.

Samsung Galaxy S4: How to Insert or Remove a SIM Card

There are some conditions when you'll probably need to insert or remove a SIM/USIM card in your Samsung Galaxy S4, for instance: when you buy a new or used Samsung Galaxy S4 and need to insert a SIM card into it, when you want to replace your current SIM card with the new one, etc. The SIM card slot is located at the back side of the phone, above the battery socket. FYI, since the SIM card slot in this phone is designed to hold a micro SIM card, if yours is a regular/mini SIM card then you have to trim it before insert it into your phone. You can ask your carrier's store to trim your SIM card or you can do it by yourself.


How to insert a SIM card?
You can do so by using the following steps:
  1. Turn off the phone.
  2. Lift the back cover with your thumb or finger using the small notch at the top side of the Power button. Make sure to do it gently so that you won't damage your fingernail or the back cover.
  3. Pull out the battery from its place with your thumb or finger using the small notch at the bottom side of the battery socket.
  4. Insert the SIM card to the slot. Make sure the gold contacts in the card facing downwards and the angled corner of the card is positioned correctly.
  5. Push the SIM card into the slot until it engages in the place.
  6. Insert the battery by placing the gold contact in the battery to the contact in the battery socket and then push the battery to its place.
  7. Replace the back cover.
  8. Now, you're ready to turn on the phone.


How to remove a SIM card?
You can do so by using the following steps:
  1. Turn off your phone.
  2. Lift the back cover with your thumb or finger using the small notch at the top side of the Power button. Make sure to do it gently so that you won't damage your fingernail or the back cover.
  3. Pull out the battery from its place with your thumb or finger using the small notch at the bottom side of the battery socket.
  4. Push the SIM card until it disengages from the slot and then pull it out.
  5. If you wish to change the current SIM card with the new one, you can insert the new SIM card to the slot now.
  6. Insert the battery by placing the gold contact in the battery to the contact in the battery socket and then push the battery to its place.
  7. Replace the back cover.
  8. Now, you're ready to turn on the phone.

Samsung Galaxy S4: How to Remove or Insert the Battery

Based on its specifications, Samsung Galaxy S4 comes with rechargeable 2600mAh lithium-ion battery that can provide the user a charge of 2600mAh up to 370 hours of standby (3G) and 17 hours of talk time (3G) without recharge. Since it's a removable battery, if needed, you can easily remove or insert the battery by yourself, for instance: when the current battery is broken and you need to replace it with the new one, when your phone freezes or doesn't respond to anything and you need to force shut down your phone, etc.


How to remove the battery?
You can do so by using the following steps:
  1. Turn off your phone.
  2. Lift the back cover with your thumb or finger using the small notch at the top side of the Power button. Make sure to do it gently so that you won't damage your fingernail or the back cover.
  3. Pull out the battery from its place with your thumb or finger using the small notch at the bottom side of the battery socket.
  4. Now, you can completely remove the battery from its place.


How to insert the battery?
Assuming that the back cover is still open, you can insert the battery by using the following steps:
  1. Place the gold contact in the battery to the contact in the battery socket and then push the battery to its place.
  2. Replace the back cover.
  3. Now, you're ready to turn on the phone.

Samsung Galaxy S5: How to Adjust the Flash Settings in the Stock Camera App in Android 4.4.2 Kitkat

Samsung Galaxy S5 is equipped with a built-in flash that is placed below the rear camera. You can use the flash as an artificial light when taking photos in some conditions, e.g: when the light levels are too low, when the subject is darker than the background, etc. By default, the flash in the stock Camera app is set to off. But, if needed, you can adjust the flash settings to fit your need.


How to adjust the flash settings in the stock Camera app?
You can do so by using the following steps:
  1. Open the stock Camera app. FYI, you can speed up the way you access the stock Camera app by enabling the camera shortcut in the lock screen.
  2. Tap to open up the detailed settings menu.
  3. Tap Flash to change the flash settings. There are three flash settings available:
    • On: use this option if you want the camera fires the flash each time you capture a photo. When this option is selected, you'll see this icon in the preview screen.
    • Off: use this option if you don't want the camera fires the flash when you capture a photo.
    • Auto: use this option if you want the camera's sensor determines when the camera need to fire the flash based on the light levels in the scene. When this option is enabled, you'll see this icon in the preview screen.

Samsung Galaxy S5: How to View Blocked Email Messages in the Stock Email App in Android 4.4.2 Kitkat

If you have added an email address or domain to the spam list in the stock Email app, all email messages come from that email address or domain will be blocked. Though you're not notified when an email message from blocked sender or domain arrives and the message is not listed in the inbox, but it will be saved in the Junk folder in each email account so that you can still view all blocked email messages in this folder if needed.


How to view blocked email messages in the stock Email app?
You can do so by using the following steps:
  1. Open the stock Email app. If you have multiple email accounts, the combined inbox will be opened by default.
  2. Tap at the top left corner of the screen to open up the stock Email app menus.
  3. Scroll down the menus to the required email account and then tap Show all folders.
  4. Tap Junk folder. All blocked email messages sent to this account will be displayed here.
  5. Tap the required email message to view and read it.

Samsung Galaxy S5: How to Adjust the Zoom Level in the Stock Camera App in Android 4.4.2 Kitkat

In some conditions, you will probably need to adjust the zoom level before taking a photo, for instance: when you can't get closer to the subject because it is not safe or in a difficult location, when you want to take a photo of a small object, etc. Fortunately, the stock Camera app lets you adjust the zoom level up to 4x so that you can still get the best shot while you're in those conditions. But, you have to remember that you can't zoom in or out your photos when you're in these shooting modes: shot&more, panorama, virtual tour shot, surround shot, animated photo and sequence shot.


How to adjust the zoom level in the stock Camera app?
You can do so by using two different methods: by using the default zoom gesture and by using the Volume key.

Method #1: By using the default zoom gesture
When you're in the stock Camera app, you can easily zoom in your photo by spreading two fingers apart together on the image in the preview screen and zoom out your photo by pinching the screen. FYI, since this gesture is a default feature in the stock Camera app, you can directly use this feature without you have to set anything first.


Method #2: By using the Volume key
When you're in the stock Camera app, you can set the Volume key as the zoom key by utilizing the Volume key option in the camera settings menu. This will let you zoom in your photo by pressing the Volume Up key and zoom out your photo by pressing the Volume Down key.

Samsung Galaxy S5: How to Use Volume Key to Take Photos in Android 4.4.2 Kitkat

For some reason, you may want to be able to take photos using the physical button, for instance: if you want to take photos as you used to do with your conventional/digital camera or if you're in a condition when it's difficult for you to take photos using the on-screen icon or the voice command. Fortunately, the stock Camera app lets you change the Volume key function as the camera key so that you can use this physical key to take photos.


How to set the Volume key as the camera key?
By default, the Volume key in the stock Camera app is set to adjust the zoom level. Thus, you have to set this key as the camera key first before you can use this key to take photos. You can set the Volume key as the camera key by using the following steps:
  1. Open the stock Camera app.
  2. Tap to open up the detailed settings menu.
  3. Scroll the settings menu to the very bottom.
  4. Tap Volume key and then select Take pictures.
  5. The Volume key has been set as the camera key.

How to take a photo using the Volume key?
When the Volume key has been set as the camera key, you can take a photo by pressing the Volume Up key or the Volume Down key. As the example, we'll try taking a photo in auto mode with the Volume key by using the following steps:
  1. Open the stock Camera app. By default, the Camera app uses auto as the shooting mode.
  2. Aim the camera to the object.
  3. If needed, you can change the focus point by tapping the screen where the camera should focus. When the subject is in focus, the focus frame turns green.
  4. Press the Volume Up key or the Volume Down key to take a photo. As a note, to get the best result, make sure to hold the phone as steady as possible when pressing the Volume key to take photos.

Samsung Galaxy S5: How to Set a Part of a Song as a Ringtone in Android 4.4.2 Kitkat

Set a unique ringtone is the best way that can be taken to help you easily know that you have incoming calls since the default ringtones may have been widely used by other users. Fortunately, aside from letting you set a song or other supported sound files as a ringtone, Samsung Galaxy S5 also has the ability to automatically extract the recommended part of a song to use it as a ringtone so that you'll have a unique one. But, you have to remember that you can't manually choose which part of the song that can be used as a ringtone since it'll be chosen automatically by the device.


How to set a part of a song as a ringtone?
You can do so by using some methods. But, in this post, we'll try to set a part of a song as a ringtone by using two different methods: from the general settings menu and from the stock Music Player app.


Method #1: From the general settings menu
You can set the recommended part of a song as a ringtone from the general settings menu by using the following steps:
  1. On any screen, swipe down the top of the screen to open up the notification panel and then tap at the top right to go to the settings menu.
  2. With the settings menu is displayed in grid view, scroll down to the Sound and display section and then select Sound .
  3. Tap Ringtones.
  4. Tap Add button.
  5. Tap Sound picker and then you're free to either tap Always button or Just once button to continue.
  6. Make sure to check the box in the right side of the Auto recommendation at the bottom of the screen to enable this option and let your device extracts the highlights from the song and then use it as a ringtone.
  7. Now, select the required song. You'll get the sound preview when you tap a song so that you'll get an idea how it might sound when it's enabled.
  8. Tap Done button.
  9. The highlighted part of the selected song has been set as a ringtone.


Method #2: From the Stock Music Player App
You can set the recommended part of a song as a ringtone from the the stock Music Player app by using the following steps:
  1. Open the stock Music Player app.
  2. Tap the Tracks tab to see your song list.
  3. Long tap the required song.
  4. Tap at the top right to open up the additional options and then select Set as.
  5. Tap Auto recommendations to select this option and let your device extracts the highlights from the song and use it as a ringtone.
  6. Tap Phone ringtone to select this option and set the highlighted part of the selected song as a ringtone.
  7. Tap Done button.
  8. The highlighted part of the selected song has been set as a ringtone.

Samsung Galaxy S5: How to Delete Email Messages in the Stock Email App in Android 4.4.2 Kitkat

For some reason, you may want to delete some email messages in the stock Email app, for instance: when you want to clean up your email list or when you don't want some email messages are displayed in your email list. Fortunately, you can easily delete a single or multiple email messages in this app with ease.


How to delete email messages in the stock Email app?
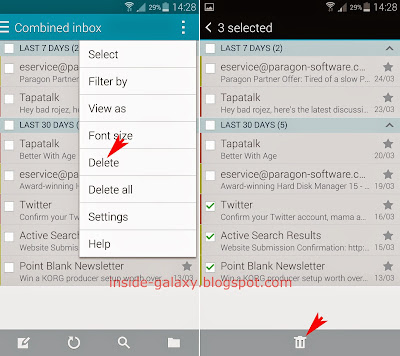
You can delete email messages in inbox or other folders by using some methods. But, in this post, we'll try to delete some incoming email messages in the stock Email app by using two different methods: by using tickboxes in the email list and by using the delete menu


Method #1: By using tickboxes in the email list
By default, the the stock Email app provides tickboxes for all email messages in the email list to let you select them with more easily. If you don't have those tickboxes, you can enable the option to show those tickboxes in the stock Email app settings menu. Well, you can use the following steps to select some email messages using tickboxes and then delete them:
  1. Open the stock Email app. When you have multiple accounts, the combined inbox will be opened by default. This inbox will display all email messages for all accounts.
  2. Tap the tickboxes next to the required email messages you want to delete to select them.
  3. Tap at the bottom of the screen.
  4. The selected email messages have been deleted.


Method #2: By using the delete menu
You can use the following steps to to select some email messages and then delete them by using the delete menu in the additional options:
  1. Open the stock Email app. When you have multiple accounts, the combined inbox will be opened by default. This inbox will display all email messages for all accounts.
  2. Tap or long press the Recent apps key to open up the additional options and then select Delete.
  3. Select the required email messages you want to delete.
  4. Tap at the bottom of the screen.
  5. The selected email messages have been deleted.