Samsung Galaxy S7 Edge: Front and Back Side Layouts

It's may a bit late, but this time I want to share you the front side and back side layouts of Samsung Galaxy S7 Edge. It's written based on my Samsung Galaxy S7 Edge SM-G935FD runs with Android 6.0.1 Marshmallow. Knowing the layout of our phones will help us to use it with more easily.


Front side layout of Samsung Galaxy S7 Edge
  1. SIM card tray(at the top side of the phone): use this tray to place two nano SIM cards to use dual SIM mode or a nano SIM card and micro SD card to use single SIM mode.
  2. Microphone (at the top side of the phone).
  3. LED indicator: it'll light up or flash red or blue while the screen is off to notify you when the battery level is low or being charged, voice recording, or receiving notifications.
  4. Light/proximity sensor: this sensor is used to make some features work when it's blocked by an object, as the example, the screen will auto turn off when this sensor is blocked by your face or ear during calls, the screen will auto turn on when you move your hand above this sensor, etc.
  5. Speaker.
  6. 5MP Front camera: you can use this to take a self-portrait photo. This camera is also used by the phone to make some features work, as the example, it'll detect your face so that the screen will stay on while you're looking at it.
  7. Volume button: press this button to adjust the volume.
  8. Touch screen/main screen: use it to use apps, navigate your phone, etc.
  9. Power button: press this button to turn on or lock the screen. Long press this button to turn on or off the phone, restart the phone, or turn on or off emergency mode.
  10. Edge screen: use it to view edge panels(e.g, task edge, people edge, apps edge, quick tools panel, etc.), edge feeds(e.g, unread notifications, S health notifications, Yahoo! news, etc). You can also set this screen to light up while the screen is facing downwards when you receive notifications.
  11. Recents key: tap this key to view the list of your recent apps. Long tap this key to launch the split screen view.
  12. Home button/fingerprints recognition sensor: press this button to turn on the screen when it's locked or return to the home screen. Long press this button to launch Google. When the screen lock type in your phone is set to fingerprints, you can use this button to recognize your registered fingerprint to unlock the screen.
  13. Back key: tap this key to return to the previous screen. Long tap this key to access additional options for the current screen.
  14. Headset jack(at the bottom side of the phone): use it to insert your headset.
  15. Multipurpose jack(at the bottom side of the phone): use it to insert a micro USB cable when you want to charge your phone or want to connect your phone to a PC. You can also use it to insert OTG adaptor so you can transfer data from other devices or connect USB peripheral devices, e.g., mouse, keyboard, etc, to your phone.
  16. Microphone(at the bottom side of the phone).
  17. Loud speaker(at the bottom side of the phone).


Back side layout of Samsung Galaxy S7 Edge
  1. 12MP Rear camera: you can use it to take a photo using various shooting modes and effects.
  2. Flash/heart rate sensor: it will light up when you turn on flash when taking photos, when you act your phone as a torch, or when you receive notifications if flash notification feature is enabled. You can also use it to measure your heart rate or easily take a self-portrait photo.
  3. NFC/MST antenna/Wireless charging coil: it will be used to pair your phone with other NFC capable device by holding them together back to back. It also be used to charge your phone with a wireless charger.
  4. Main antenna.

Samsung Galaxy S6 Edge: How to Charge the Battery Using a Wireless Charger

Your Samsung Galaxy S6 Edge has a built-in wireless charging coil pinned in the back side of the phone to let you charge the battery using a wireless charger. This can be alternative way if you want to have an easier way to charge the battery or don't like to plug and unplug a micro USB cable into multipurpose jack in your phone each time you want to charge the battery.


How to charge the battery using a wireless charger(EP-NG930)?
You can do so by using the following steps:
  1. Connect the USB cable to the USB power adaptor/Samsung's adaptive fast charger.
  2. Connect the micro USB cable into the charger port at the back side of the wireless charger.
  3. Plug the USB power adaptor/Samsung's adaptive fast charger into an electric socket.
  4. Place the centre of the your phone's back vertically or horizontally on the centre of the wireless charger. When needed, you can check the remaining charging time on the screen by pressing the Home key.
  5. If you'd like using the fast wireless charging feature, make sure the following conditions are filled:
    • The fast wireless charging feature is enabled. Please note that during fast wireless charging, the fan inside the wireless charger will operate and may produce a noise. If you don't like that noise, turn off this feature.
    • You're using a charger and components that support the fast wireless charging.
    • The phone or the screen is turned off.
  6. When the battery is fully charged, remove your phone from the wireless charger and then unplug the USB power adaptor from the electric socket.

Samsung Galaxy S6 Edge: How to Customise Application Notification Settings in Android 6.0.1 Marshmallow

If you have updated your Samsung Galaxy S6 Edge to Android 6.0.1 Marshmallow, you'll be allowed to customise notification settings for each app in your phone. You can allow or block notifications of an app, set an app as priority so that its notifications can still be received when the Do not disturb mode is enabled, set your phone to show notification previews of an app in pop-up at the top of the screen so that you won't miss any notification of that app even when you're using your phone to do other activity, set your phone to hide notifications of an app on the lock screen to prevent unauthorised people from reading it when the screen is locked, or set your phone to show notifications of an app on the lock screen with or without its content so you can easily know when you have ones when the screen is locked.


How to customise notification settings of an app?
As the example, we'll customise notification settings of the S Health app by using the following steps:
  1. On any screen, swipe down the top of the screen to open up the notification panel and then tap to go to the settings menu.
  2. Scroll down the screen to find Notifications and then tap it. By default, all apps notifications are enabled or allowed so you'll be notified when you receive new ones.
  3. Tap Advanced at the top right to customise notification settings of each app.
  4. Scroll down the screen to find S Health app and then tap it.
  5. Here, you'll be provided with the following options:
    • Allow notifications(this option is enabled by default): tap the ON/OFF switch next to this option to enable or disable it. When the switch turns blue , means the notifications of the selected app is allowed and you'll be notified when you receive new ones. When the switch turns gray , means the notification of the selected app is blocked and you won't be notified when you receive new ones.
    • Set as priority: tap the ON/OFF switch next to this option to enable or disable it. When the switch turns blue , means the selected app has been set as priority so that you will be notified when you receive notifications from the selected app while the Do not disturb mode is enabled.
    • Previews in pop-ups: tap the ON/OFF switch next to this option to enable or disable it. When the switch turns blue , means your phone will show notification previews from the selected app in pop-up at the top of the screen.
    • Hide on lock screen: tap the ON/OFF switch next to this option to enable or disable it. When the switch turns blue , means this option is enabled and your phone will hide notifications from the selected app when the screen is locked. When the switch turns gray , means this option is disabled and your phone will show notifications from the selected app on the lock screen.
    • Hide content on lock screen(this option is available when the Hide on lock screen option is disabled): tap the ON/OFF switch next to this option to enable or disable it. When the switch turns blue , means this option is enabled and your phone will show notifications from the selected app on the lock screen without displaying its content. When the switch turns gray , means this option is disabled and your phone will show notifications from the selected app and its contents on the lock screen.

Samsung Galaxy S6 Edge: How to Enable or Disable Auto Factory Reset Feature in Android 6.0.1 Marshmallow

If you have updated your Samsung Galaxy S6 Edge to Android 6.0.1 Marshmallow and are using one of the screen lock types with security lock feature(e.g., pattern, direction lock, PIN, password or fingerprints), you can use the auto factory reset feature to provide more protection for your phone. When this feature is enabled, your phone will automatically be reset to factory settings if you or others attempt to unlock the phone incorrectly 15 times. This can be used to avoid unathorized people from accessing data or information in your phone when it's lost or stolen.


How to enable or disable the auto factory reset feature?
As the example, we'll turn on or off this feature when the screen lock type is set to fingerprints by using the following steps:
  1. On any screen, swipe down the top of the screen to open up the notification panel and then tap to go to the settings menu.
  2. Scroll down the screen to find Lock screen and security and then tap it.
  3. Tap Secure lock settings.
  4. Tap the ON/OFF switch next to Auto factory reset to enable or disable this option. When the switch turns blue means the auto factory reset feature is enabled and your phone will automatically perform factory reset if you or others attempt to unlock your phone incorrectly 15 times. Please note that all data, including files and downloaded apps, will be deleted.

Samsung Galaxy S6 Edge: How to Enable and Use Quick Tools Panel Feature in Android 6.0.1 Marshmallow

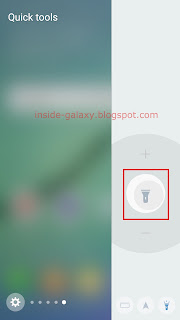
After updating your Samsung Galaxy S6 Edge to Android 6.0.1 Marshmallow, you can display more panels in the edge panels, one of which is the quick tools panel. It includes three quick and easy functions: a ruler that can be used to measure length of an object, a compass that can be used to find the geographic cardinal directions as well as the latitude and longitude of your current location, and a torch that can be used to improve your visibility.


How to enable the quick tools panel feature?
You can turn on this feature by using two different methods: from the settings menu and from the edge screen.

Method #1: From the settings menu
  1. On any screen, swipe down the top of the screen to open up the notification panel and then tap to go to the settings menu.
  2. Scroll down the screen to find Edge screen and then tap it.
  3. Tap Edge panels. If it's off, slide the ON/OFF switch to the right to turn it on. The switch turns blue when it's enabled.
  4. Check the box above the compass/quick tools panel to enable and display it in the edge panel.

Method #2: From the edge screen(in condition that the edge panels feature is on)
  1. Drag the edge panel handle towards the centre of the screen to open the edge panels.
  2. Tap to go to the edge panels menu.
  3. Check the box above the compass/quick tools panel to enable and display it in the edge panel.


How to use the quick tools panel feature?
You can do so by using the following steps:
  1. Drag the edge panel handle towards the centre of the screen to open the edge panels.
  2. If it doesn't display the quick tools panel, swipe the screen to the left or right to find it. This panel displays compass as the default function.
  3. To use your phone as a compass, place your phone flat on your palm and it will show you the cardinal directions as well as your current location(make sure you have an Internet connection and the location feature is enabled). If it doesn't work normally, you may need to calibrate it before you use it by tapping Calibrate button and then move your phone in a figure of 8 as shown in your phone.
  4. To use your phone as a torch, do as follows:
    • Tap in the panel to use torch.
    • Tap to turn on the torch.
    • Tap to get more brighter torch or tap to get more dimmer torch.
    • Tap to turn off the torch.
  5. To use your phone as a ruler, do as follows:
    • Tap in the panel to use ruler.
    • By default, it uses cm as the unit of length. But, when needed, you can switch between cm and inch by tapping cm/inch.
    • Now, you can use the ruler to measure the length of an object.