Samsung Galaxy S6 Edge: How to Use Night Clock Feature in Android 5.0.2 Lollipop

Aside from giving you beautiful curves, the edge screens in Samsung Galaxy S6 Edge also lets you use some new features, one of which is the night clock feature. When this feature is enabled, the edge screen will active to display the clock at the night while the main screen is turned off. You can set your phone to display the night clock up to 12 hours. But, you have to remember that this clock will automatically be disabled when the remaining battery power is below 15%


How to enable the night clock feature?
You can do so by using the following steps:
  1. While the screen is unlocked, swipe down the top of the screen to open up the notification panel and then tap at the top right to go to the settings menu.
  2. Scroll down the screen to the Device section and then tap Edge screen.
  3. Scroll down the screen and then tap Night clock.
  4. If Night clock is off, tap the ON/OFF switch to turn it on. The switch turns green when it's enabled.
  5. Adjust the start time:
    • Touch the arrows to adjust the start time, or tap Keypad next to Start time to input the start time using the virtual keyboard.
    • Tap Done button.
  6. Adjust the end time:
    • Touch the arrows to adjust the end time, or tap Keypad next to End time to input the end time using the virtual keyboard.
    • Tap Done button.


How to display the night clock?
As the example, if you have set your phone to display the night clock from 9PM to 5AM, during these hours, a low-light clock will be displayed on the edge screen while the main screen is turned off.

Samsung Galaxy S6 Edge: How to Charge the Battery

Samsung Galaxy S6 Edge comes with a non-removable Li-Ion 2600 mAh battery that is claimed to be able to provide you a charge of 2600mAh up to 18 hours of talk time (3G), up to 50 hours of audio playback time and up to 10 hours Internet usage time (3G) without recharge the battery. When you use Samsung's adaptive fast charger, you can charge the battery up to 1,5 times faster than the previous models in condition that your phone or its screen is off. Since this battery is rechargeable, you can recharge it by using the provided USB cable and USB power adaptor/Samsung's adaptive fast charger.


How to charge the battery of Samsung Galaxy S6 Edge?
You can do so by using the following steps:
  1. Turn off your phone. FYI, you can still use your phone while it's being charged, but it may take longer for the battery to be fully charged. Also, if you want to use the fast charging feature, your phone or its screen should be turned off.
  2. Connect the USB cable to the USB power adaptor/Samsung's adaptive fast charger.
  3. Connect the micro USB cable into the multipurpose jack in your phone(it's located under the Home key).
  4. Now, plug the charger/Samsung's adaptive fast charger into an electric socket.
  5. When the battery is fully charged, disconnect your phone from the charger by unplugging the micro USB cable from your phone and then unplug the charger from the electric socket.

Samsung Galaxy S6 Edge: How to Insert or Remove a SIM Card

Samsung Galaxy S6 Edge has a built-in SIM card tray that is located at the top side of the phone. Since the tray is designed to hold a nano SIM card, if yours is a regular or mini SIM card then you have to trim it before inserting it into your phone. You can either trim it by yourself or ask help from your carrier's store. When you have inserted a nano SIM card in your phone, you can use the calling, messaging and data network features.


How to insert a nano SIM card in Samsung Galaxy S6 Edge?
You can do so by using the following steps:
  1. Turn off your phone. As a note, if you don't turn off your phone when inserting a SIM card, your phone will automatically restart once the SIM card is completely inserted.
  2. Insert the ejection pin perpendicularly into the provided hole on the SIM card tray(it's located at the top side of the phone) to loosen the tray.
  3. Pull out the SIM card tray gently from its slot.
  4. Now, place your nano SIM card on the SIM card tray. Make sure the gold-coloured part in the card facing downwards and the angled corner of the card is positioned correctly.
  5. Insert the SIM card tray back into the SIM card tray slot and then push the tray into the slot until it engages in the place.
  6. Once done, turn on your phone.

How to remove a nano SIM card from Samsung Galaxy S6 Edge?
In case you need to remove a nano SIM card from your phone, you can use the following steps:
  1. Turn off your phone.
  2. Insert the ejection pin perpendicularly into the provided hole on the SIM card tray(it's located at the top side of the phone) to loosen the tray.
  3. Pull out the SIM card tray gently from its slot.
  4. Now, remove your nano SIM card from its tray.
  5. Insert the SIM card tray back into the SIM card tray slot and then push the tray into the slot until it engages in the place.

Samsung Galaxy S6 Edge: Front and Back Side Layout

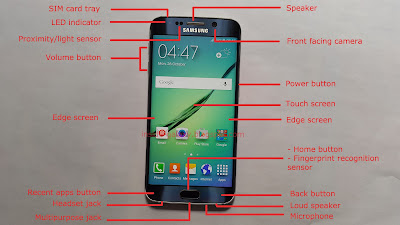
I'm so happy that I finally have the newest Samsung Galaxy S series, Samsung Galaxy S6 Edge. It's a SM-G925F runs with Android 5.0.2 Lollipop. I'm falling in love with this phone since it has a beautiful look, makes me don't want to cover it with a case. In this post, I want to share you the front side and back side layout of this phone.


Front side layout of Samsung Galaxy S6 Edge
  1. SIM card tray(at the top side of the phone): use this tray to place a nano SIM card.
  2. LED Indicator: it'll light up or flash red or blue while the screen is off when there are unread notifications, the voice recording is in progress, the battery is low and the phone is being charged.
  3. Proximity/light sensor: during calls, when this sensor is blocked by an object, e.g: face or ear, the screen will be turned off automatically.
  4. Speaker.
  5. 5MP Front facing camera.
  6. Volume button: press these buttons to adjust the volume.
  7. Power button: press this button to turn on or lock the screen. Long press this button to turn on or off the phone.
  8. Touch screen: use this main screen to use apps, navigate your phone, etc.
  9. Edge screen: use this main screen to notify you with the light when you receive calls or notifications, check missed notifications of your important contacts, view feeds and display a night clock.
  10. Recent apps button: tap this button to view the list of your recent apps. Long tap this button to launch the split screen view.
  11. Home button/Fingerprint recognition sensor: press this button to turn on the screen while the screen is locked and return to the home screen. Long press this button to launch Google. When you use fingerprints as the lock screen method, you can use this button to recognize your fingerprint to unlock the screen.
  12. Back button: tap this button to return to the previous screen.
  13. Headset jack(at the bottom side of the phone): use it to insert your headset.
  14. Multipurpose jack(at the bottom side of the phone): use it to insert a micro USB cable when you want to charge your phone or when you want to connect your phone to a PC.
  15. Microphone(at the bottom side of the phone).
  16. Loud speaker(at the bottom side of the phone).


Back side layout of Samsung Galaxy S6 Edge
  1. Microphone(at the top side of the phone).
  2. Infrared port: it will be used to remote your TV when you act your phone as a remote control. 
  3. GPS antenna. 
  4. 16MP Rear camera.
  5. Flash: it will light up when you turn on flash when taking photos or when you act your phone as a torch.
  6. NFC antenna/Wireless charging coil: it will be used to pair your phone with other NFC capable device by holding them together back to back. It also be used to charge your phone wirelessly.
  7. Main antenna.

Samsung Galaxy S4: How to Share Your Namecard via Bluetooth in Android 5.0.1 Lollipop

The stock Contacts app in your Samsung Galaxy S4 has a feature that will let you create your own name card so you can save your personal information, e.g: name, phone number, etc. When needed, you can easily share your name card to others via Bluetooth.


How to share your name card via Bluetooth?
You can do so by using the following steps:
  1. Open Contacts app.
  2. Tap the Contacts tab. All your contacts will be displayed here.
  3. Tap your name card (it's located at the top of the contact list).
  4. Tap the Menu key and then select Share name card.
  5. Tap Bluetooth. If Bluetooth in your phone is off, tap Turn on button to turn it on.
  6. Assuming that the device you want to share your name card with has been paired with yours, tap the device name to select it.
  7. When the selected device has accepted your file transfer request, your name card will be sent shortly.

Samsung Galaxy S4: How to Create Your Namecard in Android 5.0.1 Lollipop

Aside from letting you to create and manage your personal or business contacts, the stock Contacts app in your Samsung Galaxy S4 also lets you to create and manage your name card. You can use this feature to save your name, mobile phone number, home phone number, email address, address, website, and more. This can be alternative way you can use when you need to know your phone number or other information. When needed, you can also easily send your name card to others by using one of the share methods available in your phone, e.g: Bluetooth, messages, etc.


How to create your name card?
You can do so by using the following steps:
  1. Open Contacts app.
  2. Tap the Contacts tab. All of your contacts will be displayed here.
  3. Tap Set my profile (it's located at the top of the contact list).
  4. Enter your own personal information, e.g: name, mobile phone number, home phone number, address, email address, etc.
  5. If you'd like to add photo to your name card, do as follows:
    • Tap .
    • Tap Image and then select the required photo from Gallery.
    • If needed, you can adjust the area of the selected photo you want to set as the photo contact.
    • Tap Save button.
    • The selected photo has been set as the photo contact.
  6. Tap Save button to save your name card.
  7. Your name card has been created and added to the contact list.

Samsung Galaxy S4: How to Edit or Delete a VPN Profile in Android 5.0.1 Lollipop

There's a reason why you might need to edit or delete a VPN profile you had added in your phone, for instance: when you want to change its name or type, when you want to remove unused VPN profile, or when you want to turn off your lock screen so you have to delete all of your VPN profiles.


How to edit or delete a VPN profile?
You can do so by using the following steps:
  1. While your phone is unlocked, swipe down the top of the screen to open up the notification panel and then tap at the top right to go to the settings menu.
  2. Tap Connections tab.
  3. Tap More networks.
  4. Tap VPN. All VPN profiles you have added will be displayed here. To edit a VPN profile go to the step #5, while to delete a VPN profile go to the step #6.
  5. Edit a VPN profile:
    • Long tap the required VPN profile.
    • Tap Edit network.
    • Now you can edit the values within the selected VPN profile, e.g: VPN name, VPN type, VPN server address, etc.
    • Tap Save button to save the changes.
  6. Delete a VPN profile:
    • Long tap the required VPN profile.
    • Tap Delete network.
    • The selected VPN profile has been deleted.