Samsung Galaxy S6 Edge: How to Create a New Contact in Android 5.1.1 Lollipop

There are various ways that you can do to retrieve contacts to your Samsung Galaxy S6 Edge, from syncing contacts of your existing account up to transferring contacts from other devices. However, there are some reason you might need to manually add a contact to your phone, e.g: when you receive call or message from someone and want to add the number to your contacts list, when you meet someone and he asks you to save his number, etc.


How to add a new contact?
You can add a new contact by using several ways. As the example, we'll do so by using three different methods: from the contacts list, from the keypad and from the logs.

Method #1: From the contacts list
You can add a new contact while viewing your contacts list by using the following steps:
  1. Open Contacts app.
  2. Tap at the bottom right corner of the screen to create a new contact.
  3. By default, the storage location for your contacts is the phone memory. If you'd like to change it, tap the drop down box at the top of the screen and then select the required storage location, e.g: select your Google account if you'd like to save the contact to your Google account.
  4. If needed, you can add a photo to the contact by tapping . Tap to take a photo or tap to pick up a photo from the Gallery app.
  5. Enter the contact's name in the Name field.
  6. Enter the contact's phone number in the Phone number field. Tap if you'd like to add more phone numbers.
  7. Tap Save button to save the contact to the selected storage.

Method #2: From the keypad
You can add a phone number to your contacts list while you're in the dialing screen by using the following steps:
  1. Open Phone app.
  2. If needed, tap at the bottom right corner of the screen to open up the keypad.
  3. Type the phone number.
  4. Tap + Add to Contacts.
  5. Tap Create contact.
  6. By default, the storage location for your contacts is the phone memory. If you'd like to change it, tap the drop down box at the top of the screen and then select the required storage location, e.g: select your Google account if you'd like to save the contact to your Google account.
  7. If needed, you can add a photo to the contact by tapping . Tap to take a photo or tap to pick up a photo from Gallery app.
  8. Enter the contact's name in the Name field.
  9. Tap Save button to save the contact to the selected storage.

Method #3: From the logs
You can add a phone number of a received call or message to the contacts list by using the following steps:
  1. Open Phone app.
  2. Tap Log tab.
  3. Tap a phone number of a received call or message you want to save.
  4. Tap Create contact.
  5. By default, the storage location for your contacts is the phone memory. If you'd like to change it, tap the drop down box at the top of the screen and then select the required storage location, e.g: select your Google account if you'd like to save the contact to your Google account.
  6. If needed, you can add a photo to the contact by tapping . Tap to take a photo or tap to pick up a photo from Gallery app.
  7. Enter the contact's name in the Name field.
  8. Tap Save button to save the contact to the selected storage.

As a note, if you set SIM card as the storage location for a contact, you're only allowed to add a single name and phone number for the contact.

Samsung Galaxy S6 Edge: How to Remove S Finder and Quick Connect Buttons from the Notification Panel in Android 5.1.1 Lollipop

One of the functions of the notification panel in your Samsung Galaxy S6 Edge is letting you view unread notifications before you open it in an appropriate app. However, when you have some unread notifications, they will be piled so you have to swipe up the notification screen to view all of them. Luckily, if you have updated your phone to Android 5.1.1 Lollipop, you can get extra space for your missed notifications in the notification panel by removing the S Finder and Quick connect buttons.


How to remove S Finder and Quick Connect buttons from the notification panel?
You can disable both these buttons so they won't be displayed in the notification panel by using the following steps:
  1. While the screen is unlocked, swipe down the top of the screen to open up the notification panel.
  2. Tap Edit at the top of the screen.
  3. At the bottom of the screen, clear the checkbox above the S Finder and Quick connect to disable both these buttons, then tap Done button to save the changes and return to the notification panel.
  4. The S Finder and Quick connect buttons have been disabled and removed from the notification panel.

Samsung Galaxy S6 Edge: How to Edit Quick Settings in the Settings Menu in Android 5.1.1 Lollipop

If you have some frequently-used settings in your Samsung Galaxy S6 Edge but they're in the middle or the bottom of the settings menu(e,g: accessibility menu), you can add them to the quick settings for easier and faster access. It's because the quick settings section is placed at the top of the settings menu, you don't need to scroll down the screen to find and access your frequently-used settings.


How to edit the quick settings in the settings menu?
You can edit the list of your frequently-used settings by using the following steps:
  1. While the screen is unlocked, swipe down the top of the screen to open up the notification panel and then tap at the top right to go to the settings menu.
  2. Tap Edit to edit the quick settings.
  3. To add or display an item/menu to the quick settings, tick the checkbox next to the required item/menu. You can display up to 9 items/menus in the quick settings.
  4. To remove an item/menu from the quick settings, clear the checkbox next to the required item/menu.
  5. Tap the Back key to return to the settings menu.

Samsung Galaxy S6 Edge: How to Enable and Use Direct Access in Android 5.1.1 Lollipop

Samsung Galaxy S6 Edge comes with various accessibility features to help those with visual, hearing and/or dexterity impairments use this phone with more easily. For easier access to some accessibility options, you can enable the direct access feature so you can directly access to the selected accessibility options from any screen simply by pressing the Home key three times quickly


How to enable the direct access feature?
You can turn this feature on by using the following steps:
  1. While the screen is unlocked, swipe down the top of the screen to open up the notification and then tap at the top right to go to the settings menu.
  2. Scroll down the screen to the Personal section and then tap Accessibility.
  3. Tap Direct access.
  4. Slide the ON/OFF switch to the right to enable the direct access feature. The switch turns green when it's enabled.
  5. Now, you can enable the required accessibility options that you want to display in the direct access menu. There are 8 options available:
    • Accessibility
    • Voice assistant
    • Universal switch
    • Magnifier window
    • Negative colors
    • Grayscale
    • Color adjustment. FYI, you have to set up the color adjustment feature first if you want to be able to enable this option.
    • Interactive control. FYI, you have to enable the interactive control feature first if you want to be able to enable this option.


How to use the direct access feature?
As the example, if you'd like to enable the grayscale mode, you can easily do so by pressing the Home key three times quickly to open up the direct access menu and then tap Grayscale. The color of your phone's screen will be changed to grayscale.

Samsung Galaxy S6: How to Setup and Use Direction Lock in Android 5.1.1 Lollipop

Direction lock is a new screen lock type that you can find in your Samsung Galaxy S6 Edge. When it's enabled, you have to draw the direction combination that you set in advance to unlock the screen. However, since the direction lock feature is not located in the lock screen menu, you have to enable it first in the accessibility menu before you can set it as the screen lock type.


How to setup direction lock?
You can use the following steps to enable the direction lock and then set it as the screen lock type:
  1. While the screen is unlocked, swipe down the top of the screen to open up the notification panel and then tap at the top right to go to the settings menu.
  2. Scroll down the screen to the Personal section and then tap Accessibility.
  3. Tap Direction lock.
  4. Slide the ON/OFF switch to the right to enable the direction lock.
  5. Now, draw a series of four to eight directions(left, right, up or down) and then tap Continue button.
  6. Draw the direction combination again to verify it and then tap Confirm button.
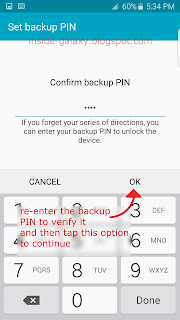
  7. Enter a backup PIN and then tap Continue button. FYI, you can use this PIN as the alternative way to unlock the screen when you forget the combination.
  8. Enter the backup PIN again to verify it and then tap OK button.
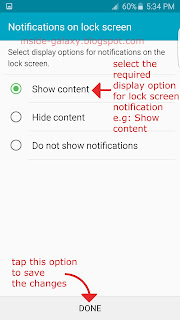
  9. Select the required display option for the lock screen notifications. There are three options available: Show content, Hide content or Do not show notifications. As the example, if you select Show content then your phone will display notifications and its contents while the screen is locked. Tap Done button to save the changes. The direction lock has been set as the screen lock type.
  10. When needed, while you're in the direction lock menu, you can enable or disable the following options:
    • Vibration feedback: enable this option to have your phone vibrates when you draw the direction combination to unlock the screen.
    • Sound feedback: enable this option to have your phone plays a sound when you draw the direction combination to unlock the screen.
    • Show directions: enable this option to have your phone shows the direction arrows when you draw the direction combination to unlock the screen.
    • Read drawn directions aloud: enable this option to have your phone reads aloud the direction when you draw the direction combination to unlock the screen.


How to use direction lock to unlock the screen?
While the screen is off and locked, press the Power key to turn it on. Draw series of directions that you have set before to unlock the screen. When you draw incorrect combination 5 times, you'll be provided with an option to enter the backup PIN to unlock the screen. If that so, tap Backup PIN and then enter the backup PIN to unlock the screen. As a note, unlocking the screen using the backup PIN will reset the screen lock type back to swipe. If you'd like to use the direction lock, you have to set it as the screen lock type and then create a new direction combination again.

Samsung Galaxy S6 Edge: How to Remove Existing Fingerprints in Android 5.1.1 Lollipop

In Samsung Galaxy S6 Edge, you can register up to 4 fingerprints and then use them to unlock the screen, login to the Samsung websites and verify your Samsung account when purchasing content in Samsung services. When needed, you can also delete or deregister some or all registered fingerprints, e.g: when you want to delete unused fingerprints so you can register the new ones.


How to delete existing fingerprints?
You can do so by using the following steps:
  1. While the screen is unlocked, swipe down the top of the screen to open up the notification panel and then tap at the top right to go to the settings menu.
  2. Scroll down the screen to the Personal section and then tap Lock screen and security.
  3. Tap Fingerprints.
  4. Place the finger that you have registered before on the Home key to verify your identity so you can manage your fingerprints. Alternatively, you can tap Backup password and then enter the backup password.
  5. Tap Edit button at the top right.
  6. Select the required fingerprints you want to delete and then tap Remove button at the top right.
  7. Tap Remove button to confirm deleting the selected fingerprints.
  8. The selected fingerprints have been removed. FYI, if you remove all fingerprints, your phone will automatically set swipe as the screen lock type.

Samsung Galaxy S6 Edge: How to Change Screen Lock Effect in Android 5.1.1 Lollipop

By default, your Samsung Galaxy S6 Edge uses swipe as the screen lock type. It's the simplest screen lock type since you just need to swipe the screen with your finger in any direction to unlock it. When swipe is set as the screen lock type, you can set your phone to play an effect when you unlock the screen.


How to change the screen lock effect?
You can do so by using the following steps:
  1. While the screen is unlocked, swipe down the top of the screen to open up the notification panel and then tap at the top right to go to the settings menu.
  2. Scroll down the screen to the Personal section and then tap Lock screen and security.
  3. Tap Unlock effect and then select from the following options:
    • None: select this option to turn off unlock effect so your phone won't play any effect when you unlock the screen.
    • Water droplet: select this option to have your phone plays water droplet effect when you unlock the screen.
    • Sparkling bubbles: select this option to have your phone plays sparkling bubbles effect when you unlock the screen.
  4. The unlock effect has been changed.