Samsung Galaxy S7 Edge: How to Block Calls From Unknown Phone Numbers in Android 6.0.1 Marshmallow

Aside from letting you block calls from unwanted phone numbers, the default call blocker feature in your Samsung Galaxy S7 Edge also lets you block calls from unknown phone numbers(those who have not been added into your contacts list). When an unknown or anonymous phone number calls you, you won't be notified with any notification and it will be rejected automatically. However, you can still trace all blocked calls in the call logs because your phone stays recording them there and marks them as rejected calls.


How to block calls from unknown or anonymous phone numbers in the Phone app?
You can do so by using the following steps:
  1. Open the Phone app.
  2. Tap More at the top right and then select Settings.
  3. Tap Call blocking.
  4. Tap Block list.
  5. Slide the ON/OFF switch next to Block anonymous calls to the right to enable it. When the switch turns , means this option is enabled and your phone will automatically reject calls from unknown/anonymous numbers.

Samsung Galaxy S7 Edge: How to Block Calls From Unwanted Phone Numbers in Android 6.0.1 Marshmallow

Samsung Galaxy S7 Edge has the default call blocker feature or auto reject call feature that will let you block unwanted phone number from calling you by adding the phone number to the block list. When an incoming call from a blocked number arrives, you won't be notified with any notification but your phone will keep recording all blocked calls in the call logs and flag them as rejected calls.


How to block calls from unwanted phone numbers?
As the example, we'll add a phone number to the block list by using three different methods: from the Phone app settings menu, from a message conversation in the Messages app, and from a call log in the Phone app.

Method #1: From the Phone app settings menu
  1. Open the Phone app.
  2. Tap More at the top right and then select Settings.
  3. Tap Call blocking.
  4. Tap Block list.
  5. Enter the required phone number you want to block in the Enter phone number field. Alternatively, you can tap the Log button to add the phone number of a call log in the Phone app to the block list, or tap the Contacts button to add a contact from your contacts list to the block list. Tap to add the phone number to the block list. Repeat this step to add more numbers to the list.
  6. The selected phone number has been added to the block list and calls come from this phone number will be blocked or rejected automatically.


Method #2: From a message conversation in the Messages app
  1. While you're reading a message comes from an unwanted phone number whose calls you want to block, tap More at the top right and then select Block number.
  2. Slide the ON/OFF switch next to Call block to the right to enable it and then tap OK button.
  3. The sender of the selected conversation has been added to the block list and calls come from this phone number will be blocked or rejected automatically.


Method #3: From a call log in the Phone app
  1. While you're in the call log, tap the required log whose calls you want to block.
  2. Tap More at the top right and then select Block/unblock number.
  3. Slide the ON/OFF switch next to Call block to the right to enable it and then tap OK button.
  4. The phone number of the selected call log has been added to the block list and calls come from this phone number will be blocked or rejected automatically.

Samsung Galaxy S7 Edge: How to Manage and Use Speed Dial Feature in Android 6.0.1 Marshmallow

Speed dial is an old feature that you still can find in your Samsung Galaxy S7 Edge and can be used to assign a contact to a speed dial number so you can easily call the contact simply by dialing the speed dial number. It'll save you more time because you don't have to dial complete phone number to call that contact.


How to manage the speed dial feature in the Phone app?
You can do so by using the following steps:
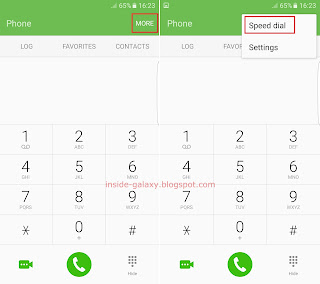
  1. Open the Phone app.
  2. Tap More at the top right and then select Speed dial.
  3. To assign a contact to a speed dial number, do as follows:
    • Tap + Add contact next to the required speed dial number.
    • Select the required contact you want to assign to the selected speed dial number.
    • The selected contact has been assigned to the selected speed dial number.
      FYI, you can add up to 999 phone numbers to the speed dial list. For easier usage, you can place your most favourite or important contacts in the top 10 or in the special number to help you easily remember in which speed dial number the contact you want to call is assigned with and avoid you from calling a wrong contact when using the speed dial.
  4. To remove a contact from the speed dial, do as follows:
    • If needed, tap or at the top of the list to find the required contact you want to remove from the speed dial.
    • Tap next to the required contact you want to remove.
    • The selected contact has been removed from the speed dial.


How to use the speed dial feature in the Phone app?
See the following steps as the example of using this feature:
  1. Open the Phone app.
    If the keypad is hidden, tap at the bottom right corner of the screen to show the keypad.
  2. To call a single speed dial number, long tap the required speed dial number. As the example, if you have assigned a contact name Albert in the speed dial number "2", long tap 2 on the keypad to have your phone automatically calls Albert.
  3. To call a multiple speed dial numbers, tap the numbers and then long tap the last number of the required speed dial number. As the example, if you have assigned a contact named Robert in the speed dial number "123", tap 1, tap 2 and then long tap 3 on the keypad to have your phone automatically calls Robert.

Samsung Galaxy S7 Edge: How to Enable and Use Easy Call and Message Feature in Android 6.0.1 Marshmallow

Samsung Galaxy S7 Edge has some features that will let you easily make a call or send a message to your contact, one of which is the easy call and message feature. When this feature is enabled, you can easily make a call or send a message to a contact while you're viewing your contacts list in the Phone/Contacts app, in the call logs, in the frequently contacted list, and in the conversation list in the Messages app simply by swiping left or right across the required contact.


How to enable or disable the easy call and message feature?
You can turn on or off this feature by using the following steps:
  1. Open the Phone app.
  2. Tap More at the to right and then select Settings.
  3. Tap the ON/OFF switch next to Swipe to call or send messages to enable or disable this option. When the switch turns , means this feature is enabled.


How to use the easy call feature?
When the easy call and message feature is enabled, you can use it to easily make a call to a contact by using the following steps:
  1. Open the Phone app and then tap the Contacts tab, or open the Contacts app.
  2. Swipe across a contact from left to the right.
  3. Your phone will automatically call the selected contact.


How to use the easy message feature?
When the easy call and message feature is enabled, you can use it to easily send a message to a contact by using the following steps:
  1. Open the Phone app and then tap the Contacts tab, or open the Contacts app.
  2. Swipe across a contact from right to the left.
  3. Write your message and then tap Send button to send the message to the selected contact.

Samsung Galaxy S7 Edge: How to Send a Scheduled Text Message in Messages App in Android 6.0.1 Marshmallow

If you need to send a message in the future without you have to worry that you'll forget to send it at the right time, as the example when you want to send birthday wishes for a friend via message right in the middle of the night, you can use the schedule message feature in the Messages app to have your Samsung Galaxy S7 Edge sends the message automatically to the selected contact at a specific time. But, you have to remember that the scheduled message won't be sent if your phone is off or the network is unstable.


How to send a scheduled text message in the Messages app?
You can do so by using the following steps:
  1. Open the Messages app.
  2. Tap at the bottom right corner of the screen to compose a new text message.
  3. Enter the phone number in the Enter recipients field, or tap to pick up the required contact from your contacts list.
  4. Write your message in the Enter message field.
  5. Tap More at the top right and then select Schedule message.
  6. Set the date and time for the message to send and then tap Done button.
  7. Tap Send button to set the message to be sent at the specified time.
  8. The message will be labelled with as a sign that it's a scheduled message.
  9. If needed, you can do the following actions before the scheduled message is sent:
    • Send the message: you can send the scheduled message right now by tapping  next to the scheduled message and then tap Send now. A pop up window will appear to tell you that it's a scheduled message but you can send it now. Tap Send now button to continue sending the scheduled message right now.
    • Delete the message: you can delete the scheduled message so it won't be sent by tapping  next to the scheduled message and then tap Delete message. A pop up window will appear to inform you that the scheduled message will be deleted. Tap OK button to continue deleting the scheduled message.
    • Edit the message: you can edit the scheduled message, such as edit the message or date and time, by tapping  next to the scheduled message and then tap Edit message. Once done, tap Send button to set the message to be sent at the specified time.

Samsung Galaxy S7 Edge: How to Adjust Font Size in Messages App in Android 6.0.1 Marshmallow

When needed, you can adjust the font size in the Messages app in your Samsung Galaxy S7 Edge to a bigger font for better reading if you have difficulty in reading with the current font size, or to the smaller font if you'd like to have more space to display more messages.


How to adjust  font size in the Messages app?
You can do so by using two different methods: by using the font size option and by using the Volume key.

Method #1: By using the font size option
  1. Open the Messages app.
  2. Tap More at the top right and then select Font size.
  3. Slide the font size adjustment bar to the left for smaller font or to the right for bigger font. You'll be provided with the preview when adjusting the font size so you'll get an idea how it might look like when a font size is selected.
  4. Alternatively, you can use your phone's font size in the Messages app by sliding the ON/OFF switch next to Use device font sizes to the right. The switch turns when it's enabled.
    FYI, if you enable this option, the font size in the Messages app will be changed automatically each time you change your phone's font size.
  5. Tap Done button to save the changes.
  6. The selected font size will be applied in the Messages app.


Method #2: By using the Volume key
While you're composing a new message, viewing conversations list, or viewing messages within a conversation in the Messages app, you can easily adjust the font size by pressing the Volume down key for smaller font or pressing the Volume up key for bigger font.