Samsung Galaxy S7 Edge: How to Set Your Own Audio File as Ringtone in Android 6.0.1 Marshmallow

If you'd like to have a different ringtone in your Samsung Galaxy S7 Edge, instead of using preloaded tones as ringtone, you can set your own audio file, such as .mp3 file, as ringtone. You can set your phone to play the selected part of the song or the whole song when receiving incoming calls.


How to set your own audio file as ringtone?
As the example, we'll set a .mp3 file as ringtone by using two different methods: from the settings menu and from a contact's detail page.

Method #1: From the settings menu
You can set a .mp3 file as the default ringtone for all contacts, except those that have been assigned to the different ringtone(see method #2), by using the following steps:
  1. On any screen, swipe down the top of the screen to open up the notification panel and then tap to go to the settings menu.
  2. Scroll down the screen to find Sounds and vibration and then tap it.
  3. Tap Ringtone.
  4. Tap Ringtone to set default ringtone for incoming calls.
  5. Scroll the screen to the very bottom and then tap Add from device storage.
  6. In the Complete action using window, tap Sound picker to select the required song from the Music player app.
  7. Tap the required song you want to use. By default, your phone will only set the highlighted part of the selected song as ringtone. However, if you'd like your phone plays the whole song, clear the checkbox in the left side of the Highlights only option to disable it. Tap Done button to save the changes.
  8. The selected song has been set as the default ringtone.

Method #2: From a contact's detail page
When needed, you can set a .mp3 file as ringtone for a specific contact, e.g., your important or favourite contacts, so you can easily know when receiving calls from that contact by using the following steps:
  1. Open Contacts app.
  2. Tap the required contact you want to change its ringtone.
  3. Tap Edit.
  4. Tap More to see more available fields for the selected contact.
  5. Scroll the screen to the very bottom and then tap Ringtone.
  6. Scroll the screen to the very bottom and then tap Add from device storage.
  7. In the Complete action using window, tap Sound picker to select the required song from the Music player app.
  8. Tap the required song you want to use. By default, your phone will only set the highlighted part of the selected song as ringtone. However, if you'd like your phone plays the whole song, clear the checkbox in the left side of the Highlights only option to disable it. Tap Done button to save the changes.
  9. Tap Save button to save the changes.
  10. The selected song has been assigned as the ringtone for the selected contact.

Samsung Galaxy S7 Edge: How to Enable or Disable Vibrate While Ringing Feature in Android 6.0.1 Marshmallow

If you have difficulty in recognising incoming calls when you bring your Samsung Galaxy S7 Edge in your pocket while you're in a noisy environment, you can enable the vibrate while ringing feature so your phone will not only play the selected ringtone when receiving calls, but also vibrate at the same time.


How to enable or disable the vibrate while ringing feature?
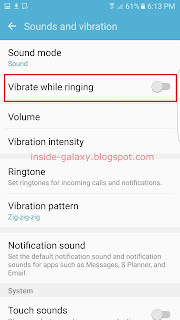
Assuming that the sound profile in your phone is set to Sound, you can turn on or off this feature by using the following steps:
  1. On any screen, swipe down the top of the screen to open up the notification panel and then tap to go to the settings menu.
  2. Scroll down the screen to find Sounds and vibration and then tap it.
  3. Tap the ON/OFF switch next to Vibrate while ringing to enable or disable this option. When the switch turns blue means the vibrate while ringing feature is enabled and your phone will play ringtone and vibrate at the same time when receiving calls.

Samsung Galaxy S7 Edge: How to Fix Cannot Send Premium SMS in Android 6.0.1 Marshmallow

If you cannot send messages to a short number in your Samsung Galaxy S7 Edge because you have accidentally set the permission of sending premium text messages to never allow, you have to change the permission to always allow so you can send messages to a short number again.


How to change the premium SMS permission?
You can do so by using the following steps:
  1. On any screen, swipe down the top of the screen to open up the notification panel and then tap to go to the settings menu.
  2. Scroll down the screen to find Applications and then tap it.
  3. Tap Application manager.
  4. Tap More at the top right and then select Show system apps.
  5. Scroll down the screen to find Message service and then tap it.
  6. Tap Send premium text message and then select Always allow so you can send text messages to a short number.
  7. The permission of sending premium SMS has been set to Always allow. Now, you can send a text message to a short number again.