Showing posts with label S6 Edge with Android 6.0.1 Marshmallow. Show all posts

Samsung Galaxy S6 Edge: How to Enable and Use Smart Capture Feature in Android 6.0.1 Marshmallow

If you have updated your Samsung Galaxy S6 Edge to Android 6.0.1 Marshmallow, you'll have a new feature named smart capture feature. When this feature is enabled, you will be provided with additional options after taking a screenshot, lets you capture the current screen and scrollable area into a single image, crop the screenshot and then save it as a new image, or immediately share it to others.


How to enable the smart capture feature?
You can turn on this feature by using the following steps:
  1. On any screen, swipe down the top of the screen to open up the notification panel and then tap to go to the settings menu.
  2. Scroll down the screen to find Advanced features and then tap it.
  3. By default, you can take a screenshot by pressing the Home key and the Power key at the same time. But, if you'd like to do so by swiping your hand to the left or right across the screen, you have to enable the palm swipe to capture feature by tapping Palm swipe to capture and then slide the ON/OFF switch to the right. The switch turns blue when this feature is enabled.
  4. Press the Back key to return to the previous screen.
  5. Tap Smart capture and then slide the ON/OFF switch to the right to enable the smart capture feature. The switch turns blue when it's enabled.


How to use the smart capture feature?
As the example, we'll try using this feature to capture the whole screen of the settings menu by using the following steps:
  1. On any screen, swipe down the top of the screen to open up the notification panel and then tap to go to the settings menu.
  2. To capture the current screen, press the Power key and the Home key at the same time until you hear the shutter sound. Alternatively, if the palm swipe to capture feature is enabled, swipe the edge of your hand across the screen, from side to side while keeping it in contact with the screen. After the screenshot is taken, the smart capture options will be displayed at the bottom of the screen.
  3. Tap Capture more to automatically scroll down the screen and capture additional screenshot. Repeat this step until the whole screen is captured. Your phone will stitch all screenshots into a single image.
  4. If needed, you can immediately share the screenshot to others by using these steps:
    • Tap Share.
    • Select the required share method you want to use to share the image, e.g., Bluetooth, Wi-Fi direct, etc. Follow the on-screen instructions to complete the process.
  5. If needed, you can crop the screenshot so you can remove unused area of the screenshot by using these steps:
    • Tap Crop.
    • Drag the edge of the frame to adjust the area you want to crop and then tap Save in Gallery to save the changes.

Samsung Galaxy S6 Edge: How to Zip or Unzip Files in Android 6.0.1 Marshmallow

If you have updated your Samsung Galaxy S6 Edge to Android 6.0.1 Marshmallow, you'll have a new feature in the My Files app that will let you compress a single file or multiple files to a zip file. You can use this feature to zip some files when you want to free up some space or transfer the files to other devices with more quickly.


How to create a zip file in the My Files app?
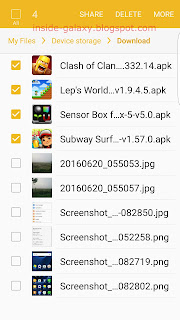
As the example, we'll zip some files in the Download folder in the device storage by using the following steps:
  1. Open My Files app.
  2. Tap Device storage.
  3. Tap Download folder.
  4. Select the required files you want to compress.
  5. Tap More at the top right and then select Compress.
  6. If needed, you can enter a new name for the zip file and then tap Compress button to start compressing the selected files.
  7. The selected files will be compressed.

How to extract or open a zip file in the My Files app?
As the example, we'll unzip or extract the zip file we created before by using the following steps:
  1. Open My Files app.
  2. Tap Device storage.
  3. Tap Download folder.
  4. Long tap the required zip file you want to extract to select it.
  5. Extract the zip file to a new folder:
    • Tap More at the top right and then select Extract.
    • If needed, enter a name for extracted folder and then tap Extract button to start extracting the selected zip file.
    • The selected zip file will be extracted to a new folder.
  6. Extract zip file to the current folder:
    • Tap More at the top right and then select Extract to current folder.
    • The selected zip file will be extracted to the current folder.

Samsung Galaxy S6 Edge: How to Create a Photo Collage in Gallery App in Android 6.0.1 Marshmallow

If you have updated your Samsung Galaxy S6 Edge to Android 6.0.1 Marshmallow, you'll be provided with a new feature in the Gallery app that will let you put some photos together to create a beautiful photo collage so you don't have to install any third-party app when you want to create a photo collage.


How to create a photo collage in the Gallery app?
You can do so by using the following steps:
  1. Open the Gallery app.
  2. Tap an album where photos you want to collage are saved in.
  3. Tap More at the top right and then select Collage.
  4. Select the required photos you want to collage and then tap Collage at the top right.
  5. If you'd like to add more photos to your photo collage, tap Add and then select photos you want to add.
  6. If needed, you can change the aspect ratio of your photo collage by tapping Aspect ratio and then select 1:1(it's selected by default) or 9:16.
  7. If needed, you can change the layout of your photo collage by tapping Layout and then select the required layout you want to use. Alternatively, you can do so by tapping Shuffle.
  8. If needed, you can change the border of your photo collage by tapping Border . Slide the adjustment bar next to to the left or right to adjust the corners curvature of the selected cell(slide the bar to the right to get more rounded corner). Slide the adjustment bar next to to the left or right to adjust the space between cells of your photo collage.
  9. If needed, you can change the background of your photo collage by tapping Background and then select the required background you want to use.
  10. To rearrange photos within your photo collage without changing the layout, tap and hold a photo in a cell and then drag it to other cell.
  11. If needed, you can do some changes for each photo within your photo collage by tapping the required cell and then use available options:
    • : tap this option to change the photo in the selected cell with other photo.
    • : tap this option to delete the selected cell.
    • : tap this option to apply an effect to the photo in the selected cell.
    • : tap this option to make some adjustments to the photo in the selected cell, e.g., rotate the photo, flip the photo horizontally or vertically, and change the photo ratio.
  12. If you're satisfied with the result, tap Save button to save your photo collage. The result will be saved in the Photo editor album.