Samsung Galaxy S4: How to Enable and Use Smart Stay in Android 4.4 Kitkat

Samsung Galaxy SIV comes with some advanced features that will surely be able to improve your experience while using this phone, one of which is the smart stay feature. Turning on this feature will allow your phone to detect your face by using the front camera so that the screen will remain on as long as you're looking at it.


How to enable or disable the smart stay feature?
By default, this feature is disabled therefor if you want to use it then you have to enable it first. You can enable or disable this feature either from the quick settings panel or the Settings menu.


Method #1: From the quick settings panel
  1. Swipe down the top of the screen with two fingers to open up the quick settings panel.
  2. Depending on your current settings, tap the Smart stay button to enable or disable this option. When the button turns green means the option is enabled.


Method #1: From the Settings menu
  1. Go to Settings.
  2. Tap My device tab.
  3. Scroll down to find Smart screen and then tap it.
  4. Depending on your current settings, tap Smart stay to enable or disable this option. When the checkbox besides this option is checked means the option is enabled.

How to use the smart stay feature?
Once the smart stay feature is activated, when it comes the time to turn off the screen then you'll see the smart stay icon is displayed on the status bar to detect your face by utilizing the front camera. If the camera detects your face then the screen will stay on, if not then the screen will be turned off.
FYI, I've tested this feature on my phone and it only worked if all of the following conditions are fulfilled:
  • The phone is held steady and upright.
  • You have to use this feature in well lit conditions but the screen is not in direct light so that the front camera won't have difficulty to detect your face. If there's a source of bright light(e.g: sunlight), you have to place it behind the phone.
  • The front camera is not being used by other apps.

Tips:
Since this feature is related with the screen timeout value you're currently using, to avoid your battery drained fast whilst this feature is on then you'd better to set the screen timeout value to the longest interval. Prolong the screen timeout interval while using the smart stay feature means prolong the interval of the front camera to detect your face which also means more battery are saved for you.

Samsung Galaxy S4: How to Fix Can't Find Hidden Pictures in Gallery app in Android 4.4 Kitkat

Today an insider told me that she couldn't find some pictures that have been hidden by her using the hide items options in the Gallery app. Normally, when you hide a picture in the Gallery app by using the hide items option, then you can find/unhide them easily by using the show hidden items option in the Gallery app. Sadly to say that in some cases, some of hidden pictures are suddenly missing and can't be found both in the show hidden items option in Gallery app or in the default folder where you save the picture files in the My Files app.

See also: How to Hide or Show Hidden Pictures in the Gallery app in the Samsung Galaxy S4 with Android 4.4 Kitkat

I've read somewhere out there and found that in the Android 4.4 Kitkat, all hidden files using that method will be moved to the another hidden folder in the internal storage. That's why you can't find them in their default folder. You have to move them to another unhide folder manually to display them back in the Gallery app.


How to find hidden pictures in Android 4.4 Kitkat?
I realize, a picture can be so meaningful for someone therefor I summarize this method here to help those of you who may be experiencing this problem and want to get those hidden-then-lost pictures back. I've tested this method and it worked. So, here they are:
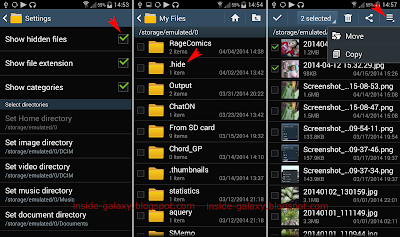
  1. Open My Files app.
  2. Tap the Menu key and then select Settings.
  3. Check the box besides the Show hidden files option to enable this option.
  4. Tap the Back key.
  5. Tap All files.
  6. Tap Device storage.
  7. Scroll down to find the folder named .hide and then tap it to open it.
  8. Tap Island (I don't know why Samsung used it as the folder name. I think it may be different in other phones so please let me know if your phone has another folder name).
  9. Now you should see all pictures you have hidden by using the hide items option in the Gallery app are displayed here.
  10. Copy/move and then paste the desired hidden pictures to another folder. Use the following steps if you don't know how to do so:
    • Select the desired pictures you want to copy/move.
    • Tap the three horizontal line icon located at the top right corner of the screen and then tap Copy to copy the selected files or tap Move to cut the selected files.
    • Navigate to the required folder you want to paste the files.
    • Tap Paste here.
  11. Once the selected files are copied or moved to another folder, they should be displayed again in the Gallery app.

As a note, this method also can be applied to retrieve hidden video files that you have hidden using the same way from the Gallery app. You can also perform this method by using another third-party File Manager app (e.g: ES File explorer, Astro File Manager, etc).

Samsung Galaxy S4: How to Fix Can't Remove Facebook Photo Albums in the Gallery App in Android 4.4 Kitkat

By default, you'll be presented with some sync options while you're installing the Facebook app in your phone, one of which is the sync Gallery option that will allow you to sync your Facebook photo albums with your phone so that you can view them directly from the Gallery app. If you chose to skip/disable this option at that time, then you can enable/activate the sync option by adding your Facebook account to the Gallery app.

See also: How to Sync Facebook Photo Albums with Gallery App in the Samsung Galaxy S4 with Android 4.4 Kitkat

As with other sync processes, the sync process between your Facebook photo albums and Gallery app can cause your phone becomes slower than before, and it'll be worse if you have a ton of photos on your Facebook account. In some cases, the sync process may cause the Gallery app crashes or slows or doesn't work properly. If the problem start irritating you, then you can fix them by stopping sync process or removing the Facebook account from the Gallery app.


How to remove Facebook photo albums in Gallery app temporarily?
FYI, these steps only stop syncing process and hide the Facebook photo albums in the Gallery app without removing the Facebook account from the Gallery app. These steps work best if the synced photos are only in a small amount. Here are the steps:
  1. Open the Gallery app.
  2. Tap the Menu key and then select Settings.
  3. Under the Accounts section, tap your Facebook account.
  4. Clear the checkbox next to Sync Gallery to stop syncing process.
  5. You can also hide the Facebook photo albums temporarily by using the following steps:
    • While you're in the Gallery app, tap the Menu key and then select Content to display.
    • Clear the checkbox next to Content in Facebook.
    • Tap OK button.
    • Now, the Facebook photo albums shouldn't be displayed in the Gallery app.


How to remove Facebook photo albums in Gallery app permanently?
These steps will remove your Facebook account from the Gallery app, but it won't remove your Facebook account in the Facebook app. These steps work best if you have a lot of photos in your Facebook account. Here are the steps:
  1. Open the Gallery app.
  2. Tap the Menu key and then select Settings.
  3. Under the Accounts section, tap your Facebook account.
  4. Tap Remove account button located at the top right corner of the screen.
  5. Tap Remove account button to confirm removing the account.
  6. Now, the Facebook photo albums will be removed from the Gallery app permanently unless you sync them again with the Gallery app.

Each method mentioned above has their own advantages. Removing the Facebook photo albums temporarily will keep the synced photos and will allow you to sync with them again with ease as well as speed up the Gallery load times as long as the synced photos are only in a small amount, while removing the Facebook photo albums permanently will be able to speed up the Gallery load times and avoid crashes especially if you have a lot of photos in your account.

Samsung Galaxy S4: How to Sync Facebook Photo Albums with Gallery App in Android 4.4 Kitkat

As we all know that Facebook has been being one of the most popular social media since a couple years back. Having a Facebook account allows you to stay connected with others' users, create status, share picture, etc. Even though this app is quite popular but the Samsung Galaxy SIV didn't include it as one of the pre-installed apps therefore you have to install this app by yourself through the Google Play Store if you want to use this app in your phone.

See also: How to Download and Install Free Apps From the Google Play Store in the Samsung Galaxy S4

So, if you already have a Facebook account and often upload your photos to your account from various devices, then you can sync your Facebook photo albums with your phone so that you can view them directly from the Gallery app and use all available options in this app, for instance set a Facebook photo as the wallpaper, contact photo, etc or share the photo to your contacts easily from the Gallery app.


How to sync Facebook photo albums with Gallery app?
FYI, these steps only allow you to view the Facebook photo albums and use the available options in the Gallery app, but it won't allow you to edit or delete the photos. Well, assuming that you already have the Facebook app in your phone, then here are the steps to sync:
  1. Open the Gallery app.
  2. Tap the Menu key and then select Settings.
  3. Tap located at the top right corner of the screen and then select Sync apps with Facebook.
  4. Enter your Facebook username and password and then tap Log in button.
  5. You'll be asked whether you want your phone to post to Facebook for you. Tap OK button if you want or tap Not now button if you don't. I personally prefer to choose Not now button.
  6. Mark the checkbox besides the Sync Gallery option to allow your phone synchronizes your Facebook photo albums with Gallery app.
  7. Tap Done button. Your Facebook account will be added in the Accounts section in the Gallery app settings and the phone will start syncing. The sync process may take a few minutes or so, depending on how many photos on your Facebook account.
  8. To avoid large data for syncing process, you can set your phone only sync your Facebook photo albums when you're connected with the Wi-Fi network by turning on the Sync only via Wi-Fi option.
  9. Once the sync process is completed, you'll see all your Facebook photo albums are displayed and labelled with the Facebook icon in the Gallery app.

Please note that your phone may become slower than before because it must load the Facebook photo albums, especially if you have a lot of photos on your Facebook account.

Samsung Galaxy S4: How to Use Buddy Photo Share in the Gallery App in Android 4.4 Kitkat

If you like taking picture with your friends and then want to share the picture with them, then you can do that thing easily in this phone by utilizing the buddy photo share feature that you can find in the Gallery app. In order to be able to use this feature, first you have to enable the face tag feature in the Gallery app and then tag your contacts to the recognized faces on the pictures. Once done, you can easily share the picture to the tagged contacts through the email message or multimedia message.


How to share a picture using buddy photo share?
Below are the steps to do so:
  1. Open the Gallery app.
  2. Tap an album and then tap the required picture to view it.
  3. If you have not tagged your contacts on the picture yet, then you have to tag them first. If you don't know how to do so, you can see the complete steps here.
  4. If you have already tagged your contacts on the picture then you can share the picture easily to the tagged contacts by tapping the Menu key and then select Buddy photo share.
  5. On the "Send picture to" menu, check the box next to the tagged contacts you want to share the picture with. FYI, by default this feature uses the email message as the share method, but if the tagged contacts has no email message then this feature will use the multimedia text as the share method. If the contact has email address and phone number, then you can change the share method by tapping the contact name and then select which email or phone number(if the contact has more than one email addresses or phone numbers) you want to use to share the picture.
  6. Tap OK button.
  7. The picture will be sent to the selected contacts by using the selected share method.

Basically, you can share any picture you have in your phone by utilizing the share menu, but by using the buddy photo share feature you will be easier and faster to share the picture to the contacts you have tagged on the photos.

Samsung Galaxy S4: How to Enable and Use Face Tag in the Gallery App in Android 4.4 Kitkat

Gallery app has been equipped with several useful features, one of which is the face tag feature. Turning on this feature will help you to recognize faces on the pictures and then allow you to tag your contacts with ease. After you've added a contact to the recognized face then you'll be easier to make a call, send a text or email message or share the picture to the contact. By default, this option is disabled, so in order to make you able to use this feature you have to enable it first from the Gallery app settings.


How to enable or disable face tag in the Gallery app?
Below are the steps to do so:
  1. Open the Gallery app.
  2. Tap the Menu key and then select Settings.
  3. Depending on your current settings, tap Face tag to enable or disable this option. When the box next to this option is ticked means the option is enabled. When this option is enabled, you'll see the yellow box appears around the recognized faces in the picture.


How to use face tag?
Once the face tag feature is activated, you can tag your contacts to the recognized faces by using the following steps:
  1. Open the Gallery app.
  2. Tap an album and then tap the required picture to view it.
  3. The yellow box will appear around the recognized face on the picture.
  4. Tap the yellow box and you'll see two options available:
    • Me: select this option if the recognized face is you.
    • Add name: select this option if the recognized face isn't you. You'll be prompted to select or add a new contact.
  5. After the contact is added to the recognized face, when you tap the picture the yellow box will be replaced with the grey box contains with the contact name you've tagged. When you tap the tag, you'll be presented with some available options, such as:
    • : Tap this option to make a call to the tagged contact.
    • : Tap this option to send a text message to the tagged contact.
    • : Tap this option to send an email message to the tagged contact.
    • : Tap this option to edit or remove tag.


How to tag a contact in a picture manually?
If the device doesn't recognize the face on a picture because the face angle or other conditions, then you can tag your contact to that face manually by using the following steps:
  1. Open the Gallery app.
  2. Tap an album and then tap the required picture to view it.
  3. Long tap on the unrecognized face.
  4. Move the blue block to the face. If necessary you can adjust the blue box size.
  5. Tap Save button.
  6. Select or add a contact.
  7. After the contact is added to the recognized face, when you tap the picture the yellow box will be replaced with the grey box contains with the contact name you've tagged. When you tap the tag, you'll be presented with some available options, such as:
    • : Tap this option to make a call to the tagged contact.
    • : Tap this option to send a text message to the tagged contact.
    • : Tap this option to send an email message to the tagged contact.
    • : Tap this option to edit or remove tag.

If you have activated the face tag feature, your phone will learn to recognize contacts in the pictures automatically therefore if you ever tagged a contact in the past then your phone will suggest you the contact name when you tag the same contact in other pictures.

Samsung Galaxy S4: How to Enable and Use Turn Over to Mute/Pause in Android 4.4 Kitkat

To speed up the way you control and interact with your Samsung Galaxy SIV, this phone has provided you some motion features, one of which is turn over to mute/pause which will let you easily mute playing sounds when you receive incoming calls, message alerts or when the alarms go off by turning over the device. This feature also let you easily pause the music/video playback with the same way. In order to make you be able to use this feature, you have to enable it through the motion menu.


How to enable or disable turn over to mute/pause?
Below are the steps to do so:
  1. Go to Settings.
  2. Tap My device tab.
  3. Scroll down to find Motions and gestures, and then tap it.
  4. Slide the ON/OFF switch next to Motion to the right to enable it.
  5. Tap Motion.
  6. Depending on your current settings, tap the ON/OFF switch next to Mute/Pause to enable or disable this option. When the switch is on the right side or shows green means this option is enabled.

How to use turn over to mute/pause?
Once the turn over to mute/pause feature is activated, you can use it to mute incoming calls, message alerts and alarms as well as to pause media(music and video) playback by turning over the device so that the screen will face downward.


Please note that this feature will not work to pause media playback if the screen is off or if the headsets is plugged in into your phone, and this feature may not work in the third-party app.

Samsung Galaxy S4: How to Enable and Use Pan to Browse Images in Android 4.4 Kitkat

Samsung Galaxy SIV is equipped with some motions that will help you controlling and interacting with your phone easily, one of which is pan to browse images. Enabling this motion will allow you to browse and move around the image which is zoomed in in the Gallery app, allows you to take a look at other parts of the image simply by using a single tap.


How to enable or disable pan to browse images?
Below are the steps to do so:
  1. Go to Settings.
  2. Tap My device tab.
  3. Scroll down to find Motions and gestures, and then tap it.
  4. Slide the ON/OFF switch next to Motion to the right to enable it.
  5. Tap Motion.
  6. Slide the ON/OFF switch next to Browse an image to the right to enable it. When you tap this option when it's enabled, you'll be presented with the following options:
    • Try it: select this option to try using pan to browse images in the short tutorial given by this phone.
    • Advanced settings: select this option to adjust the pan sensitivity.

How to use pan to browse images?
Once the pan to browse images feature is activated, now you can use this feature to scroll through the image which is zoomed in in the Gallery app by moving the device in any direction. Here are the steps to use it:
  1. Open the Gallery app.
  2. Tap an album and then tap the required image to view it.
  3. Zoom in the image by spreading two fingers apart on the screen or by tapping and holding the screen at two points and then tilt the device forwards.
  4. When the image is zoomed in, tap and hold a point on the screen and then move the device left or right to pan vertically or move the device up and down to pan horizontally.
  5. Release to stop panning.

Please note that this feature is not applicable when you use it on the image which is not zoomed in. Anyway, aside from using pan to browse image, basically you can also move around the image that is zoomed in by flicking the screen, but for me using pan to browse image is easier and simpler than flicking the screen. So, how about you? Which feature do you like best when you want to move around the image, panning to browse image or flicking the screen?

Samsung Galaxy S4: How to Enable and Use Tilt to Zoom in Android 4.4 Kitkat

In some cases, you may want to zoom in or out while viewing images in the Gallery app to get larger and more detail image or while browsing webpages in the Internet app to get larger or closer view. To meet that need, the Samsung Galaxy SIV has provided you some methods to zoom in or out, one of which is by tilting the device back and forth. To make you able using this method, you have to enable this feature through the motion menu.


How to enable or disable tilt to zoom?
Below are the steps to do so:
  1. Go to Settings.
  2. Tap My device tab.
  3. Scroll down to find Motions and gestures, and then tap it.
  4. Slide the ON/OFF switch next to Motion to the right to enable this option and then allow you to access all of the motion options available under this menu.
  5. Tap Motion.
  6. Slide the ON/OFF switch next to Zoom to the right to enable this option. If you tap Zoom when it's enabled, then you'll be given with the following options:
    • Try it: tap this option to try using tilt to zoom in the short tutorial given by this phone.
    • Advanced settings: tap this option to adjust the tilt sensitivity.

How to use tilt to zoom?
Once tilt to zoom is activated, you can use this feature to zoom in or out in the Gallery app and in the Internet app.

I. Using tilt to zoom in the Gallery app:
  1. Open the Gallery app.
  2. Tap an album and then tap the required image to view it.
  3. Tap and hold the screen at two points with your fingers and then tilt the device backwards to zoom out or tilt the device forwards to zoom in.
II. Using tilt to zoom in the Internet app:
  1. Open the Internet app.
  2. Type the URL or webpage address in the address bar and then tap Go.
  3. Once the webpage is fully loaded, tap and hold the screen at two points with your fingers and then tilt the device backwards to zoom out or tilt the device forwards to zoom in.

By knowing this method, now you have one more alternative method to zoom in or out other than the default pinch-to-zoom feature that you can use while viewing images in the Gallery app or browsing webpages in the Internet app.

Samsung Galaxy S4: How to Enable and Use Smart Alert in Android 4.4 Kitkat

Samsung Galaxy SIV provides several ways to allow you easily know if you have any missed call or message, one of which is by using the quick glance feature. Enabling this feature will let you seeing notifications, missed calls, new messages, date and time, and more, simply by hovering your hand above the sensor when the screen is off and the phone is lying on a flat surface with the display facing upward.

See also: How to Enable and Use Air Gesture in the Samsung Galaxy S4

Aside from using the quick glance feature, you can also set your phone to vibrate when you pick up your phone to notify you if you have any missed call or message. You can do so by enabling the smart alert feature that you can find under the motion menu.


How to enable or disable the smart alert feature?
Below are the steps to do so:
  1. Go to Settings.
  2. Tap My device tab.
  3. Scroll down to find Motions and gestures, and then tap it.
  4. Slide the ON/OFF switch next to Motion to the right to enable this option.
  5. Tap Motion.
  6. Slide the ON/OFF switch next to Smart alert to the right to enable this option.

How to use the smart alert feature?
Once the smart alert is activated in your phone, now you're ready to use this feature. Here's the example how to use it:
  1. After you use your phone and then put it down, the screen will turn off after a set of interval.
  2. When you pick up your phone, your phone will vibrate to notify you when you have missed any call or message.

Given to this function, this feature will be able to help you to know if you have any missed call or message and also remind you to check them as soon as you pick up your phone. As a note, this feature will not drain your battery because it doesn't need a lot of power to run.

Samsung Galaxy S4: How to Enable and Use Direct Call in Android 4.4 Kitkat

In the Samsung Galaxy SIV, you'll be allowed to do an activity by using several methods, ranging from the manual to the automatic one. For instance, when you want to make a call, aside from calling the phone number manually, you can also set the device to make a voice call automatically by picking up and holding your phone near your ear while you're viewing call, message or contact details. You can do so by enabling the direct call feature that you can find under the motion menu.


How to enable or disable the direct call feature?
Below are the steps to do so:
  1. Go to Settings.
  2. Tap My device tab.
  3. Scroll down to find Motions and Gestures, and then tap it.
  4. Slide the ON/OFF switch next to Motion to the right to enable this option and then allow you to access all motion options available under this menu.
  5. Tap Motion.
  6. Slide the ON/OFF switch next to Direct call to the right to enable this option.
  7. Now, you're ready to use this feature.

How to use the direct call feature?
Once the direct call feature is activated, now you can use it to call the contact whose log, message, or contact details are currently displayed on the screen with ease by bringing the phone near to your ear.


While opening a message in the Messaging app
  1. When you have a new message notification, swipe down the top of the screen to open up the notification panel and then tap the notification of the new message to open up the message. Or, you can access all of your messages by opening the Messaging app and then tap the required message from particular contact.
  2. Once the message is opened, bring the phone near to your ear.
  3. The phone will automatically call the contact whose message you're opening.


While viewing a call log
  1. When you have a missed call notification, swipe down the top of the screen to open up the notification panel and then tap the notification of the missed call to bring you to the call log screen. Or, you can access all of your call logs by opening the Phone app and then tap Logs tab.
  2. Tap the required call log from particular contact.
  3. Once the call log is opened, bring the phone near to your ear.
  4. The phone will automatically call the contact whose log you're viewing.


While viewing a contact details
  1. Open the Contacts app.
  2. Tap the Contacts tab or the Favourites tab or the Groups tab.
  3. (Tap the group name first if you've selected the Groups tab before) Tap the required contact name.
  4. Once the contact detail is opened, bring the phone near to your ear.
  5. The phone will automatically call the contact whose details you're viewing. If the contact has more than one numbers, then the phone will call the first or the default number.

In my opinion, this feature is great because it allows me to make a call to the contact currently displayed on the screen with ease without touching the screen. And the best part of it is that this feature doesn't need a lot of power to run, so you don't need to worry about your battery life while this feature is being enabled on your phone.

Samsung Galaxy S4: How to Enable and Use Smart Scroll in Android 4.4 Kitkat

Samsung Galaxy SIV is a great Android-based smartphone that comes with a set of powerful hardware and software as well as equipped with various advanced features that will be able to improve your experience while using this phone. One of the advanced features owned by this phone is the smart scroll feature. This feature utilizes the front camera to detect your face so that you can scroll down/up the webpages or email messages without touching the screen, you just need tilting your head or the device.


How to enable or disable the smart scroll feature?
Generally, there are two methods available that you can use to enable or disable the smart scroll feature, either through the quick setting panel or through the settings menu.


Method #1: From the quick setting panel
This method allows you to enable or disable the smart scroll feature quickly, but it doesn't allow you to configure the smart scroll settings. Here are the steps:
  1. Swipe down the top of the screen using two fingers to open up the quick setting panel.
  2. Tap the Smart scroll button to enable or disable this option.
    • shows the smart scroll is disabled.
    • shows the smart scroll by tilting the device is enabled
    • shows the smart scroll by tilting head is enabled.


Method #2: From the Settings menu
This method is little bit longer than the method #1, but it will allow you to configure the smart scroll settings.Here are the steps:
  1. Go to Settings.
  2. Tap My device tab.
  3. Scroll down to find Smart screen, and then tap it.
  4. Slide the ON/OFF switch next to Smart scroll to the right to enable this option.
  5. Tap Smart scroll.
  6. Under the Scroll by section, you'll be presented with the following options:
    • Tilting head: select this option if you want to scroll pages by tilting your head backwards or forwards.
    • Tilting device: select this option if you want to scroll pages by tilting the device backwards or forwards.
  7. Under the General section, you'll be presented with the following options:
    • Speed: use this option to adjust the speed of scrolling while using the smart scroll feature.
    • Visual feedback display: enable this option to display a signal icon when the device recognizes your action.


How to use the smart scroll feature in Internet app?
To make this feature works well, make sure you're holding the device upright and steady in well lit conditions (not in the bright light or in the dark condition) as well as the screen is not in direct light because it'll make the front camera hard to recognize your face. Also, you have to disable multi window while using this feature. I noticed that this feature only will work if the ideal conditions are fulfilled. The smart scroll works in the Internet app and the stock Email app. In this post, to make it easier, the Internet app will be used as the example:
  1. Open the Internet app.
  2. Open a webpage by entering the URL in the address bar and then tap Go.
  3. Wait until the webpage is fully loaded.
  4. The Smart scroll icon will be displayed on the status bar as a sign that this feature is available.
  5. If you use the smart scroll by tilting the device:
    • Look at the screen until you see this icon is displayed in the middle of the screen as a sign that the device has recognized your face.
    • Tilting the device backwards to scroll down the webpage or tilting the device forwards to scroll up the webpage.
  6. If you use the smart scroll by tilting head:
    • Look at the screen until you see this icon in the middle of the screen. The icon will change to as a sign that the device has recognized your face.
    • Tilting your head backwards to scroll up the webpage or tilting your head forwards to scroll down the webpage.

For me, this feature is great. It allows me to scroll through webpages and email messages without touching the screen. But, sadly to know that this feature consumes lot of power to run. I noticed that my battery drained fast when this feature was being activated on my phone. So, how about you? Do you often use this feature?

Samsung Galaxy S4: How to Watch Videos in the Youtube App in Android 4.4 Kitkat

Youtube app is one of Google apps that is available in the Samsung Galaxy SIV. You can use this app to access youtube.com site. As we have known that Youtube is the most popular video sharing websites available today. You can use this app to upload, share and watch a wide variety of videos (e.g: music videos, user-generated videos, TV clips, etc.). In order to make you able to use all of the features owned by this app, make sure you have activated your Google account in your phone, either by creating the new Google account or adding the existing Google account.


How to watch a video in the Youtube app?
Below are the steps to do so:
  1. Open the Youtube app.
  2. Tap a preview thumbnail or the title link of a video to view the video.
  3. If you want to watch other video, you can use the search function in this app by tapping the Search icon located at the top right corner of the screen and then enter your search terms.
  4. In the search result list, tap the desired video you want to watch.
  5. While you're watching the video, you'll be given with the following options:
    • : Tap this option to view the video in a small window. While the video is displayed in the small window, tap or flick the small window to the top to return to the previous size(in portrait view) or to view it in full screen(in landscape view) or you can flick the small window to the left to close it.
    • : Tap this option to add the video to the playlist.
    • : Tap this option to share a link to the video using the available share methods.
    • : Tap this option to view more options.
    • : Tap this option to pause or resume playback.
    • Drag the bar in the bottom side of the video to move forwards or backwards.
    • : Tap this option to view the video in full screen. It will also rotate the video in the landscape orientation automatically.
    • : Tap this option to view the video in a small window. This option will be available if you watch the video in the landscape view.

For the record, Youtube is a data-intensive feature that may charges you with large data. So, if you like using this feature, you'd better upgrading your account to a large or unlimited data plan to avoid additional data charge.

Samsung Galaxy S4: How to Personalise Call Sound Settings in Android 4.4 Kitkat

For certain reason, you may want to adjust call audio for incoming call so that you can get a better call audio according to your need and situation. You can do so by personalizing the call audio to make it softer, clearer or even optimized for your right or left ear.


How to personalize call sound settings?
Generally, there are three methods available that you can use to do so, from the settings menu, from the call settings or while you're on an active call.


Method #1: From the Settings menu
  1. Go to Settings.
  2. Tap My device tab.
  3. Tap Call.
  4. Scroll down to find Personalise call sound, and then tap it. 
  5. You'll be given with these following options:
    • Adapt Sound: select this option to use your current adapt sound settings for your right or left ear during calls. To see your current adapt sound settings, tap Check Adapt Sound again button and if necessary you can re-setup your adapt sound by tapping the Retry button and then follow the on-screen instructions to complete the adapt sound personalization. The headphones should be inserted while you're personalizing the adapt sound.
    • Soft Sound: select this option if you want to use softer sound than the default during calls.
    • Clear Sound: select this option if you want to use clearer sound than the default during calls.
    • Off: select this option to use the default call sound settings.
  6. The selected option will be applied.


Method #2: From the Call settings.
  1. Open the Phone app.
  2. Tap the Menu key and then select Call settings.
  3. Scroll down to find Personalise call sound, and then tap it. 
  4. You'll be given with these following options:
    • Adapt Sound: select this option to use your current adapt sound settings for your right or left ear during calls. To see your current adapt sound settings, tap Check Adapt Sound again button and if necessary you can re-setup your adapt sound by tapping the Retry button and then follow the on-screen instructions to complete the adapt sound personalization. The headphones should be inserted while you're personalizing the adapt sound.
    • Soft Sound: select this option if you want to use softer sound than the default during calls.
    • Clear Sound: select this option if you want to use clearer sound than the default during calls.
    • Off: select this option to use the default call sound settings.
  5. The selected option will be applied.


Method #2: While you're on an active call
This method allows you to change the call audio with ease while you're on an active call. Also, please note that you have to disable the extra volume feature and disconnected any earphones before using the personalize call sound option. Well, here are the steps:
  1. During call, tap . The icon shows grey when the personalize call sound is disabled and it'll turn green
    when enabled.
  2. You'll be presented with the following option:
    • Adapt Sound: select this option to use your current adapt sound settings for your right or left ear during calls. To see your current adapt sound settings, tap Check Adapt Sound again button and if necessary you can re-setup your adapt sound by tapping the Retry button and then follow the on-screen instructions to complete the adapt sound personalization. The headphones should be inserted while you're personalizing the adapt sound.
    • Soft Sound: select this option if you want to use softer sound than the default during calls.
    • Clear Sound: select this option if you want to use clearer sound than the default during calls.
    • Off: select this option to use the default call sound settings.
  3. The selected option will be applied.

By knowing how to adjust call sound settings, now you can set it according to your need. I personally like using adapt sound so that the call audio will be optimized based on my hearing ability and preferences. So, how about you? Which option do you often use?