Samsung Galaxy S4: How to Create a Photo Collage in Android 4.4 Kitkat

Gallery app is one of the stock apps that is owned by the Samsung Galaxy SIV. This app will allow you to view, edit and manage all pictures and videos that are saved in your phone, either those in the internal storage or in the SD card. With this app, even you're allowed to display photo albums from another sources(e.g: Facebook photo albums, Picasa albums, etc).

See also: How to Fix Can't Remove Picasa Albums from Gallery App in Android 4.4 Kitkat in the Samsung Galaxy S4

As same as other apps, Gallery app also has been equipped with some useful features, one of which is the create collage feature. This feature will allow you to select between two or four pictures then combine them into a single snapshot of the event.


How to create a photo collage?
Below are the steps to do so:
  1. Open Gallery app.
  2. Tap the required album.
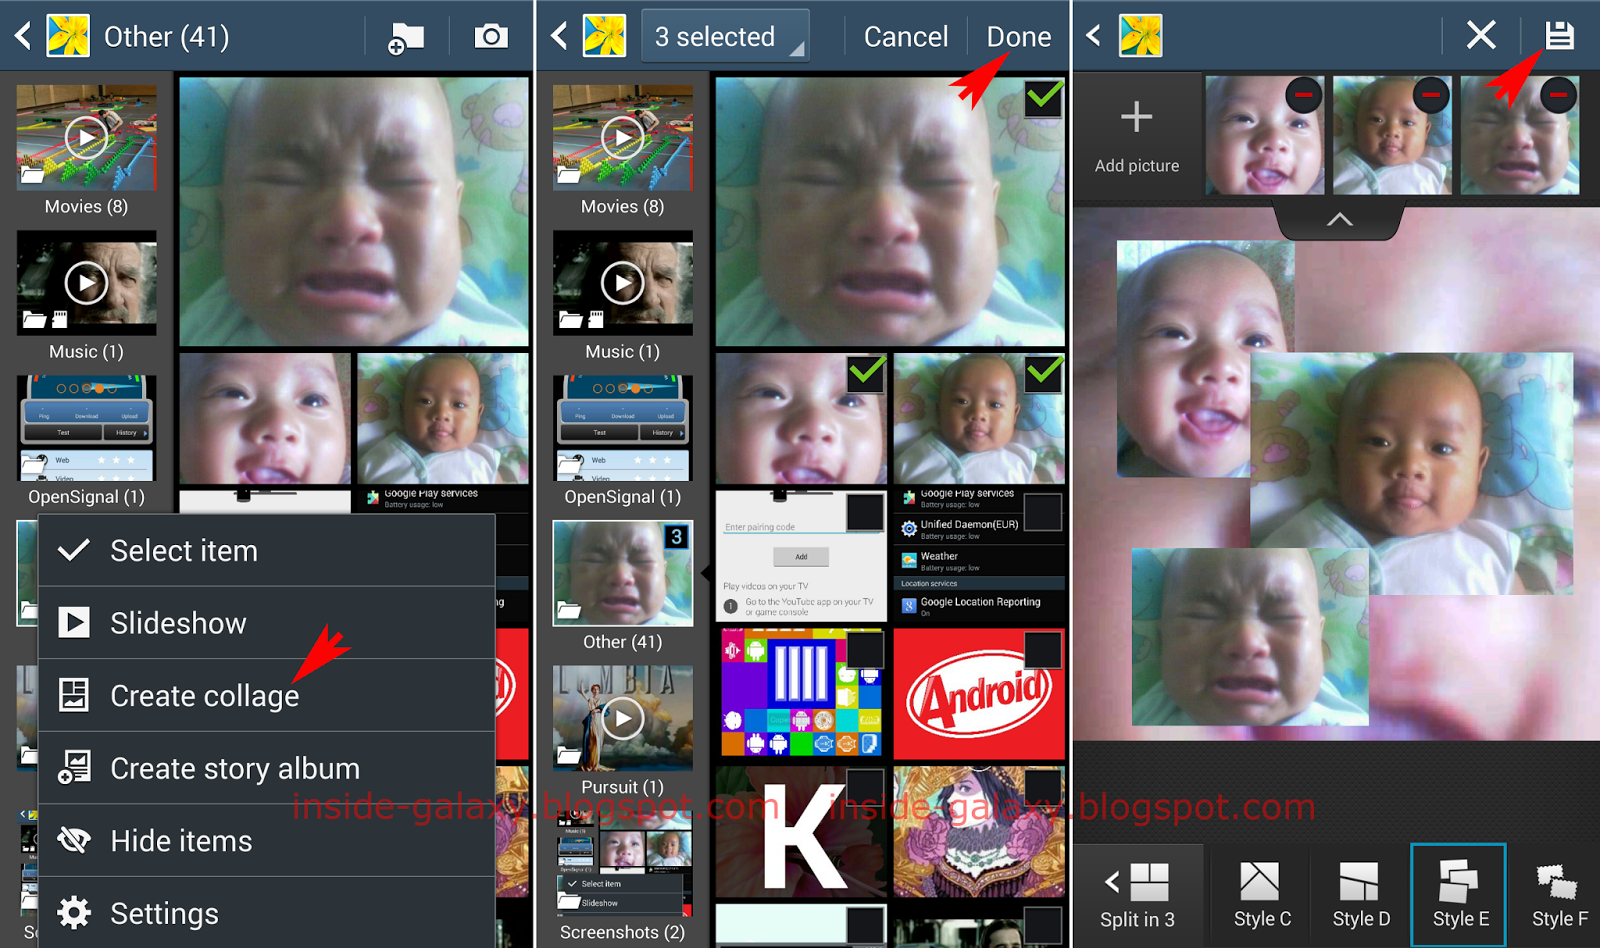
  3. Tap the Menu key then select Create collage.
  4. Select between 2 and 4 photos you want to use for your photo collage. The selected photos will be marked with the green check mark at the top right corners.
  5. Tap Done button.
  6. Select the desired collage layout(Split in 2, Split in 3, Split in 4) and then select the desired split style you want to use to split the photos.
  7. Tap and drag to adjust the border of each photo within the collage.
  8. Tap and swipe a photo to fit its position within the box.
  9. Pinch or expand a photo within the box using two fingers to resize it.
  10. Tap the Down arrow button above the collage to display additional options. From here you can do the following actions:
    • Tap Remove icon to remove a photo from the collage.
    • Tap Add icon (+) to add photos to the collage.
    • Tap and hold a photo then drag it to an empty box to add it to your collage.
    • Tap and hold a photo then drag it to a box then it'll replace the currently displayed photo within the box.
  11. Once done, tap Save button to save your collage.

By knowing how use create collage feature in the Gallery app, now you can create your own collage and then save it for your collections or use it as your unique wallpaper or share it with your friends.

Samsung Galaxy S4: How to Fix Can't Remove Picasa Album from Gallery App in Android 4.4 Kitkat

If you notice, there some sync options available under your Google account and all of them are enabled by default. One of sync options available is an option to sync with your Picasa web albums. When this option is enabled, then your Picasa albums will be displayed in the Gallery app and they will be labelled with Picasa icon .

See also: How to Activate Google Account in the Samsung Galaxy S4

A couple days ago, an insider sent me an email and told me that he want to remove Picasa albums from Gallery app because it slowed down his phone whenever he opened Gallery app, unfortunately he can't remove the albums because when he was selecting an album he wasn't given an option to delete it. FYI, given Picasa albums come from another source, then to remove it you need to disable sync process between your phone and Picasa web albums and then clear the Gallery app data.


How to completely remove Picasa album from Gallery app?
Generally, there are two methods available that you can use to remove Picasa album, through the Settings menu or through the Gallery app.


Method #1: Via Settings menu
  1. Go to Settings.
  2. Tap Accounts tab.
  3. Tap Google.
  4. Under Accounts section, tap your Google account.
  5. Scroll to the very bottom and then clear the checkbox next to Sync Picasa Web Albums.
  6. Tap the Back button twice to go back to the Settings menu and then tap More tab.
  7. Tap Application manager.
  8. Swipe the screen to the right until you see All tab.
  9. Scroll down to find Gallery, then tap it.
  10. Tap Clear cache button and then tap Clear data button (it won't erase any photo you save in your phone, it just repopulates them and revert back the Gallery app to the default settings).
  11. Now, the Picasa web albums should be removed from your Gallery app.


Method #2: Via Gallery app
  1. Open Gallery app.
  2. Tap the Menu key then select Settings.
  3. Under Accounts section, tap your Google account.
  4. Scroll to the very bottom and then clear the checkbox next to Sync Picasa Web Albums.
  5. Now, go to Settings by swiping down the top of the screen then tap Settings icon.
  6. Tap More tab.
  7. Tap Application manager.
  8. Swipe the screen to the right until you see All tab.
  9. Scroll down to find Gallery, then tap it.
  10. Tap Clear cache button and then tap Clear data button (it won't erase any photo you save in your phone, it just repopulates them and revert back the Gallery app to the default settings).
  11. Now, the Picasa web albums should be removed from your Gallery app.

I personally like to use sync features to backup my pictures but I don't like to display albums from another sources(including with Picasa web albums) because sync process--especially if it contains lot of pictures--sometimes makes the phone slower or even crash when opening Gallery app. So, if this problem also occurs on your phone, you can use these steps to completely remove Picasa albums from your Gallery app.

Samsung Galaxy S4: How to Fix Can't Delete Folder in Apps Menu in Android 4.4 Kitkat

A few days ago, an insider sent me an email and asked why she can't delete a folder that has been created after she had updated her phone to Android 4.4 Kitkat, even when the folder is empty. If you notice, in Android 4.3 Jelly Bean we can delete a folder in apps menu by tapping and holding the folder and then drag it to the Remove icon located at the top of the screen. Actually, this option is not removed, but in Android 4.4 Kitkat you need to do an extra step to be able to remove a folder in the apps menu.


How to delete folder in apps menu in Android 4.4 Kitkat?
Below are the steps to do so:
  1. Go to Apps through Home screen.
  2. Tap the Menu key then select Edit.
  3. Tap and hold the required folder you want to delete and then drag it to the Remove icon located at the top of the screen. Release to delete the folder. FYI, if the folder contains some apps, when you delete the folder then the apps will not be uninstalled but they will be placed again in apps menu.
  4. Tap Save button to save the changes.
  5. The selected folder has been deleted.

I personally love this Android version than the old one because it doesn't give me any problem and it makes my phone work better than before though in this Android version, sometimes we need to do an extra step to do some things as you can see in the steps above. However, if you also have the difficulty to remove a folder in the apps menu post update to Android 4.4 Kitkat, now you can delete them easily by using these steps :)

Samsung Galaxy S4: How to Share Mobile Data Connection Via Bluetooth in Android 4.4 Kitkat

If in the previous post we have learnt about how to enable and use Wi-Fi tethering in the Samsung Galaxy SIV, now we'll learn about how to enable and use Bluetooth tethering in the same device. As same as Wi-Fi tethering, Bluetooth tethering also will allow you to share your mobile data connection, but it's used between Bluetooth capable devices.


How to enable Bluetooth tethering?
These steps are done in the Samsung Galaxy S4 with Android 4.4 Kitkat:
  1. First, you have to enable mobile data in your Samsung Galaxy SIV. You can do so by swipe down the top of the using two fingers and then tap Mobile data button to enable it(it shows green when enabled).
  2. Now, go to Settings.
  3. In Connections tab, tap More network.
  4. Tap Tethering and portable hotspot.
  5. Check the box next to Bluetooth tethering to enable this option. It'll automatically activate Bluetooth on this phone.
  6. To make it easier, you can also set your Bluetooth visibility by following these steps:
    • Go to Settings.
    • In Connections tab, tap Bluetooth.
    • Under My device section, check the box next to your Bluetooth name(By default, the name is Galaxy S4) to make your device visible to all nearby Bluetooth devices.


How to access internet using Bluetooth tethering?
These steps have been tested in the Samsung Galaxy Tab 2.7 with Android 4.3 Jelly Bean:
  1. Go to Settings.
  2. Under Wireless and network section, enable Bluetooth by sliding the ON/OFF switch to the right. The phone will automatically scan for nearby Bluetooth devices. Or, you can tap Scan button to scan for nearby Bluetooth devices manually.
  3. If both devices have already paired, simply tap the Bluetooth name(in this case, Galaxy S4) to connect to the paired device for internet access.
  4. If it's the first time to pair between both devices, you need to connect them by tapping the device name (in this case, Galaxy S4) and then tap OK in the Bluetooth pairing request notifications in both devices.
  5. Tap Settings (cogwheel) icon next to Galaxy S4 to enter its settings.
  6. Tap Internet access.
  7. You'll see the Bluetooth tethering icon is displayed on the status bar as a sign that you're connected to the paired device for internet access.
  8. The mobile data connection from Samsung Galaxy SIV now can be used in this phone.

All of us might be know that Wi-Fi tethering will be able to provide us faster internet connection. So, if you're like me, if available I always prefer to use Wi-Fi tethering than Bluetooth tethering. And you should note that this feature also consumes more battery, so if you concern with the battery life issue, it'll be better if you only use this feature as needed.

Samsung Galaxy S4: How to Share Mobile Data Connection Via Wi-Fi in Android 4.4 Kitkat

Wi-Fi is one of connectivity features available in the Samsung Galaxy SIV. You can use it to gain internet connection by connecting your phone to a Wi-Fi network, either it's an open or secured Wi-Fi network. Once you have an internet connection, you can use it to send emails, browsing webpages, install apps, etc.

See also: How to Connect to a Wi-Fi Network in Android 4.4 Kitkat in the Samsung Galaxy S4

Aside from the ability to connect to a Wi-Fi network, you can also set your phone as internet Access Point by using portable Wi-Fi hotspot feature. This feature will allow you to share your mobile data connection to another Wi-Fi enabled devices(max. 10 devices).


How to set Samsung Galaxy S4 as Wi-Fi hotspot?
To do so, kindly follow the steps listed below:
  1. First, you have to enable the mobile data on your phone. From any screen, swipe down the top of the screen using two fingers and then tap Mobile data button to enable it(it shows green when it's enabled).
  2. Now, go to Settings.
  3. Tap Connections tab.
  4. Tap More networks.
  5. Tap Tethering and portable hotspot.
  6. Slide the ON/OFF switch next to Portable Wi-Fi hotspot to the right to enable this option.
  7. Tap Portable Wi-Fi hotspot to configure menus under this option. To change Wi-Fi hotspot access go to the step #8, to add allowed devices go to the step #9 while to configure Wi-Fi hotspot settings go to the step #10.
  8. Change Wi-Fi hotspot access:
    To change Wi-Fi hotspot access, tap the Wi-Fi network name (by default the name is AndroidAP) and then select from the following options:
    • All devices: select this option if you want all Wi-Fi enabled devices can access the internet via your data network.
    • Allowed device only: select this option if you want only the devices in the Allowed devices list that can access the internet via your data network.
  9. Add and remove devices in the Allowed devices list:
    • Tap Allowed devices button.
    • Tap Add button (+).
    • Enter the device and the MAC address of the device you want to allow to access your Wi-Fi hotspot.
    • Tap OK button.
    • The device will be added to the Allowed devices list.
    • To remove device from the list, tap the Trash can icon then select the device you want to remove from the list and then tap Delete button.
  10. Configure portable Wi-Fi hotspot:
    • Tap Configure button.
    • If necessary, change the Wi-Fi network name by entering the required name in the Network SSID field.
    • If necessary, check the box in the left side of Hide my device option to hide your network profile when another device is scanning Wi-Fi.
    • If necessary, you can change the security. By default, the security is open or without using password but if you want to set password for your hotspot you can change the security to WPA2 PSK and then enter the password.
    • Once done tap Save button to save the changes.


How to connect to a Wi-Fi hotspot?
I've tested these steps by using Samsung Galaxy Tab 2.7 with Android 4.3 Jelly Bean:
  1. Go to Settings.
  2. Under Wireless and network section, enable Wi-Fi by sliding the ON/OFF switch to the right.
  3. The phone will automatically scan for the available Wi-Fi networks. If the Wi-Fi hotspot is open, then it will automatically connect. If you set the password for the Wi-Fi hotspot, tap the Wi-Fi network name (by default, the name is AndroidAP) and then enter the password and then tap Connect button.
  4. The mobile data connection from Samsung Galaxy SIV now can be used in this phone.

For the record, while you set your phone as a Wi-Fi hotspot, it may consumes more battery. So, if you're tight with the battery issue, better you don't use this feature for a long time or simply use this feature as needed.

Samsung Galaxy S3: How to Fix Can't Use the Volume Key to Zoom In or Out in the Camera App in Android 4.3 Jelly Bean

It seems that Android 4.3 Jelly Bean has been bringing some problems to the users since it launched at the first time. A few days ago, some insiders left their comments and asked why the zoom function of the Volume key didn't work in the Camera app after they had updated their Samsung Galaxy SIII to Android 4.3 Jelly Bean.

See also: How to Fix Camera Flashes when Alarm Goes Off in Android 4.3 in the Samsung Galaxy S3

After some further investigations, I've found that there were two things that can caused the zoom function of the Volume key didn't work, the camera mode and the Home screen mode.


How to fix can't zoom in or out using the Volume key in the Camera app?
If you're also experiencing this problem, you can check the following steps to make the zoom function of the Volume key works again:
  1. Check the camera mode
    Some camera modes (e.g: panorama mode) will automatically disable the zoom function. So, to make the zoom function works, you need to change the camera mode to another mode. You'll be informed with the error message "cannot zoom in or out in this mode" if you're using a camera mode where the zoom function is not allowed to use.
  2. Check the home screen mode
    If your phone is using the easy mode as its home screen mode then it will automatically disable the zoom function. So, to make the zoom function works, you need to set the home screen mode to the standard mode. You can do so by using the following steps:
    • Go to Settings.
    • Tap My device tab.
    • Tap Home screen mode and then select Standard.
  3. Use the pinch to zoom feature
    If the step #1 and #2 didn't work, you still be able to zoom in or out by pinching the screen with two fingers.

For the record, I've tested these steps in the Samsung Galaxy SIV with Android 4.4 Kitkat and it worked. So, I can conclude that these steps should be worked in another Samsung Galaxy phones with Android 4.3 Jelly Bean or above.

Samsung Galaxy S4: How to Save Pages for Offline Reading in Any Browser App in Android 4.4 Kitkat

As we have known that the save page is an option that is owned by the stock Browser app in the Samsung Galaxy SIV. This option will allow you to read saved pages offline or without using an internet connection.

See also: How to Offline Reading Using the Stock Browser App in Android 4.4 Kitkat in the Samsung Galaxy S4

However, for those of you who are prefer to use another third-party browser apps (e.g: Chrome, Firefox, Dolphin, Opera, etc), then you can also save a page to read it offline later though some of them have no option to save a page by default. You can do so by using third-party app called Pocket app.


How to save a page in any browser app?
You need an internet connection to do these steps. FYI, I've already tested these steps in the stock Browser(Internet app), Chrome, Firefox, Opera and Dolphin app. But, to make it easier, these steps use Chrome app and Dolphin app.


By using Chrome app:
  1. Download and install Pocket app from the Google Play Store and then follow the on-screen instructions to complete installation.
  2. Open Chrome app.
  3. Open a webpage by entering its address or URL in the address bar and then tap Go.
  4. Once the webpage is fully loaded, tap the Menu key then select Share...
  5. On pop up menu select Add to Pocket.
  6. The webpage will be saved to the Pocket app.


By using Dolphin app:
  1. Download and install Pocket app from the Google Play Store and then follow the on-screen instructions to complete installation.
  2. Open Dolphin app.
  3. Open a webpage by entering its address or URL in the address bar and then tap Go.
  4. Once the webpage is fully loaded, tap the Menu key then select Share page.
  5. Tap Add to Pocket.
  6. The webpage will be saved to the Pocket app.


How to read offline a saved page from any Browser app using Pocket app?
If previously you've saved a webpage from any browser to the Pocket app, then you can read it offline or without using an internet connection from Pocket app by using the following steps:
  1. Open Pocket app.
  2. By default, Pocket app will display all your saved pages.
  3. Tap the required save page you want to read.
  4. The selected saved page will be opened and ready to read.

For certain reason, some of users prefer to use third-party browser app than the stock one. So, by knowing these steps, now you can enjoy using an offline-reading-like feature by using Pocket app to read articles you've saved from any browser app you like.